- Qualcomm Launches Snapdragon 4 Gen 2 Mobile Platform
- AMD Launches Ryzen PRO 7000 Series Mobile & Desktop Platform
- Intel Launches Sleek Single-Slot Arc Pro A60 Workstation Graphics Card
- NVIDIA Announces Latest Ada Lovelace Additions: GeForce RTX 4060 Ti & RTX 4060
- Maxon Redshift With AMD Radeon GPU Rendering Support Now Available
Social & RSS Feeds
Latest Videos


Latest News
GIGABYTE Z87X-UD3H Motherboard Review
by Rob Williams on September 6, 2013 in Motherboards
At its $160 price-point, GIGABYTE’s Z87X-UD3H brings a fair bit to the table. It offers a plethora of SATA and USB ports, for starters, even going as far as to include two internal USB 3.0 headers. Past that, it has a solid layout, and perhaps best of all, features one of the best EFI implementations we’ve ever seen.
Page 2 – A Hardware Tour of GIGABYTE Z87X-UD3H
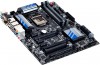
As usual (alright… this is the second time), we’ll start things off on this page by taking a look at an overview shot of the motherboard. Where we can, we prefer to use a stock shot, since I haven’t quite mastered the art of these top-down photos and don’t have a light tent to help remedy that.
That said, looking over the UD3H, I clued in to the fact that GIGABYTE goes about its mainstream lineups in a much different way than ASUS. As we discussed last week, ASUS’ entire mainstream lineup features a black PCB with gold accents; GIGABYTE is going a slightly different route by coloring its lineup seemingly without rhyme or reason.
For example, while the UD3H has blue accents, the UD4H is red (and looks quite sharp, actually), while the top dog, the UD5H, boasts gold accents. This is slightly humorous, as GIGABYTE clearly is going with gold for that board to show its superiority among its mainstream lineup, while at the same time, ASUS splashes gold on its entire lineup. There’s only one solution for Z97 or whatever it’ll be called from GIGABYTE: platinum color schemes!

As mentioned earlier, the UD3H offers the luxury of having two internal USB 3.0 headers, with one settled next to the chassis connectors and the other just below the DIMM slots. The board also includes 6 fan headers; 5 being 4-pin, the other being 3-pin. Just above the CPU socket, 2x 4-pins can be found, with the three others located to the bottom-left of the socket, the bottom-left of the board, and the bottom-right, just under the SATA ports. The lone 3-pin sits beside the 24-pin power connector.
Also of note, an LED BIOS readout can be found just above the aforementioned 3-pin fan header, while reset / power / CMOS clear buttons can be found towards the top-right of the board. In addition to the 2 internal USB 3.0 headers, 3x USB 2.0 headers are located at the bottom.
Alright – let’s buckle-up and go on this hardware tour.
At the top-right of the board we can see 4x DIMM slots in their natural habitat, with 5 buttons / switches to the top-right of that. These include: Power, Reset, BIOS Switch, DualBIOS Disable/Enable and CMOS clear. At the bottom of the DIMM slots, the primary USB 3.0 (Intel-driven) header is seen. As mentioned on the first page of this article, the UD3H is designed to handle up to 32GB of RAM @ DDR3-3000 speeds.
It’s a little hard to see, but the board’s lone 3-pin fan header is located just on the other side of the 24-pin power connector.

Moving south, we find the 8x SATA 6Gbps ports (the black are Intel; gray, Marvell), one of the 4-pin fan headers, chassis connectors, the other USB 3.0 header (Renesas-based, plugged shut in this shot) and the USB 2.0 connectors.

The UD3H has a total of 7 PCI slots to take advantage of, with one being a legacy slot, and the others split down the middle with x1 and x16 options. Due to Z87-limitations, the second and third x16 slot will have reduced overall bandwidth; those taking advantage of multi-GPU on this board will effectively be running an x8+x8 configuration.
Also in this pic (but blurred) is the other bottom 4-pin fan header and various connectors (TPM, COM, audio, et cetera).

In this angle, we can see the shrouded 10 phase power setup (2 of which is dedicated to the DRAM), the two 4-pin CPU fan headers to the top-right, and another 4-pin header just below the left portion of the heatsink. If the top PCIe x1 slot is left empty, you’ll have access to the EFI’s battery without having to remove the GPU (and believe me, removing the GPU to get at this battery when it’s needed is rather frustrating).

The shot below accomplishes little more than looking cool, but it does give us a quick idea of what we’d be dealing with once the board is installed into a chassis. The 8-pin connector is found vertical up at the top – a huge plus as far as I’m concerned. I do wish the connector would be flipped 180° however, as here, the notch is on the top – if you’re routing your PSU cable up behind your chassis and out through the top, it’ll be easier to plug in if the notch is the other way. A minor issue, to be sure, but it can be assumed that if you’re not routing through the back, you gain the luxury of having enough slack to spin your connector upside-down. I’ve been in situations where, when routing through the back, I’ve really had to struggle in turning my cable end around, since I had virtually no slack.

At the back, and from left-to-right, we have the PS/2 keyboard/mouse port, 2x USB 3.0 ports, VGA, DVI, S/PDIF, HDMI, DisplayPort, 2 more USB 3.0 ports, 2x eSATA 6Gbps (which cannot be used at the same time as the onboard Marvell ports (gray)), the Intel NIC, 2 more USB 3.0 ports and finally, a full assortment of audio ports.

In terms of accessories, what’s included here is a bit on the light side, but we’d expect nothing different for a board of this price-range. Found here are 4x SATA cables, the I/O panel, a 2-way SLI bridge, manual and driver DVD-ROM (hidden inside the manual – I’ll do anything to avoid photographing white-on-white!).

For $160, I’m impressed with this board quite a bit. It offers plenty of SATA and USB ports (even going as far as to have two internal 3.0 headers), offers the entire assortment of video connectors, has 6x fan headers, and, for what it’s worth, it looks good (the most minor of pluses, but something I appreciate).
Continuing our tour, we’ll take a left turn and head straight into the EFI.

Support our efforts! With ad revenue at an all-time low for written websites, we're relying more than ever on reader support to help us continue putting so much effort into this type of content. You can support us by becoming a Patron, or by using our Amazon shopping affiliate links listed through our articles. Thanks for your support!

Rob Williams
Rob founded Techgage in 2005 to be an 'Advocate of the consumer', focusing on fair reviews and keeping people apprised of news in the tech world. Catering to both enthusiasts and businesses alike; from desktop gaming to professional workstations, and all the supporting software.


