- Qualcomm Launches Snapdragon 4 Gen 2 Mobile Platform
- AMD Launches Ryzen PRO 7000 Series Mobile & Desktop Platform
- Intel Launches Sleek Single-Slot Arc Pro A60 Workstation Graphics Card
- NVIDIA Announces Latest Ada Lovelace Additions: GeForce RTX 4060 Ti & RTX 4060
- Maxon Redshift With AMD Radeon GPU Rendering Support Now Available
Social & RSS Feeds
Latest Videos


Latest News
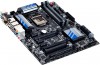
GIGABYTE Z87X-UD3H Motherboard Review
by Rob Williams on September 6, 2013 in Motherboards
At its $160 price-point, GIGABYTE’s Z87X-UD3H brings a fair bit to the table. It offers a plethora of SATA and USB ports, for starters, even going as far as to include two internal USB 3.0 headers. Past that, it has a solid layout, and perhaps best of all, features one of the best EFI implementations we’ve ever seen.
Page 3 – A Look at the EFI
An archive including all of these screenshots and more can be snatched here (.ZIP, 6.5MB).
In the past, I’ve been a little critical of GIGABYTE’s EFI design choices, as I found them to force me to grab hold of the mouse to get around, rather than stick to just using the KB – which I find to be far more efficient.
In some of my past reviews, I’ve said that GIGABYTE should focus on building an EFI around keyboard use, and not to mention enhance some other areas just to make the experience better overall.
Well, for its Z87 lineup, GIGABYTE delivered. Big time:

With its latest EFI, GIGABYTE has pulled off a couple of things that I didn’t even realize were possible. The visuals, for example, are a level beyond what I’ve ever anticipated to see – it looks like a desktop app, plain and simple. Helping it to feel like a desktop app is the fact that it can run at full HD resolution (1080p).
Have you ever run a game or your OS at low resolution on your high resolution display? The mouse will feel odd. That’s because your monitor is effectively producing 2 or 3 pixels for every 1 pixel that the app is rendering. You lose precision as a result. Thus, when your EFI runs at 1080p, the mouse is going to feel a lot more natural – and in this particular case, I can state with assurance that it does.
Fortunately, that doesn’t mean that GIGABYTE decided to stick to the mantra of “mouse is better”. Keyboard interaction has been vastly-improved here as well. GIGABYTE’s been busy since Z77… that much is absolutely clear.
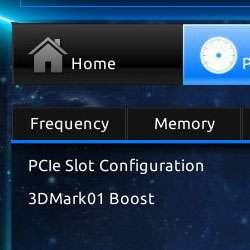
In our look at ASUS’ Z87-EXPERT, we explored a new EFI feature called “My Favorites”, where users can cherry-pick the EFI options that they’d like to gain quicker-access to. Here, we can see GIGABYTE had much of the same idea, except the entire screen can be built at once, via a pop-up menu system, seen here:

Both GIGABYTE’s and ASUS’ solutions are quite nice, but I have to give a slight nod to GIGABYTE’s implementation, as I find it a lot easier to keep track of everything that I’m adding to my screen – on ASUS’ EFIs I have to go back to the My Favorites screen to see which options I’ve added (important for someone like me who forgets things instantly sometimes).
The above is an example of an EFI area where a mouse does come in handy, because it allows you to very quickly navigate the various menus in order to get to the option you’d like to add to your custom screen. It can of course be acccomplished via a keyboard as well, but it’s just less efficient.
Moving on, a look at something else GIGABYTE’s doing that’s a bit interesting: Integrating pictures into the EFI to help explain a feature. Granted, this is the only particular area that I noticed an image being introduced, but it’s a useful one: Before choosing your loadline calibration, you can see how the board will conduct its scaling on the right.

Our last look at a full EFI screen showcases another simple yet attractive option: Setting the date. You get a real calendar, and if you want, can use your mouse to soar through the years and months to get it to where you need it, quickly.

I’d like to call out two other features in this EFI. On the bottom-left, you can see a menu that appears when you right-click your mouse in an open area, giving you quick access to key areas – a nice touch. On the bottom-right, an option that made me laugh out loud (for real): “3DMark01 Boost”. Apparently, this is something overclockers had been demanding. It in effect alters some memory functions whenever 3DMark01 is detected so as to deliver better results. I never thought I’d see such a specific benchmark targeted in a BIOS/EFI before.
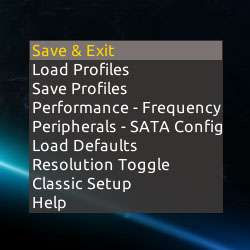
Notice that “Classic Setup” option above? That’s for those who might not like GIGABYTE’s new EFI style, and instead would like to use something more familiar. Clicking it brings us back to the same EFI design we’ve seen for the past couple of years:

It should go without saying at this point, but GIGABYTE’s latest EFI design is impressive. Very impressive. Let’s see if the company’s latest software suite matches up.

Support our efforts! With ad revenue at an all-time low for written websites, we're relying more than ever on reader support to help us continue putting so much effort into this type of content. You can support us by becoming a Patron, or by using our Amazon shopping affiliate links listed through our articles. Thanks for your support!

Rob Williams
Rob founded Techgage in 2005 to be an 'Advocate of the consumer', focusing on fair reviews and keeping people apprised of news in the tech world. Catering to both enthusiasts and businesses alike; from desktop gaming to professional workstations, and all the supporting software.


