- Qualcomm Launches Snapdragon 4 Gen 2 Mobile Platform
- AMD Launches Ryzen PRO 7000 Series Mobile & Desktop Platform
- Intel Launches Sleek Single-Slot Arc Pro A60 Workstation Graphics Card
- NVIDIA Announces Latest Ada Lovelace Additions: GeForce RTX 4060 Ti & RTX 4060
- Maxon Redshift With AMD Radeon GPU Rendering Support Now Available
GIGABYTE Aivia M8600 Wireless Gaming Mouse Review
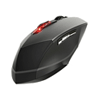
Finding a good gaming mouse isn’t hard, but finding one that’s wireless is. Even high-end options suffer from a major flaw: poor battery life. GIGABYTE realizes this and made sure no one could say that about its Aivia M8600, which in our tests lasted an entire week in ‘gaming’ mode. Let’s see if that, and its other features, warrant the M8600’s $105 price.
Page 3 – Software
The software, where to begin… let’s start with the installation. The M8600, like many other mice these days, uses the standard HID-compliant driver and only requires software for programming the unit and making use of non-standard extended functionality. The mini-CD with the drivers is actually hidden away as the lid for the part of the box containing the bag of accessories. However, if you lose it, the same software is made available online.
Once inserted, you’ll be asked to install either the Flash or non-Flash version of the software. Either as a fault of the installer, or due to certain imperceptible differences, both versions look and act the same, right down to the animated button actions.
The software would be one of the biggest weaknesses of the mouse, and indeed, the same can be said for its cousin, the K8100 keyboard. This is not just a problem with GIGABYTE, but with many other user interface teams for gaming peripherals. For some reason, they like to throw all kinds of garish color schemes, silly names and confusing graphics at you, not to mention poorly documented features.
While the main interface is different compared to the K8100, the overall style is very much the same – throw in as many textures, icons and flashy colors as possible, strewn all over the interface in a haphazard fashion.
After getting past the ocular onslaught that is the main screen, we’re presented something that would not be out of a place from a late 90’s sci-fi orientated film. It’s a real clash of garish colors, shapes and pictograms.
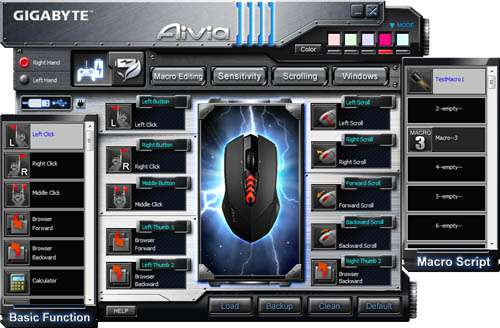
Along the right-hand side is a long list of available default actions you can perform, and you can simply drag-and-drop them onto the relevant button slot, depicted in the middle (if you can find the one you want). This drag-and-drop process is very simple, but at the same time it comes with a catch. Every action you transfer over results in the mouse locking up for 5-6 seconds while the transfer takes place. This happens with every single change and becomes extremely infuriating after a while.
There are some oddities in the list of the default actions such ‘Calculator’, ‘X’ and ‘Y’ axis-locking, and 2x, 4x and 8x speed boosts which increase the sensitivity of the mouse (sadly, there is no reduce sensitivity option, like that found on the R.A.T. 7)
The left-hand side lists all available macros that can be set where available. By default, there are none. To create them, you select the ‘Macro Editing’ button at the top of the main interface.
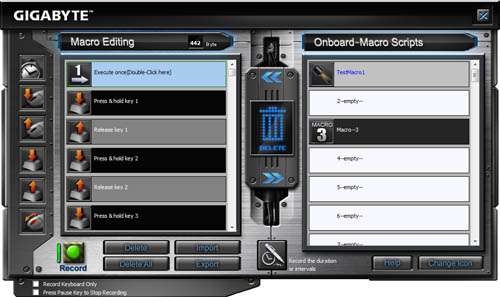
Initially, things are quite simple. You can either drag and drop up/down key and mouse events into the left panel, along with delays if you wish, or you can simply hit record. Every action takes up 2 bytes of memory, with the mouse capable of storing 32KB in total. With some experimenting, the largest single macro I could make was 442 bytes, or 221 actions, which is approximately 110 key presses. Delays can be recorded, too, but this will again limit the total number of key presses.
Macros can be recorded from anywhere, even fullscreen apps, but it will not record mouse placement. Mouse recording can be stopped by pressing the pause key if the check-box in the lower left is selected. You can not mass select events to delete or move specific parts; you can only delete all or move and delete individual actions.
Once the macro is setup, you need to simply drag-and-drop any action over to the right panel and it’ll be uploaded to the macro set, again, with a 6 second pause. You may rename and assign an icon to the new macro. Once saved, you can then transfer the macro over to any of the available buttons, which yet again, causes a 6 second pause.
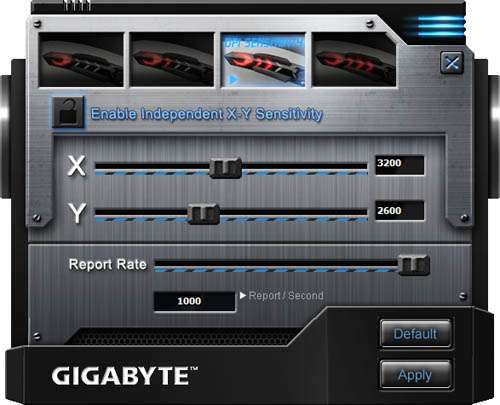
Moving onto the top row buttons in the main interface, you can set sensitivity for each of the 4 levels. These are universal DPI settings and are not specific to a given color profile.
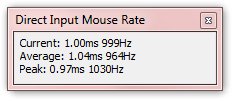
You can enable axis-independent control and also change the USB poll rate to conserve power if need be (250 should be a suitable trade off as over 500 realistically doesn’t provide much benefit to response times). The screenshot above with the DIMR tool shows that the mouse can use the full 1000Hz poll rate.
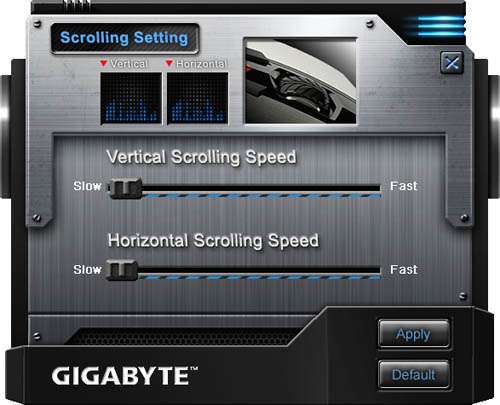
Scrolling allows to set the horizontal and vertical scroll speeds. Window brings up the OS-based mouse settings dialogue.
In the top-right corner, you can change between the different profiles available on the mouse, or use the fixed on-mouse button (right-side top button). You can change the color of these profiles too, as indicated by the central light.
There is a quick button on the top-left corner that allows you to change from right to left-handed, and this works instantly, swapping all macro buttons around, too.
Support our efforts! With ad revenue at an all-time low for written websites, we're relying more than ever on reader support to help us continue putting so much effort into this type of content. You can support us by becoming a Patron, or by using our Amazon shopping affiliate links listed through our articles. Thanks for your support!


