- Qualcomm Launches Snapdragon 4 Gen 2 Mobile Platform
- AMD Launches Ryzen PRO 7000 Series Mobile & Desktop Platform
- Intel Launches Sleek Single-Slot Arc Pro A60 Workstation Graphics Card
- NVIDIA Announces Latest Ada Lovelace Additions: GeForce RTX 4060 Ti & RTX 4060
- Maxon Redshift With AMD Radeon GPU Rendering Support Now Available
Social & RSS Feeds
Latest Videos


Latest News
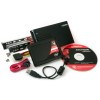
Kingston SSDNow M Series Bundle
by Rob Williams on May 22, 2009 in Storage
Have the urge to jump on the SSD bandwagon, but don’t want to go through the hassle of yet another format and OS re-installation? Don’t fret, because Kingston has got you covered. With their new SSDNow M Series bundle, you’ll have all you need to upgrade from your current drive, while keeping your OS configuration and applications intact.
Page 2 – Pre-requisites
When planning to upgrade to an SSD, there are a few things to need to keep in mind. First, and most important, is that because SSDs today are small compared to mechanical drives, chances are good that you are going to have more “used” space on your primary drive than the SSD can hold, and that’s obviously a problem when it comes to cloning.
The solution is simple… clean up your drive and make sure that no more than 85% of the SSD you’re planning to upgrade to is used on your main drive. Since we are dealing with a 80GB drive here, our main OS drive can have no more than 68GB of used space. It’s important to note that we’re dealing with full disks here, and not partitions, so if you have more than 68GB used across multiple partitions on the same drive, the cloning process will not be allowed to take place.
This is a limitation I’m not too thrilled over, but I’m hoping that it will effect few people. If you have more than one hard drive in your machine, and the other hard drives have a lot of free space, then that’s where you’ll want to back up a lot of the data on your main drive to, if you have to take the route of cleaning it up in order to free up enough space for the clone to take place.
What you should take away from this limitation is that your main drive shouldn’t have any partitions at all. You cannot split your main drive into two in order to use the second for backing up the data, because it just won’t work. This is a limitation of the included software, which is True Image HD by Acronis. I have a good feeling that Acronis’ full-blown Home or Business edition could do things on partition-by-partition basis, but to offer this kit at an affordable price, Kingston obviously had to make some choices.
Cloning Process
To help properly test this upgrade kit, I first formatted the notebook being used, and set it up according to how I’d set it up if I were to actually use it in day-to-day life. This meant installing all of the applications I’d use on a regular basis, including related profiles for those applications (specific user data, such as for e-mail, IM logs and information, et cetera) and of course, also my regular documents folder, which included over 30GB worth of documents and photos.
I deliberately installed more than 80GB worth of stuff in order to get a realistic perspective on things. Chances are good that you’ll also have more than 80GB used on your primary drive, so it seemed fair to take the same route. Plus, at this point I wasn’t sure of the limitations of the included cloning software, but I can say that in order to get anywhere, you have to be using no more than 68GB.
Here’s what was installed before I performed a “clean up”:


About 124GB used, which spanned numerous applications, five games (three Steam, two non-Steam), and other things you’d expect to see on a regular PC, such as IM clients, Microsoft Office, audio stuffs, all in addition to whatever was found in my documents folder.
Prior to cleaning things up, I defragged the full hard drive and was left with a nice result:

With the freshly-defragged drive, I ran a few iterations of HD Tune, and saw an average read speed of 65.3MB/s and a minimum of 38.3MB/s. This was done on a 320GB 7200GB Seagate Momentus drive, so it’s quite fast for something found in a notebook. We’re sure to see some stark differences after we upgrade to our SSD, though.

Because I had far too much used space on this drive, I had no choice but to uninstall what I could in order to get the size down to something a little more modest. To do so, I first backed-up my entire documents folder to an external drive, then uninstalled Lineage II, and all three games I had in steam. That left me with 64GB used, 4GB away from the limit. But, I was good to roll.

Support our efforts! With ad revenue at an all-time low for written websites, we're relying more than ever on reader support to help us continue putting so much effort into this type of content. You can support us by becoming a Patron, or by using our Amazon shopping affiliate links listed through our articles. Thanks for your support!

Rob Williams
Rob founded Techgage in 2005 to be an 'Advocate of the consumer', focusing on fair reviews and keeping people apprised of news in the tech world. Catering to both enthusiasts and businesses alike; from desktop gaming to professional workstations, and all the supporting software.


