- Qualcomm Launches Snapdragon 4 Gen 2 Mobile Platform
- AMD Launches Ryzen PRO 7000 Series Mobile & Desktop Platform
- Intel Launches Sleek Single-Slot Arc Pro A60 Workstation Graphics Card
- NVIDIA Announces Latest Ada Lovelace Additions: GeForce RTX 4060 Ti & RTX 4060
- Maxon Redshift With AMD Radeon GPU Rendering Support Now Available
Social & RSS Feeds
Latest Videos


Latest News
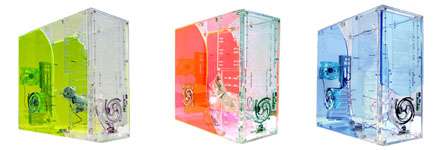
Logisys Acrylic Yin Yang Case
by Rob Williams on July 29, 2005 in Cases & PSUs
Logisys has recently released a new slew of cases, the Yin Yang series. These cases are acrylic and completely see through, but sport the cool Yin Yang design. Let’s take a deeper look at this case!
Page 2 – Closer Look
We are taking a look at the Green version of the case, but there is also a Red and Blue one available.
I was very impressed by how the case arrived. The reason I rarely show the boxes that the case comes in, is because they always get beat around the mail truck. Logisys realizes this, and this case was very tightly packed. The case was entirely wrapped in a thin plastic, and then very tightly wrapped with bubble wrap. Into the Styrofoam it went, and then into the box. It would have been very difficult to receive the case in rough condition with this great packaging job.
After tearing through all the plastic, I had to hold my breath because of the extreme smell of fresh plastic. That smell quickly went away, so I tore off the thin plastic off the case, which was used to prevent scratches. As I finished taking off the last strip, I was amazed at just how cool this case looked. It really has to be seen in front of you to totally appreciate it.


Installation
Time to transfer all my goods to this gorgeous new case. Here I ran into my first frustration. The side door is technically two pieces, each half of the Yin Yang design. You can take off one or the other, or both. But, each side you wish to take off, requires 6 screws to be removed. If you want to remove the entire side, that would be 12 screws to remove. This is not such a big deal, because I understand that this design is what they were going for. It’s not such a big problem unless you are in and out of your case all the time.
I’ll let that pass, because some of the problems I run into next made me completely forget about simply removing screws. During installation, I ran into 3 substantial problems, that I blame the design for.


The first problem I ran into was related to the motherboard install. The case has a total of 12 motherboard risers pre-installed. I only needed 10 for mine, so I removed the two unnecessary ones, which simply unscrewed. When I install motherboard, I usually secure it from the bottom up. By the time I had to screw in the top three screws, I found I was unable because the holes did not align with the motherboard. If I were to secure them, the screws would be in on an angle, something I was not going to try.
|
|

Support our efforts! With ad revenue at an all-time low for written websites, we're relying more than ever on reader support to help us continue putting so much effort into this type of content. You can support us by becoming a Patron, or by using our Amazon shopping affiliate links listed through our articles. Thanks for your support!

Rob Williams
Rob founded Techgage in 2005 to be an 'Advocate of the consumer', focusing on fair reviews and keeping people apprised of news in the tech world. Catering to both enthusiasts and businesses alike; from desktop gaming to professional workstations, and all the supporting software.


