- Qualcomm Launches Snapdragon 4 Gen 2 Mobile Platform
- AMD Launches Ryzen PRO 7000 Series Mobile & Desktop Platform
- Intel Launches Sleek Single-Slot Arc Pro A60 Workstation Graphics Card
- NVIDIA Announces Latest Ada Lovelace Additions: GeForce RTX 4060 Ti & RTX 4060
- Maxon Redshift With AMD Radeon GPU Rendering Support Now Available
Social & RSS Feeds
Latest Videos


Latest News
Mastering rsync and Bash to Backup Your Linux Desktop or Server

by Rob Williams on October 4, 2013 in Software
Keeping good backups of your data is important; don’t be the sucker who loses important files and has to deal with it afterwards! In this in-depth guide, you’ll learn about using rsync and lftp to transfer files, writing your own scripts and automating them, and backing up to external storage, a NAS, and a remote server without passwords.
Page 3 – Backup To Network-Attached Storage (NAS)
As a network device, a NAS needs to be mounted to the local machine in order for it to be used like normal storage. Most of what’s being discussed on this page could apply to server shares in general, but we focus on NAS since it’s widely-targeted by those who want to keep safe backups off of their main PC.
Because a NAS is in effect a computer, a vendor could avail you different methods of being able to interface with it. For example, if the NAS happens to support SSH, you could backup to it without mounting a share first. I’d imagine, however, that most who backup to their NAS probably also want the ability to access that storage without having to navigate the network protocols in a file manager, so mounting the share as local storage is probably what you’re looking for.
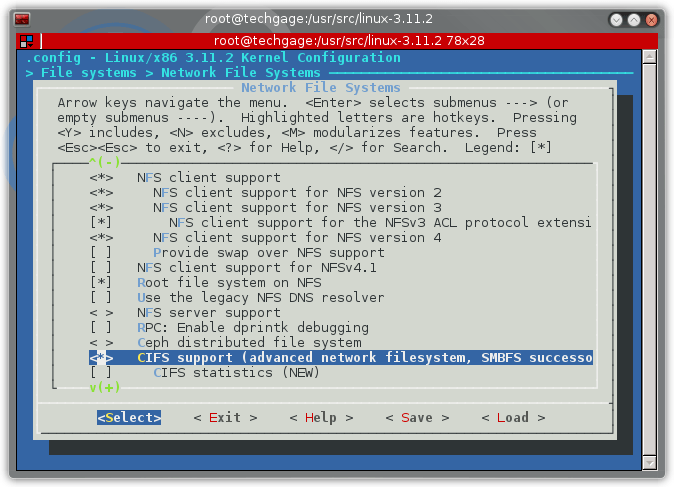
In order to mount a NAS (or network drive in general), CIFS support is required (a Samba successor). Chances are good that support is built into your distro, but if you’re taking the DIY route, it can be found in the kernel options under “Network File Systems”.
Even if CIFS is configured in the kernel, utilities are needed to actually mount a network share. Thus, you’ll want to search your repo for ‘cifs-utils’, and if it’s not installed, install it (eg: apt-get install cifs-utils). Afterwards, you’ll have ‘mount.cifs’ available on your system.
At this point, the important bits are prepared, and the time has come to mount a network share. This is where things can become a little confusing, however. Over the years, I’ve encounted NASes that like to be mounted via IP, and then others that require being mounted via the general network filepath. If you try to mount one way and it doesn’t work, try the other.
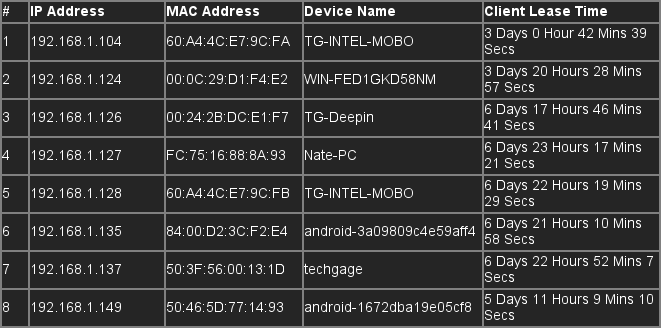
If you’re unable to mount via share name, and don’t happen to know the IP address for your NAS, you can have a look in your router’s DHCP lease section, which will look like this:
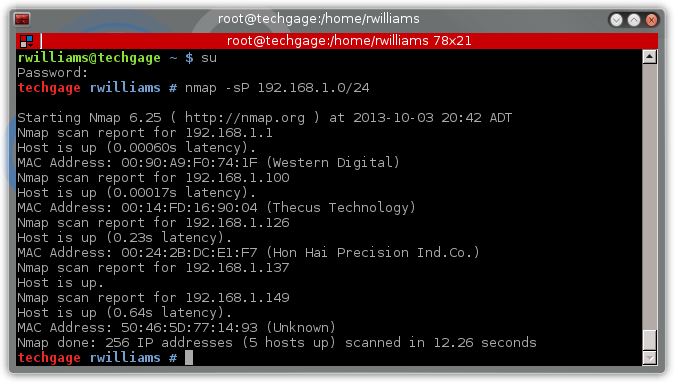
Alternatively, if nmap is installed, you could run nmap -sP 192.168.0.0/24 (or 192.168.1.0, depending on the router’s internal IP address) and get it that way:
Finding the proper network share name is unfortunately a little complicated under Linux, but if the ‘smbtree’ terminal application happens to be installed (can be run as a normal user), that might make things easy. Searching through the network section of your file manager could help as well. What you’ll be looking for is effectively a share name like: \\NAS\Share, or as a real example: \\tg_nas\Storage\.
That being said: Even if the share comes up as \\tg_nas\Storage, Linux is unable to mount it exactly as it’s stated. Instead, the forward slashes need to be changed to backslashes; eg: mount -t cifs -o guest //tg_nas/Storage /mnt/nas, or mount -t cifs -o guest //192.168.1.100 /mnt/nas if the IP address needs to be used.
The -o switch allows us to enter a username and password, or just ‘guest’ if no password is needed.
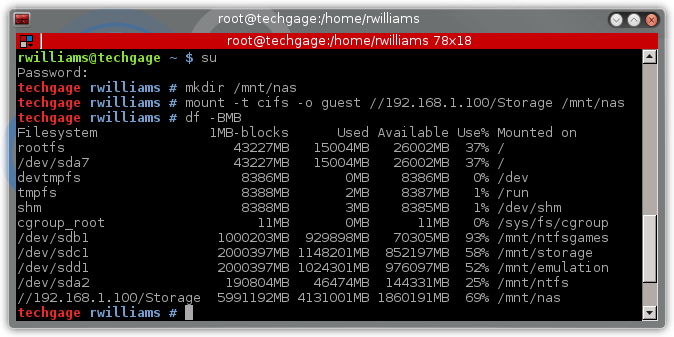
Here’s the complete mounting process in action:
Other mounting examples:
mount -t cifs -o username=username,password=password //NASname/Sharename /mnt/nas
mount -t cifs -o username=username,password=password //192.168.1.100/Sharename /mnt/nas
To have the NAS share automount at boottime, you can add an entry to your /etc/fstab file. Here are a couple of examples:
//tg_nas/Storage /mnt/nas smbfs username=admin,password=techgage 0 0
//192.168.1.100/Storage /mnt/nas cifs guest,uid=1000,iocharset=utf8 0 0
//192.168.1.100/Storage /mnt/nas cifs username=username,password=password,uid=1000 0 0
Because everyone’s configuration is different, it’s impossible to cover all of the bases here. You might need to specify a domain when mounting (domain=domainname), for example, mount with a different character set or adjust the users that have should have access to it. If you run into issues, I’d recommend hitting Google and searching for ‘mount cifs (distro name)’.

Support our efforts! With ad revenue at an all-time low for written websites, we're relying more than ever on reader support to help us continue putting so much effort into this type of content. You can support us by becoming a Patron, or by using our Amazon shopping affiliate links listed through our articles. Thanks for your support!

Rob Williams
Rob founded Techgage in 2005 to be an 'Advocate of the consumer', focusing on fair reviews and keeping people apprised of news in the tech world. Catering to both enthusiasts and businesses alike; from desktop gaming to professional workstations, and all the supporting software.


