- Qualcomm Launches Snapdragon 4 Gen 2 Mobile Platform
- AMD Launches Ryzen PRO 7000 Series Mobile & Desktop Platform
- Intel Launches Sleek Single-Slot Arc Pro A60 Workstation Graphics Card
- NVIDIA Announces Latest Ada Lovelace Additions: GeForce RTX 4060 Ti & RTX 4060
- Maxon Redshift With AMD Radeon GPU Rendering Support Now Available
Social & RSS Feeds
Latest Videos


Latest News
Matrox TripleHead2Go
by Greg King on June 22, 2006 in Graphics & Displays
We have all dealt with products that, on paper, are full of promise. These products generate a lot of hype and buzz but once they become hands on, the magic surrounding them seems to disappear. Today we are taking a look at a product that seems almost too good to be true.
Page 3 – Installation & Hardware
On the driver CD, there is plenty of software included. This software includes the needed drivers as well as a configuration tool to optimize game titles for wide screen gaming. The first screen you see when you insert the CD into your drive is this…

From here, you will want to install the software. This will not only install the driver, but install the PowerDesk SE software. The PowerDesk SE software allows you to tweak and customize your triple monitor experience. Here are some shots from the different options you have to manipulate.


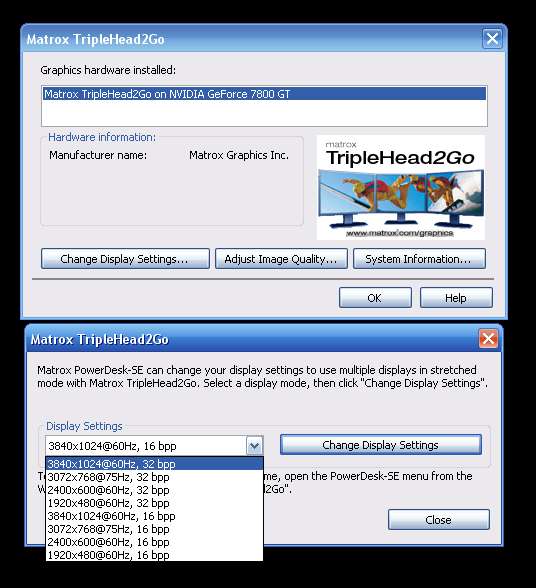
As you can see, there are many different settings that you can have. My personal favorite is ability to maximize the windows in the display that the window is in. You also have the option to maximize it across all three when you hold down the control button while maximizing. I work a lot with my PC so being able to have 3 separate windows open at once is a beautiful thing and is something that no one can appreciate until it is experienced.
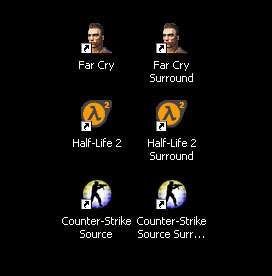
Another program you will install is the Matrox TH2Go Surround Gaming Utility. This program will allow you to optimize any supported game installed on your computer. In my case, I have Half Life 2, Counter Strike: Source and Far Cry. I have other games on my PC that are installed that will allow me to set the resolution to 3840×1024 but these 3 titles can optimized by using the SGU.

Once each game is optimized, an icon will be placed on your desktop. Only by double clicking on the widescreen shortcut can you play the optimized version for widescreen. These shortcuts look just like the original ones, only with surround in the name.
Installation of the TH2Go is as easy of hooking up a monitor. You obviously want to have the correct displays going into the correct ports but for times sake, I will work under the assumption that you all ready know which cable corresponds to the left, right and center monitor on your desk. Once installed, you will have a bit of a cable mess but in my case; it blends right in with all the other cables I have running out of the back of my case.

Once installed, you can now select your desired screen resolution.

|
|

Support our efforts! With ad revenue at an all-time low for written websites, we're relying more than ever on reader support to help us continue putting so much effort into this type of content. You can support us by becoming a Patron, or by using our Amazon shopping affiliate links listed through our articles. Thanks for your support!