- Qualcomm Launches Snapdragon 4 Gen 2 Mobile Platform
- AMD Launches Ryzen PRO 7000 Series Mobile & Desktop Platform
- Intel Launches Sleek Single-Slot Arc Pro A60 Workstation Graphics Card
- NVIDIA Announces Latest Ada Lovelace Additions: GeForce RTX 4060 Ti & RTX 4060
- Maxon Redshift With AMD Radeon GPU Rendering Support Now Available
Social & RSS Feeds
Latest Videos


Latest News
MSI Z97 Gaming 9 AC Motherboard Review
by Rob Williams on November 12, 2014 in Motherboards
The last time we took a look at an MSI gaming motherboard, it was the company’s smallest current offering: Z97I Gaming AC. For this review, we’re looking to the top of the Z97 ladder, with the Z97 Gaming 9 AC. Priced at about $290, it’s easy to predict what this board might bring to the table, but all told, it still managed to impress us.
Page 2 – A Look at the EFI & Software
Please note that most of the information on this page was carried over from my review of MSI’s Z97I Gaming AC, as the EFI and software package is identical. In that review, I forgot to take a look at the ECO Power feature of the software, as it wasn’t a part of the main software suite. I’ve added information about that at the end of this page.
Not much has changed with MSI’s EFIs over the past couple of years, but it’s been refined enough where I consider what’s here to be quite good. That said, I don’t really care for it as much as ASUS’ solution, mostly because I don’t like the layout of the options and sections; ASUS’ implementation is more straight-forward. MSI’s EFI beats the pants off of GIGABYTE’s solution, though, mostly because I consider that one to be an eyesore.

The shot above is the screen you’ll see as soon as you enter the EFI, and as the following screenshots will highlight, most of the UI elements have static locations, regardless of what section you’re in. At times, the right pane will disappear to make way for expanded sections, but for the most part, you’ll be looking at the center of the screen most often.
From this screen, you can enable MSI’s OC Genie overclocking tool, adjust the bootloader sequence, and get simple temperature information, as well as see the CPU and DRAM frequency.
It’s on this screen that I find navigation a little complicated; using the arrows to get from one side to the next, while in a menu, requires a couple of hits of the Esc key to hit the home screen, at which point you can select the other options. Alternatively, you can simply use the mouse to get to those sections faster, which is what I did.
An example of the menu system can be seen below, and it looks quite good overall, with clear text and simple navigation. For some reason, I didn’t have an XMP option available to me, despite the kit of RAM I used having four profiles; normally you would see one. I blame the lack on some quirk about the RAM I was using, but it’s still unusual.

A standout feature in this list is called Memory Try It!; with it, you can select a target CAS latency and let the board adjust micro-timings to optimize the RAM as much as possible. If you’re using a kit of CAS 11 memory, for example, you’d want to choose “CL11 Performance”. You could also try overclocking the memory by choosing CL10 Performance; and if that doesn’t work, maybe CL10 Compatibility will. I am not entirely sure that many people will make use of this feature, but it’s a cool one to see included.

In my look at ASUS’ Z97I-PLUS, I was impressed by an EFI feature that allowed you to adjust or create new fan profiles with a graphical chart. As it happens, MSI has the exact same feature, and in some ways (definitely not aesthetically), it’s a little neater.

With this implementation, whenever you click on a plot marker, it zooms in like this to let you fine-tune things easier. Plus, all the while you’re doing this, you can monitor voltages at the bottom. I admit that ultimately, I prefer to use an external fan controller to manage fan speeds, but this is an excellent feature for those wanting a more hands-off approach.
Board Explorer isn’t a brand-new feature, but it’s not one I’ve talked about before, so I’d like to do it here. As simple as it might sound, this is a feature I think all motherboards should have, because it’s informative. Here, you can see an overview of the board, with some areas highlighted red. Hovering over any of these areas will reveal information about it. Hover over the CPU, for example, and it will tell you what model is installed. PCIe slot? It’ll tell you what’s there. You can see an example of this in the shot below.

Here’s where things go from informative to downright useful. Hovering over the SATA ports, for example, will tell you which ports are occupied, and which drives are installed where. Hovering over the back I/O panel will reveal the same sort of information. Feeling seriously lazy and don’t want to look behind the PC? Simply load up Board Explorer and it will tell you if you have a USB port free!
While I still prefer the more traditional EFI layout that ASUS has been implementing on its boards, MSI has done a fine job here. I don’t find it extremely intuitive at all times, but it’s certainly easy to look at and has a load of functionality.
A Look at the Software: MSI Command Center
When I took a look at MSI’s Z77A-GD55 two-years-ago, I didn’t pay any attention to the software. Part of the reason behind this was that at the time, few vendors gave anyone a great reason to check it out. The software solutions that existed were simply boring and uninspired or not entirely useful.
A lot has changed since then. MSI, along with ASUS, GIGABYTE and I’m sure others, have been working hard on making their software solutions worthwhile, and MSI’s Command Center is a good example of how far we’ve come. As this page will cover, it makes tweaking many different board features a simple affair, and it’s not too bad looking, either.
Command Center has a simple design; the center area slides over depending on which of the top five menu buttons you choose. If you’ve clicked on IGP, for example, you’ll still see DRAM settings, because neither feature takes up that much room.

For adjusting voltages, the fans, and extra DRAM settings, the advanced menu can be used to pop-out a new window. In the shot below, you can see all of the various voltage-related settings there are. If you’re a fan of overclocking inside of Windows (I’m certainly not), this solution should suit you just fine.

Those looking for a slight system-wide boost will want to check out the OC Genie feature, which automatically takes care of voltages and frequencies. Using this on the Core i7-4770K in the test rig yielded an absolutely minor overclock of 4GHz, which is really modest for a the stock 3.5GHz chip. Other boards have boosted the chip to at least 4.2GHz, so if you want a truly nice overclock, you’ll have to get your hands dirty.

One feature that some board vendors are beginning to roll out to their higher-end motherboards is the ability to create a RAMDisk. If you’re not sure what a RAMDisk is, it’s just as it sounds: Storage on your RAM. Whatever’s stored there will be wiped clean on every reboot, but if you have the need for extreme storage speed for whatever reason, it’s an awesome feature to have, either to speed up games, or projects you’re working on.

Configuring a RAMDisk is simple. Choose the drive letter, the size of the disk, its file system, and then hit “Accept”. If you want the software to automatically link your browser’s cache to the RAMDisk, you can choose to do so – and yes, it can make a significant difference on some webpages. Should you want the RAMDisk to store the same exact data on every reboot, you can copy the data there, and then create an image to restore. This of course will require copying the data from the SSD or HDD, so not all of the data will be instantly available after you boot into the OS.
For testing, I created a 5GB RAMDisk, and benchmarked it using CrystalDiskMark. The results are downright impressive:
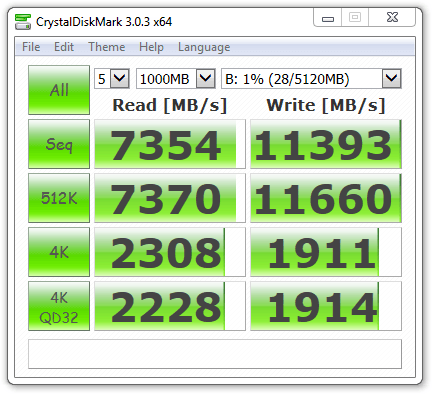
At 7.35GB/s read, this RAMDisk proved to be about 73x faster than a hard drive, and at least 15x faster than an SSD. The write side is even more impressive. And 2.3GB/s 4K? I don’t have a RAMDisk in my personal rig, but after fiddling around with one on this board, I want one, and want one soon.
While not part of the main Control Center, “ECO Center” might be worth checking out. With it, you can disable various components on the motherboard that you’re not using in order to cut down on the power draw. In testing, I came to believe that this is for those who really want to reduce their power, because regardless of what you disable, you shouldn’t expect more than a few watts worth of savings. Even so, this is a cool feature.

Overall, MSI’s Command Center isn’t as robust as ASUS’ AiSuite III that I took a look at in my Z97I-PLUS review, but it’s certainly designed well and gives you access to many important tweaking options fast. A very good piece of software.

Support our efforts! With ad revenue at an all-time low for written websites, we're relying more than ever on reader support to help us continue putting so much effort into this type of content. You can support us by becoming a Patron, or by using our Amazon shopping affiliate links listed through our articles. Thanks for your support!

Rob Williams
Rob founded Techgage in 2005 to be an 'Advocate of the consumer', focusing on fair reviews and keeping people apprised of news in the tech world. Catering to both enthusiasts and businesses alike; from desktop gaming to professional workstations, and all the supporting software.


