- Qualcomm Launches Snapdragon 4 Gen 2 Mobile Platform
- AMD Launches Ryzen PRO 7000 Series Mobile & Desktop Platform
- Intel Launches Sleek Single-Slot Arc Pro A60 Workstation Graphics Card
- NVIDIA Announces Latest Ada Lovelace Additions: GeForce RTX 4060 Ti & RTX 4060
- Maxon Redshift With AMD Radeon GPU Rendering Support Now Available
Social & RSS Feeds
Latest Videos


Latest News
Nikon D50 6.1MP Digital-SLR Camera
by Rob Williams on October 2, 2006 in Miscellaneous
If you are looking to get into the D-SLR world but find it too expensive, then you may not know the value that awaits you. We are taking a look at the Nikon D50 6.1 megapixel camera, and given the pricerange, it packs a serious punch.
Page 3 – Closer Look Cont.
|
|
The backside of the camera is where the majority of the options are, or at least the ones you may use most often. Here we have a “Play” button which shows the last photo you shot in the LCD screen. The bottom three buttons are dual-function. First we see an icon with squares… this displays the pictures on the screen as singles or in a 2*2 or 3*3 grid.
When you are in a menu and don’t know what an option does, hitting the ? button will tell you. Note the lock also… this is for the picture viewer mode. It will lock the photo so that it cannot be accidently deleted. Menu and Enter are self-explanatory, I hope.

As for the dual functions, the ISO/WB and Qual are triggered by use of the dial on the top right side of the above photo. In shooting mode, you can hold down either button and use the dial at the same time to change the ISO, white balance of the quality of the pictures. It’s a better way to get things done quick. However, you don’t need to deal with any of this, except the Quality if you are relying solely on the Auto mode.
The front of the camera is what you would expect from a D-series Nikon. Beside the D50 logo is the Flash trigger button. In manual modes, pushing this will pop up the flash. Below the logo and not shown in the image is the lens manual/auto mode, and also the lens release button.

Below is a top down view of the camera… but this is the largest image that I could find off Nikons website. The dial has many options including auto, close-up, portrait and night-time portrait, landscape, sports and child. As for the manual modes, there is aperture priority auto, shutter priority auto, programmed auto and manual. Manual gives you complete control over the settings, and should be used by those who really understand the situation in which they are shooting.
In the center of the camera is a shoe designed for use with a speedlight. The on/off button is placed atop the shutter release button, for quick powering on of the camera. Beside the shutter release is a button for the shutter release delay, and also white balance control which ranges from -5 to +5 in intervals of ~0.3v or 0.5 depending on the option selected in the menu.
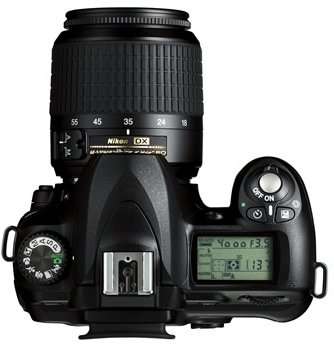
The screen includes all of the info you need to know… and I mean everything. Shutter speed, aperture, white balance, battery level, flash mode and more. More importantly, there is a counter listed here that tells you approximately how many photos it will take to use up the remaining space on the card. On average, I have found this number to be 20% off, in my favor. While RAW+JPEG on a 512MB card told me 59 pictures, I successfully took 71.
That wraps up the look at the camera itself. Now let’s take a look at the lenses we will be dealing with.
|
|

Support our efforts! With ad revenue at an all-time low for written websites, we're relying more than ever on reader support to help us continue putting so much effort into this type of content. You can support us by becoming a Patron, or by using our Amazon shopping affiliate links listed through our articles. Thanks for your support!

Rob Williams
Rob founded Techgage in 2005 to be an 'Advocate of the consumer', focusing on fair reviews and keeping people apprised of news in the tech world. Catering to both enthusiasts and businesses alike; from desktop gaming to professional workstations, and all the supporting software.


