- Qualcomm Launches Snapdragon 4 Gen 2 Mobile Platform
- AMD Launches Ryzen PRO 7000 Series Mobile & Desktop Platform
- Intel Launches Sleek Single-Slot Arc Pro A60 Workstation Graphics Card
- NVIDIA Announces Latest Ada Lovelace Additions: GeForce RTX 4060 Ti & RTX 4060
- Maxon Redshift With AMD Radeon GPU Rendering Support Now Available
Social & RSS Feeds
Latest Videos


Latest News
NZXT Beta Mid-Tower
by William Kelley on May 27, 2009 in Cases & PSUs
When building a PC on a budget, one of the most difficult components to pick out is the chassis. For many, $100 is the sweet-spot, as it usually gives a solid design and great aesthetics. With the help of the Beta, though, NZXT helps prove that even $50 chassis’ can handle the task at hand just fine, and after our look, we’re impressed.
Page 2 – Assembly and Testing
For my testing I used a new program called OCCT 3.0. Not only does this simple program push the CPU to the brink of a meltdown through the use of LINPACK testing for Intel processors, it also turns up the juice on your GPU. It automatically maintains graphs of temperatures throughout your testing. I highly recommend you try it out on your own for your testing needs. I always run all my tests 3 times and take an average just to weed out any erroneous results. My ambient temperature is kept at a near constant 68°F (20°C) year round as my test bed PC is in my basement. There are no fans or heat vents in the area of the test platform.
I use a static overclock and settings for all my testing. Stock testing is done with all settings in the motherboards BIOS to Auto. Overclocked testing is done by turning the CPU multiplier to 11x and manually setting the Vcore to 1.275v as well as enabling line load option. This results in a processor frequency of 3.67GHz with 1.25v Vcore as reported by CPU-Z in Windows. The video card is by nature of being fanless does not over clock enough to change the results so it remains at stock speeds through all testing. This is by no means the absolute maximum clocks, they are just meant to add extra stress to the components to simulate a potential overclock obtainable by most people.
|
Component
|
Model
|
| Processor |
Intel Core 2 Extreme QX9650 – Quad-Core, 3.0GHz, 1.30v
|
| Motherboard |
ASUS P5Q PRO – P45-based
|
| Memory | |
| Graphics | |
| Audio |
On-Board Audio
|
| Storage |
Seagate 7200.11 1TB
|
Optical |
LG 20X DVD DL
|
| CPU Cooler | |
| Power Supply | |
| Et cetera |
The build process was pretty straight-forward and went off without a hitch. The layout was not completely friendly for wire maintenance, but there were places to zip tie things down easy enough. There were no included ties so I used some from my private stock.

The tool-less locking plates for the ODD drives were extremely effective and easy to use. There is one for each side and they firmly hold the drive in place. They are quite honestly some of the best I have used.

Another feature I very much appreciated was the ability to use a locking screw to lock the hard drives into place. The plastic rails that hold them in were decent, but the ability to lock them in with a screw was welcome.

Finally, I wanted to point out that there is a full 10 ½ inches allotted for graphics cards. As you can see my HD4830 is dwarfed by the allotted room and you should be able to fit any current graphics card inside.

And finally, here are the temperature results for both the CPU and GPU:
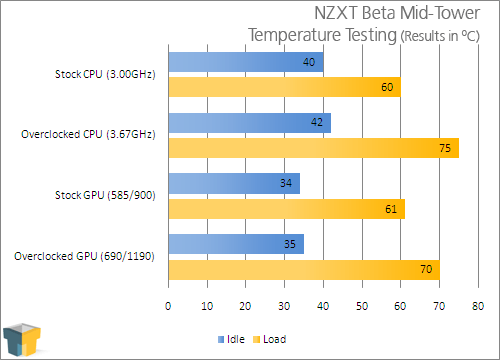
Overall, I’m very impressed with the results when you factor in there is only a single intake fan supplying all the airflow for cooling. There is no doubt in my mind that one could expect a 5C-10C drop in operating temperatures once a rear exhaust fan is installed.

Support our efforts! With ad revenue at an all-time low for written websites, we're relying more than ever on reader support to help us continue putting so much effort into this type of content. You can support us by becoming a Patron, or by using our Amazon shopping affiliate links listed through our articles. Thanks for your support!