- Qualcomm Launches Snapdragon 4 Gen 2 Mobile Platform
- AMD Launches Ryzen PRO 7000 Series Mobile & Desktop Platform
- Intel Launches Sleek Single-Slot Arc Pro A60 Workstation Graphics Card
- NVIDIA Announces Latest Ada Lovelace Additions: GeForce RTX 4060 Ti & RTX 4060
- Maxon Redshift With AMD Radeon GPU Rendering Support Now Available
Social & RSS Feeds
Latest Videos


Latest News
NZXT Lexa
by Rob Williams on February 6, 2006 in Cases & PSUs
If you have never heard of NZXT, you don’t know what great cases you are missing! We are taking a look at their Lexa case, which combines “Perfect Symmetry” with class and functionality. Let’s check it out and see if we have a winner on our hands.
Page 3 – Interior
Another wicked feature is the blowhole on the top of the case. Beneath it is an 80mm fan that will suck in cool air. This is great for keeping your system as cool as possible. However, we ran into a problem with the placement. With a large PSU installed, you will have no choice but to uninstall that fan. My current PSU is an Antec Phantom 500W, and it’s just long enough to make removal of the fan a must. This could not really be helped though, because moving it towards the front of the case would definitely reduce it’s effectiveness. Luckily though, we have a massive fan on the door to help out also.
The fan attached to the door is a 120mm blue LED, that’s also used to exhaust hot air. In addition, there is a filter covering it that will act as a dust catcher and a safety feature so nothing will get caught in the fan from the outside. Towards the back of the case is another large 120mm fan, identical to the one in the door. Without a doubt, the ventilation on this case was well thought out and the placement of the fans is great.
On the back of the case is the other half of the arch, which allows the back of the case to be fully exposed. There are handles here that you can use when carrying the case around. They look flimsy, but they felt sturdy. You can also see that there is already a PSU included, which is an NZXT branded 500W. I like to stick with my own PSU, so I removed it and replaced it with the Antec Phantom.


Before we take a look inside, I have to mention that something I absolutely love about this case. Because of the two ends of the arch, your case is lifted off the ground by a few inches. This is great, because it will allow cool air to enter. This is definitely a well thought out case.
A look inside the Lexa
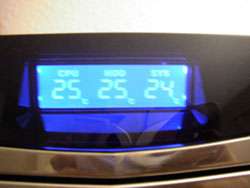
Looking at the available wires, there’s everything we’d possibly need here. In addition to the normal motherboard wires, there are additional connectors for setting up the case USB, Firewire and etcetera. There’s even some temperature diodes which you can use for your CPU, HDD and system. Sadly, I forgot completely about these, so due to time constraints I was unable to hook them up. Tony from Pro-Clockers was kind enough to lend us an image from his Lexa review, which you can see below. I knew that arc had to be raised for a reason!
In the picture of the wires, you can also see the filter at the bottom of the case. You may be able to remove the tabs and mounted a fan there, but chances are it’s fine the way it is.
Towards the back we can see the dual ended molex connector for the 120mm fan, which is long enough so that you should have no issues hooking it up. The same goes for the fan on the door. I was able to connect both fans to each other and then into the PSU line.
All the miscellaneous cables are wired behind the drive cages so that you can keep them out of the way, but most are so long that they will get in the way anyway.
|
|

Support our efforts! With ad revenue at an all-time low for written websites, we're relying more than ever on reader support to help us continue putting so much effort into this type of content. You can support us by becoming a Patron, or by using our Amazon shopping affiliate links listed through our articles. Thanks for your support!

Rob Williams
Rob founded Techgage in 2005 to be an 'Advocate of the consumer', focusing on fair reviews and keeping people apprised of news in the tech world. Catering to both enthusiasts and businesses alike; from desktop gaming to professional workstations, and all the supporting software.


