- Qualcomm Launches Snapdragon 4 Gen 2 Mobile Platform
- AMD Launches Ryzen PRO 7000 Series Mobile & Desktop Platform
- Intel Launches Sleek Single-Slot Arc Pro A60 Workstation Graphics Card
- NVIDIA Announces Latest Ada Lovelace Additions: GeForce RTX 4060 Ti & RTX 4060
- Maxon Redshift With AMD Radeon GPU Rendering Support Now Available
Social & RSS Feeds
Latest Videos


Latest News
NZXT Panzerbox Classic Series Mid-Tower
by William Kelley on July 6, 2009 in Cases & PSUs
Do you find most mid-towers a little too large, but find small form-factor chassis’ to have the opposite issue? The latest entry to NZXT’s “Classic Series”, the Panzerbox, may have you covered. This sturdy aluminum chassis is neither too large nor too small, yet it still offers ample internal room for effective cooling. It doesn’t look too bad, either!
Page 2 – Installation and Testing
Before we jump into our test results, feel free to look over the components we used for this build:
|
Component
|
Model
|
| Processor |
Intel Core 2 Duo E7200 – Quad-Core, 3.0GHz, 1.30v
|
| Motherboard |
Gigabyte GA-EP45 UD3P – P45-based
|
| Memory | |
| Graphics | |
| Audio |
On-Board Audio
|
| Storage |
Seagate 7200.11 500GB
|
Optical |
LG 20X DVD DL
|
| CPU Cooler | |
| Power Supply | |
| Et cetera |
Creative Fatal1ty X-FI
Windows Vista Ultimate 64-bit |
Installation of the motherboard and expansion cards was a breeze thanks to the removable motherboard tray. I sure wish this feature was available on most other chassis’, especially if it’s done this well.

Sliding it back in was just as easy. There were no clearance issues at all and if anything, there was extra space, so overall it was an absolute snap.

Below, you can see a shot that shows just how much room there is for large heat sinks to slide in. While I realize that the Freezer 7 PRO is only 126mm tall, you can easily see that there is almost another 40mm of space for even larger models.

The open interior swallowed up our drives with ease. You have to be a little creative with your wire management since there are not many places to wire tie things securely.

Installing the power supply is the final task. While it did feel strange to place it here on its side, there was plenty of room. Again, any oversized GPU coolers may not cooperate with this layout. For extra wire-hiding, you can tuck them into the space underneath the support brackets.

Finally, after installing the side panel, I felt it was necessary to snap my final picture showing the intake fan of the power supply in relation to the mesh panel. Almost all of the fan is open to pull air through. Even users with oversized power supplies will have no worries here about keeping them cool.

For my testing I used a new program called OCCT 3.0. Not only does this simple program push the CPU to the brink of a meltdown through the use of LINPACK testing for Intel processors, it also turns up the juice on your GPU. It automatically maintains graphs of temperatures throughout your testing. I highly recommend you try it out on your own for your testing needs. I always run all my tests 3 times and take an average just to weed out any erroneous results. My ambient temperature is kept at a near constant 68°F (20°C) year round as my test bed PC is in my basement. There are no fans or heat vents in the area of the test platform.
Stock testing is done with all settings in the motherboards BIOS to Auto. All fan control settings are turned off so that the fan header on the motherboard for the CPU receives full power. Due to the fact we are upgrading our testing hardware which was not complete at the time of writing, I was unable to perform overclocked testing. The testing I have included will give you a great indication of the airflow characteristics and I will be revisiting and reporting results when I am using the upcoming new Quad Core 2 Duo platform that will be the standard of all my chassis reviews for some time to come.
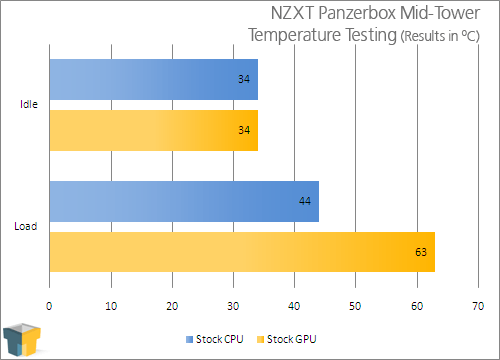
As you can see by my results, there is plenty of airflow. The included fans are noisier than I would like and using a sound level meter positioned 1′ from the front of the chassis I recorded a level of 46.5db. Sadly, most of this noise is due to the rear 120mm ran as the larger fans are quieter on their own. The noise level is not overbearing, but it should not be as loud as it is.

Support our efforts! With ad revenue at an all-time low for written websites, we're relying more than ever on reader support to help us continue putting so much effort into this type of content. You can support us by becoming a Patron, or by using our Amazon shopping affiliate links listed through our articles. Thanks for your support!