- Qualcomm Launches Snapdragon 4 Gen 2 Mobile Platform
- AMD Launches Ryzen PRO 7000 Series Mobile & Desktop Platform
- Intel Launches Sleek Single-Slot Arc Pro A60 Workstation Graphics Card
- NVIDIA Announces Latest Ada Lovelace Additions: GeForce RTX 4060 Ti & RTX 4060
- Maxon Redshift With AMD Radeon GPU Rendering Support Now Available
Social & RSS Feeds
Latest Videos


Latest News
QNAP TS-109 Pro NAS
by Greg King on March 26, 2008 in Networking, Storage
Network storage if growing more popular each day, and thanks to that, there are countless NAS boxes to choose from. We take our first look at a QNAP offering, that proves you do get what you pay for. This single-bay NAS offers pure silence, a great feature-set and simple setup.
Page 3 – Features and Setup
Not wanting to bore you with specs that most won’t care about (as well as attempting to not make an entire page of the review only copied stats, ripped from the manufacturers web page), we have listed only the most notable features of the QNAP TS-109 Pro. While the features and specs of the TS-109 Pro are numerous, the most relevant to a majority of people interested include:
- SoC 500 MHz RISC processor
- 128MB DDR 2, 8MB flash
- Up to 1TB SATA II HDD
- Gigabit Ethernet
- 3 USB ports for printer serving and camera and thumb drive backups
- 210(D) x 60(W) x 182(H) mm
- Consumes a ZNAP reported 6.6M in sleep mode and 14.4W in operation
File Server
- FTP Server supporting up to 32 concurrent connections, SSL/TLS encryption and passive FTP port range control
- RAID 1/0/JBOD
- Print Server
- Backup Server
- Web Server
- My SQL Server
- UPnP Media Server
- iTunes Server
- Photo Album Viewing
- Active Director Support
- Robust User Control
Now that we have a firm idea of what the TS-109 Pro has to offer, let’s get into the setup of the NAS.
Setting up the TS-109 Pro for all intents and purposes is a straight forward affair assuming your home network is setup correctly from the beginning. As with most other NAS devices that we have looked at in the past, QNAP has included is a small utility that will scan the network for any connected QNAP products. This is useful if you have DHCP setup on your home router to assign the NAS a valid address but don’t happen to know the given address. Running the QNAP finder, we see that the app found our device and has listed it’s IP address, software version and MAC address.

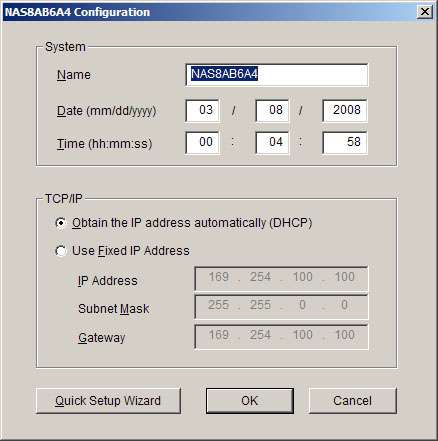
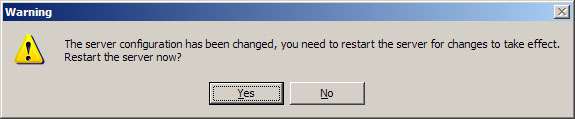
When we click connect, we are taken to a window that allows us to change the name of the device from the default name (last 6 digits of the MAC with NAS in front) to anything we want. You can also set the date, time and TCP/IP settings. Once the desired settings are in place, the TS-109 Pro needs to restart for them to take effect.
If you choose to go the easy setup route, you can let the wizard ask you about each setting that you want to change. You start out with the ability to choose the name of your TS-109 Pro as well as setup a administrative password. By default, the logon credentials are admin/admin but you can change this to whatever you see fit when you setup yours.


For system time, you can manually set the time and time zone or you can point the device to an external time server on the ‘net. If you are anal about the time and have an internet connection, why not do this? Many universities across the nation have connections setup so if your into atomic timing, point your TS-109 Pro in their direction.

Offered on the TS-109 Pro is a selection of many different languages as well. Offering all of the major American, European and Asian languages, regardless of there your located, the probability of you being able to read the TS-109 Pro’s display is quite good.

Not much has changed in the network address settings page. You can either assign the TS-109 Pro its own unique IP address of you can allow your local DHCP server to foot the work of network addressing.

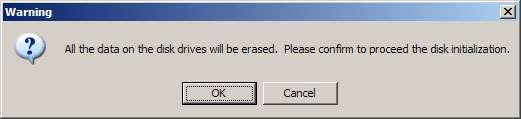
Now that we have the TS-109 Pro setup, we need to initialize the installed hard drive. In our case, we are using our tried and true test drive, a Seagate ST3750640NS. You will be reminded that once the process of initiation is completed; all data that was currently on the drive will be lost. If your cool with the thought of that (if not, what are you using it in the first place?), we now need to point the TS-109 Pro to the correct location of the install software. Like we stated earlier, the OS is installed directly onto the hard drive much like it is in a regular PC.


Once you have everything setup the way that you want it, you are given one last option to go back through the setup process and change anything that you might have overlooked. If you’re satisfied with your selections, clicking through to the next window will get the ball rolling in the right direction.
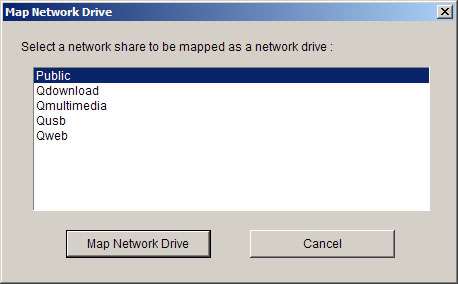
In our case, our 750GB drive took a while to initialize but given the sheer size of the disk, it wasn’t surprising. Once completed, we are given the chance to let the included setup software map our drives for us by simply checking a box. Clicking finish will finalize the setup process and write your settings to the NAS itself.


By default, QNAP has five different folders setup on the TS-109 Pro. These include Qdownload, Qmultimedia, Qusb, Qweb and Public. Any of these five folders can be mapped to your PC either will the help of the included software or manual within Windows. You can go into the web interface and create as many additional folders as you would like but to start out with, these five will have to do. They all have a purpose but more on this later.
An in-depth look at the software is next.

Support our efforts! With ad revenue at an all-time low for written websites, we're relying more than ever on reader support to help us continue putting so much effort into this type of content. You can support us by becoming a Patron, or by using our Amazon shopping affiliate links listed through our articles. Thanks for your support!