- Qualcomm Launches Snapdragon 4 Gen 2 Mobile Platform
- AMD Launches Ryzen PRO 7000 Series Mobile & Desktop Platform
- Intel Launches Sleek Single-Slot Arc Pro A60 Workstation Graphics Card
- NVIDIA Announces Latest Ada Lovelace Additions: GeForce RTX 4060 Ti & RTX 4060
- Maxon Redshift With AMD Radeon GPU Rendering Support Now Available
Ripping Your Blu-rays the Easy and Free Way

Do you think that getting a Blu-ray movie off of its disc and onto your PC is complicated? It once was an arduous chore, but today, it’s easier and more accessible than ever. We take a look at one of the simplest ways to both rip a movie onto to your PC, and then encode it into a variety of formats. Best part? It will cost you $0.00.
Page 3 – Converting your Blu-ray to a Single File Cont., Final Thoughts
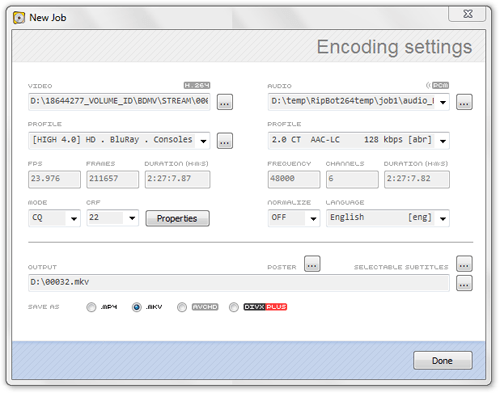
Once you make your selections and proceed, you’ll be waiting a few minutes (or many minutes) for the program to scan through the file and demux the chosen streams. For most of the movies I encoded, this process took around 15 – 30 minutes. When the program is done with what it needs to do, you’ll be able to choose between a couple of different options that will tailor the resulting file to your needs. The absolutely first thing to choose is the output format. The options are MP4, MKV, AVCHD and also DivX Plus.
The choice here is going to be based on personal preference, but for me, I tend to stick with MKV, but if you want the resulting file to play on something like a PS3, you might want to choose MP4. Or, if you want MKV now, and possibly MP4 later, you could do what I do and use mkv2vob to get the job done, as it’s a quick solution.
From here, you can choose the video profile you want to use for encoding, and also the quality level. For most people, the default settings are going to suffice, as the end result is going to be as close to Blu-ray quality as possible, but at a quarter of the size. If you’re looking to encode for a mobile platform, you’ll have to select the respective profile from the drop-down. Bear in mind though, some of these devices won’t play files over 4GB in size, so you will need to be careful about the options you choose.
If you’re like me and are really fussy about end quality, you might be a little concerned about the default encoding mode and value. For the most part, a Constant Rate Factor (CRF) of 22 is going to deliver superb image quality without going overboard with the file size.
Though not a truly comparable example, this is somewhat like comparing CD Audio to FLAC to MP3. CD Audio has a CBR of 1,411 Kbit/s, while FLAC can get that down to 800 ~ 1,200 Kbit/s on average and still be considered “lossless”, since the purged data is unimportant. Then there’s MP3 which filters out actual data but not in such a way that it will be noticeable to the listener.
The higher the CRF number, the lower the overall bitrate is going to be, and the smaller the file. The lower the number, the beefier the average bitrate and file size becomes. CRF is a smart algorithm, though, and in essense, the bitrate throughout the movie will vary depending on the type of scene – lower when it’s not needed, and higher when it is. In the end, it delivers the best possible quality for a given file size, and in many polls around the Web, 22 seems to be the best-received default value. If you are worried that your rip might still be lacking some quality, you might want to change the value to 20, and if you want archival quality, you could use 18.
For mobiles, you might want to change the “Mode” to 2-pass, and then select an appropriate bitrate. For things like iPods, PSP’s and similar devices, it’s easy to choose an overkill bitrate, so 3,000Kbit/s or around there should deliver the best quality and still retain a modest file size.
For audio, there are a bunch of choices to be found in the respective profile to the right. You’ll have the choice of encoding for 2.0 up to 5.1 audio, and in some cases, you can choose to use a direct stream, which is lossless. As mentioned before, not all movies and modes allow this option, but typically if the film includes DTS support, it will.
Under the “Properties” section, you can choose to resize the final picture, crop it, add a de-noise filter and also take care of other tasks. For most rips, these options should be left alone, since it will preserve the film as best as possible.
At this point, you’re almost home free. You just need to okay your selections, and when back at the main list, you can hit “Start”. Unless of course you want to add more tasks to the pile, which would be useful if you know you’re not going to be at the PC for a while and need a lot of encoding done.
Final Thoughts
Compared to DVDs, Blu-rays can take much longer to encode, and I do mean “much”. For most movies I encoded, they took around 4 hours to complete on AMD’s six-core Phenom II X6 1090T. On a Core i3-350 notebook, a similar process took 8 hours. So, don’t expect to set it and forget it for only a half-hour. It’s work like this that gives sleep-time new meaning! Unfortunately, there just doesn’t seem to be a method for ripping and converting Blu-rays any faster, but I’d love to be corrected if I’m wrong!
After the entire process is done, you’ll have your resulting file ready to go and ready to be used in any way you see fit. And with a file resulting in at 6GB – 12GB, you’re going to have a lot of room left over on that 2TB hard drive for even more rips. On-demand has new meaning!
In the future, I’d like to revisit this entire process by writing a more in-depth way of ripping and converting, but as I’m still a relative beginner in this, I have a lot of research and experimentation to do. If you have advice, or would like to recommend another method of ripping and re-encoding, please feel free to jump into our related forum thread and give your suggestions there.
For screenshots of a few movies I ripped with the exact tools and steps I laid out here, head on over to the next page.
- Related Sites
- DVDFab HD Decrypter(Blu-ray Ripper)
- RipBot264 (Recode the rip)
Discuss this article in our forums!
Have a comment you wish to make on this article? Recommendations? Criticism? Feel free to head over to our related thread and put your words to our virtual paper! There is no requirement to register in order to respond to these threads, but it sure doesn’t hurt!
Support our efforts! With ad revenue at an all-time low for written websites, we're relying more than ever on reader support to help us continue putting so much effort into this type of content. You can support us by becoming a Patron, or by using our Amazon shopping affiliate links listed through our articles. Thanks for your support!


