- Qualcomm Launches Snapdragon 4 Gen 2 Mobile Platform
- AMD Launches Ryzen PRO 7000 Series Mobile & Desktop Platform
- Intel Launches Sleek Single-Slot Arc Pro A60 Workstation Graphics Card
- NVIDIA Announces Latest Ada Lovelace Additions: GeForce RTX 4060 Ti & RTX 4060
- Maxon Redshift With AMD Radeon GPU Rendering Support Now Available
Rosewill Blackhawk Mid-Tower Chassis Review
In our first-ever look at a Rosewill product, we’re taking the company’s Blackhawk mid-tower chassis for a spin. It offers similar design cues to another mega-popular chassis and adds in a couple of new features to help set itself apart, so let’s see if it manages to stand on its own and becomes worthy of your $100.
Page 3 – Installation & Testing
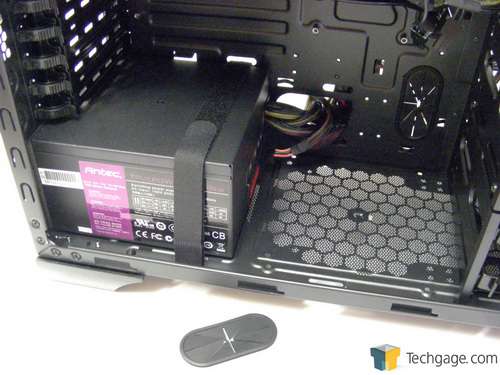
The motherboard installed without any problems and when it came time for the power supply, the unit slid into place nice and flush. However, the review sample was missing one of the foam pads that it would rest on.
There were also problems with running leads through the nearest opening in the motherboard tray – I could not keep that rubber grommet in place no matter how careful I was, likely due to the sharp angle that the leads needed to be run at. This put extra strain on the grommet and it pulled away from the motherboard tray. Even without cables run through the opening I couldn’t get the grommet back on for some reason, so after 15 minutes of trying it was pulled from the system.
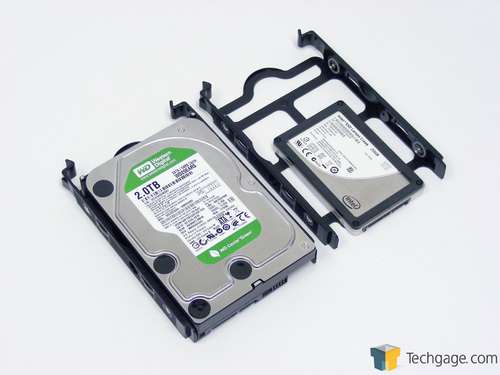
Hard drive installation was easy enough with 3.5″ drives simply snapping into the tray and held in place by metal pegs surrounded by rubber to help absorb vibrations. A 2.5″ drive used for demonstration was installed using four of the included screws to secure it from the bottom.
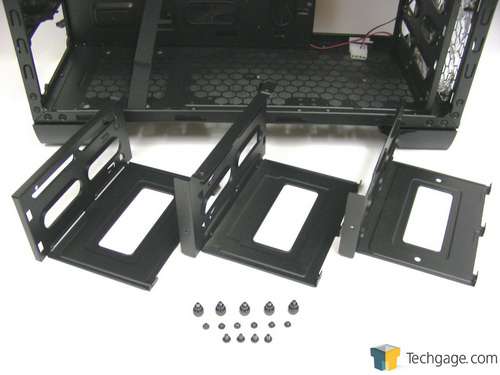
To ensure nothing is overlooked during a case review I always test out each feature, even if it isn’t required during the build process. One such feature is the sectioned hard drive cage. To remove all sections there are the two thumbscrews on the bottom of the case and three more behind the motherboard tray. On the left side of the drive cage are four standard screws holding the top two sections in place along with another six that need to be removed from the front through small openings in the frame of the case and are only accessible with the front panel off.
This is far too inconvenient for those who regularly switch their configuration and far too intricate for those who may not have a steady hand or at least a screw driver with a magnetic tip. Putting the screws back in through the small openings was a pain as well when the frame obstructed my view. If you didn’t like the game Operation, you won’t like this any better.
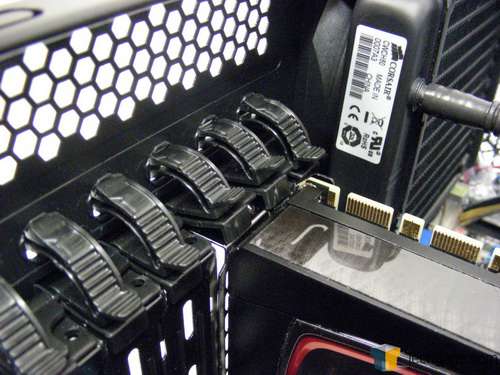
Expansion cards such as GPUs, soundcards or network cards are all intended to be held in place by using the plastic retention mechanisms. Each is opened by pushing in on the rounded area until it clicks. It can then be swung open and closed up when the card is in place. That’s how it should work, but not how it actually works.
As you can see, it simply cannot engage and lock anything in place because it does not have the clearance thanks to the plastic shroud over the GPU heatsink. This is not a new design on GPUs so this should have been caught during the design phase. It’s best to go old school with some trusty screws if cards do not lock into place.
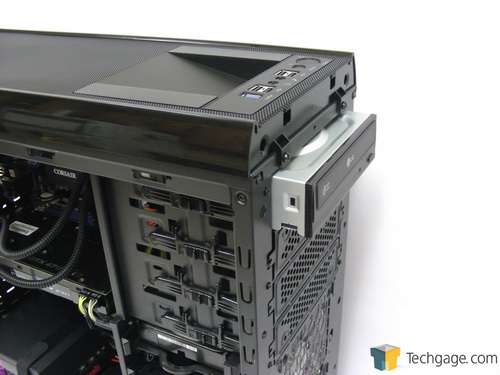
The optical drive installed without issue as well although it felt pretty tight. I could not tell if it was because of the bay itself or if the drive was contacting the wires that hang down ever so slightly from the top panel. Pulling back on the latch and lifting up disengaged the locking pins and once the drive was in place it swung back down and pushed forward to lock it in. There is absolutely no forward to back movement once the bay is locked.
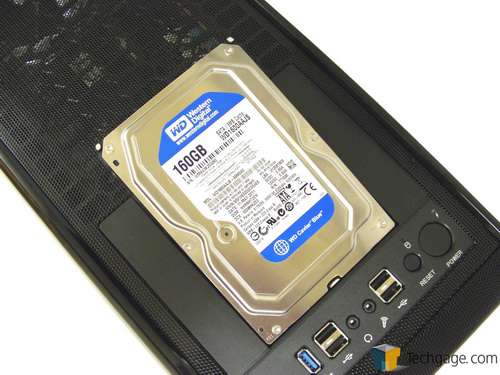
There were no issues with the hot swap bay on top as it picked up the drive instantly. Slide it in and slide it out. There’s nothing difficult about that. I like the fact that the drive sat secure but not to the point where excessive pulling force was needed to remove it. For some reason, making fast, jerky movements with a mechanical hard drive just doesn’t appeal to me.
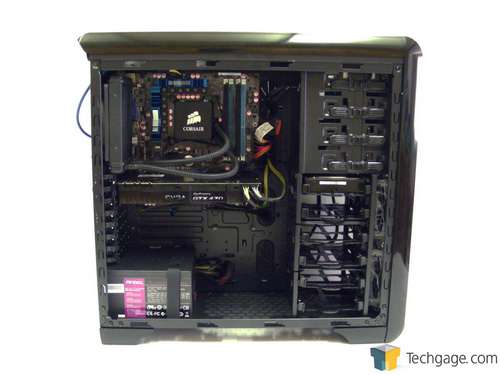
With all of the components installed, users will end up with something that hopefully looks like this. All cables were long enough to reach the intended connectors and there were no other issues to speak of until it came time for cable management on the back side of the motherboard tray.
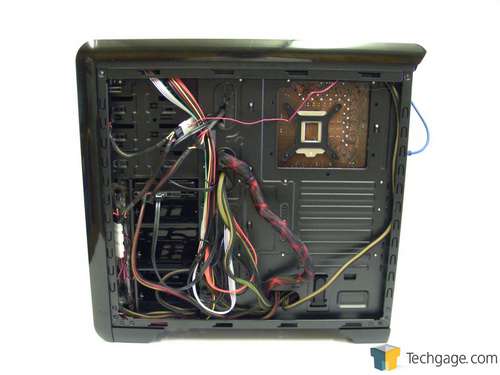
Here the Blackhawk threw a curve ball due to the limited space available. Most power leads can be hidden behind the hard drive cage but it was actually the 24-pin power connector that caused the problem in our build. The lead itself is so thick that it made for a very tight fit when the right panel was put on. After a few attempts, it did finally go on, but I don’t think I’ve ever seen a panel bow outward as much as this one did.
Testing
All of our testing is performed in a near steady 20°C ambient environment with readings taken before and after with a standard room thermometer. AIDA64 Extreme Engineer is used for monitoring and recording all system temperatures throughout the testing process.
Windows is allowed to sit idle for 10 minutes after startup to ensure all services are loaded before recording the idle CPU and GPU temperatures. CPU load temperatures are generated by performing a 20 minute run of OCCT LINPACK using 90% of the available memory, while GPU load temperatures are generated by OCCT’s built in test, also for 20 minutes.
Stock CPU settings were obtained by setting the AI Tweaker option with the BIOS to Auto and the maximum stable overclock frequency of 4.0GHz was obtained after extensive testing to ensure stability. The final clocks for the GPU are 760MHz on the core and 1000MHz QDR (4000MHz relative) for the memory with the voltage increased to 1.087V using MSI’s Afterburner overclocking utility. As with the CPU overclock, testing was done prior to ensure full stability.
The components used for testing are:
|
Component
|
Techgage Test System
|
| Processor |
Intel Core i5-661 – Dual-Core (3.33GHz)
|
| Motherboard |
ASUS P7H55D-M EVO mATX – H55-based
|
| Memory |
Corsair Dominator 2x2GB DDR3-1600 7-8-7-20-2T
|
| Graphics |
EVGA GeForce GTX 470
|
| Audio |
On-Board Audio
|
| Storage |
Western Digital 2TB Green
|
| Power Supply |
Antec TP-750 Blue
|
| Chassis |
Corsair Obsidian 650D Mid-Tower
Corsair SE White 600T NZXT H2 Rosewill Blackhawk Sentey Arvina SilverStone Raven 03 Thermaltake Level 10 GT |
| CPU Cooling |
Corsair H60 (Exhaust Configuration)
|
| Et cetera |
Windows 7 Ultimate 64-bit
|
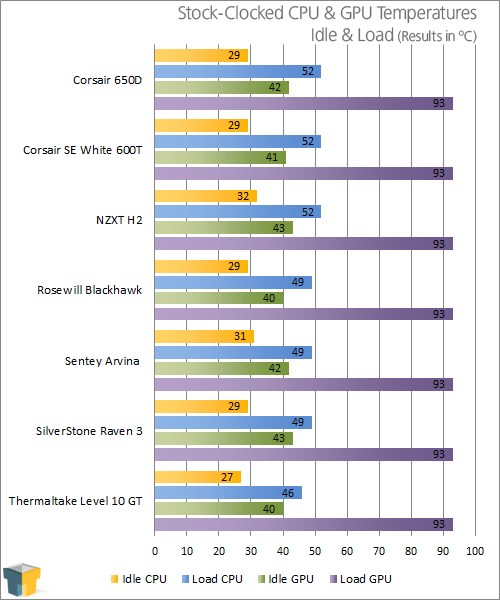
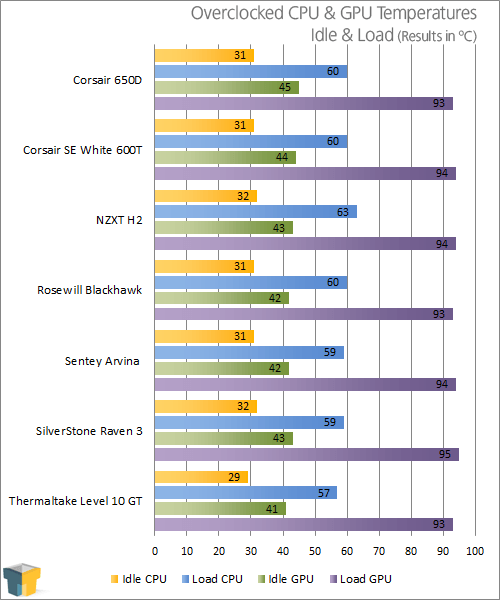
Luckily, the shortcomings of the Blackhawk are offset by the thermal performance. At stock it turns in numbers better than most with the exception of the Level 10 GT, but it does manage to hold its own when it comes to the GPU. When overclocked, the numbers are in line with the rest of the group with the exception again being the Thermaltake case.
When it comes to noise I found it to be a little on the loud side. Without sound measuring equipment I cannot give a quantifiable number but it seems to be the loudest case of the bunch, making slightly more noise than the Corsair 600T that may or may not have had a bad top fan. I felt no vibration through the case so I don’t believe that is the cause for the extra noise and will simply chalk this one up to the fans. It’s not intrusive by any stretch of the imagination but it certainly isn’t whisper quiet.
Overall this was a typical build with some twists and turns and finished off with a fairly happy ending thanks to the thermal performance. Next up is the thrilling conclusion to our story.
Support our efforts! With ad revenue at an all-time low for written websites, we're relying more than ever on reader support to help us continue putting so much effort into this type of content. You can support us by becoming a Patron, or by using our Amazon shopping affiliate links listed through our articles. Thanks for your support!


