- Qualcomm Launches Snapdragon 4 Gen 2 Mobile Platform
- AMD Launches Ryzen PRO 7000 Series Mobile & Desktop Platform
- Intel Launches Sleek Single-Slot Arc Pro A60 Workstation Graphics Card
- NVIDIA Announces Latest Ada Lovelace Additions: GeForce RTX 4060 Ti & RTX 4060
- Maxon Redshift With AMD Radeon GPU Rendering Support Now Available
Running Sega Dreamcast Games on Your PC with nullDC

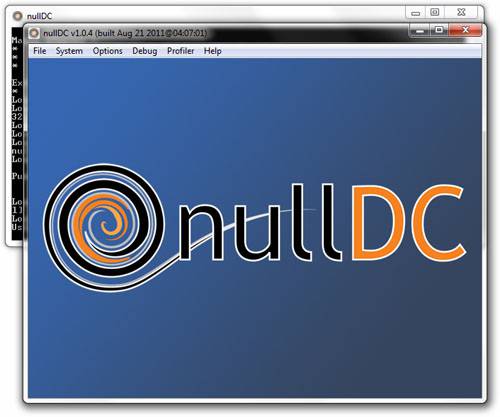
Want to play your Sega Dreamcast games but don’t want to haul the console out of the closet? You’re in luck, because there exists an outstanding emulator that I recently became addicted to: nullDC. This article covers all you need to know about it, including how to get started. So what are you waiting for? SoulCalibur is waiting.
Page 1 – Introduction
As a gamer, one of the worst experiences is finding out that your favorite console is reaching its end-of-life stage. Yet, it’s inevitable. Also inevitable is the fact that fans will create an emulator to make sure that the platform never dies. Luckily, pretty-well every console prior to and including the Sega Dreamcast have stellar emulator options available. That = a lot of gaming potential.
Nearly five years ago, I wrote a how-to entitled “Game Emulation in Linux“, which as the title implies, talked about getting various emulators working under the OS along with a gamepad. At the end, I stated, “The only other system I really wanted to see an emulator for, but didn’t, was the Sega Dreamcast. I guess we can’t have it all!” This sentiment was directed at Linux, but the truth was that the options were ultra-limited for Windows as well.
As it’s been a while since I last gave any Dreamcast emulator a test, I decided to once again seek out the available options and see how they fared. To my surprise, I found two popular choices: DEMUL and nullDC. For various reasons, I didn’t have luck with DEMUL at all, after a couple of nights of testing. nullDC on the other hand, I had working no problem, so that’s the focus of this article. Unfortunately for Linux and OS X users, neither of these emulators are designed for either OS – though Wine might be an option on the Linux side.
What Makes nullDC Great
It’s open-source. Want to contribute? You can!
The most important factor that sets an emulator apart from the rest is how well it works. In the case of nullDC, my overall experience has been amazing – much better than I anticipated. In all of the games I tested with nullDC (about 80), each one that worked delivered the same audio I’d expect to get from the console, and for the most part, the same could be said about the graphics. There are occasions where texture glitches occur or fonts may not render ideally through the emulator as they would on the console, but so far I haven’t encountered any problem too notable.
You might have noticed that I mentioned “each one that worked” above, and that’s because not all games are going to work with nullDC. The limiting factor is WinCE. If a game happens to use it, then it will not work in nullDC. It’s worth noting that DEMUL does support WinCE, so that is one thing that does set the two emulators apart. Select games that run on WinCE and subsequently won’t operate in nullDC are Resident Evil 2, Armada, 4×4 Evolution, Matt Hoffman’s Pro BMX, POD SpeedZone and Ducati World.
If you’re familiar with emulators, chances are you know how tedious it can be to find the right plugin for each module of a console, such as graphics, audio, gamepad and so forth. This is one area where nullDC shines (or doesn’t, depending on your view), as it pre-bundles all of the plugins right inside of the main package. That means that you’ll be able to get going fairly quickly without having to hunt down different plugins from a bunch of different websites. The downside, however, is that if one plugin doesn’t really agree with you, then you are somewhat out of luck. I’ve been unsuccessful in trying to find alternate plugins for nullDC.
Setting it Up
nullDC doesn’t have much of an official website, but rather is hosted via Google’s ‘code’ project hosting here. You’ll want to download the non-NAOMI version of the emulator, and then extract it. There’s no installer for this emulator, so wherever you extract it is where it will run from.
Like most emulators, nullDC requires a BIOS to operate, and adding to the similarity, it’s the one thing that doesn’t come included with the program. The reason for this is that the developers don’t want to risk angering Sega’s lawyers, and I don’t blame them. A quick Google search for ‘nullDC BIOS’ will yield quick results, or for a safe download I recommend grabbing it here. You will need to place the BIOS and other files in the archive into the ‘data’ folder within the nullDC folder.
Once that’s done, nullDC should load up without a hitch. If it complains about not being able to find the BIOS, double-check that it was extracted to the proper folder (‘data’) and also that its naming scheme is appropriate (‘dc_boot.bin’).
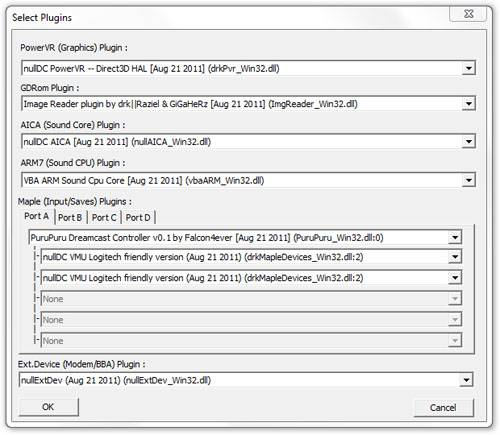
Your first stop should be Options > Select Plugins. The first four options can be left alone; it’s the “Maple” section that’s to be tackled. Maple is the plugin for gamepads, VMUs and other things. For some reason, I couldn’t get my Xbox 360 gamepad to work with the default plugin here, so I changed it to “PuruPuru Dreamcast Controller”. For extra save space, I added a second VMU to the first gamepad, and then two more to my nonexistent second gamepad.
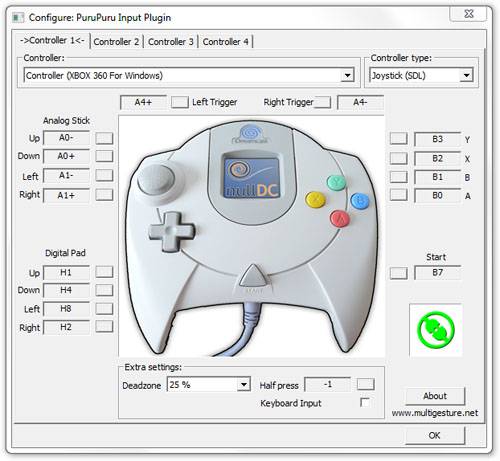
At this point, there’s just one more important thing to take care of: gamepad configuration. To handle this, you need to go to Options > Maple > Port A > and then use the configuration tool for whichever plugin you’re using. Here’s the configuration screen for PuruPuru and also how I have my Xbox 360 gamepad setup for it:
With gamepad configuration dealt with, you’re effectively done and ready to go. You might however want to spend a couple of minutes looking through the various tweaks in the Options menu, such as changing the default region or altering some of the graphics modes. Two options I personally enable are Per Triangle under the Sort section in the PowerVR menu, and also Extra Geom under the Aspect Ratio section in the same menu. The latter option helps reveal more of the game on each side, effectively making 4:3 games run with a widescreen ratio. This is not done by stretching, but rather revealing the extra area that the console itself would crop out. You will see some garbage on the sides on occasion, but the widescreen effect once in a game that supports it is generally worth it.
nullDC has the tendency to crash on occasion, so once all of your configuration tasks are handled, I’d recommend closing down the program and reopening it before loading up a DC game, just in case.
Support our efforts! With ad revenue at an all-time low for written websites, we're relying more than ever on reader support to help us continue putting so much effort into this type of content. You can support us by becoming a Patron, or by using our Amazon shopping affiliate links listed through our articles. Thanks for your support!


