- Qualcomm Launches Snapdragon 4 Gen 2 Mobile Platform
- AMD Launches Ryzen PRO 7000 Series Mobile & Desktop Platform
- Intel Launches Sleek Single-Slot Arc Pro A60 Workstation Graphics Card
- NVIDIA Announces Latest Ada Lovelace Additions: GeForce RTX 4060 Ti & RTX 4060
- Maxon Redshift With AMD Radeon GPU Rendering Support Now Available
Social & RSS Feeds
Latest Videos


Latest News
Saitek Cyborg Command Unit
by Nate Marion on April 10, 2008 in Peripherals
Hardcore gamer? Have a need to create insane macros to get the job done? Saitek’s “Cyborg” Command Unit delivers! Although the hardware itself leaves a bit to be desired, the included software offers the ability to create numerous long macros to help you get the job done.
Page 2 – Installation and Software
Getting the software installed is as simple as clicking a mouse. Here you can see the basic driver menus. The main driver tab allows the user to test the joystick and buttons, and indicates the position of the three-position switch by highlighting the switch icon appropriately.
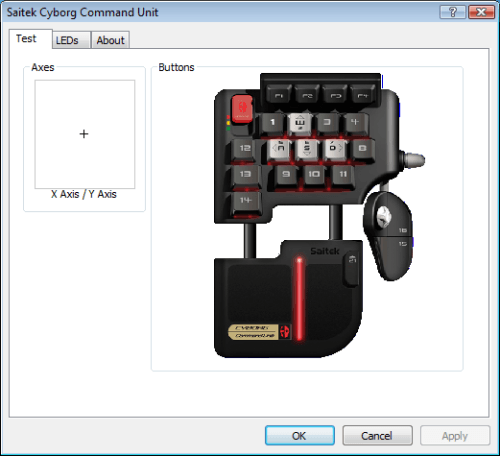
The crosshair moves when the joystick is used, and each button is highlighted red when pressed. In the screenshot above, you can see that there is no limit to the number of simultaneous operations – literally all of the buttons can be pressed at the same time while moving the joystick without having any commands dropped. On top of that, the PC still responded to Ctrl+Alt+PrtScr – pardon me while I untangle myself.
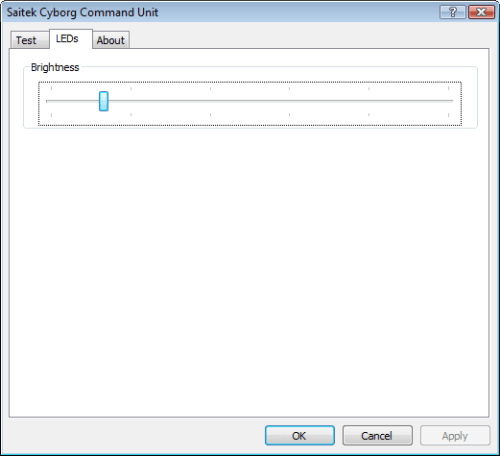
The next tab allows users to adjust the brightness of the LEDs. The position pictured is the third tick on a scale of 16; anything less than this turns off the LEDs entirely. This is definitely a nice feature, but again I have to note that the red line on the palm rest cannot be turned off this way.
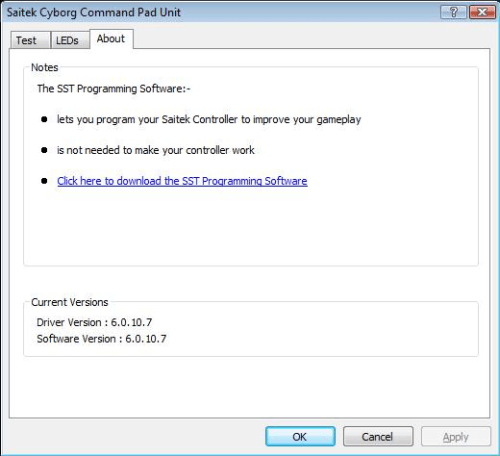
The last tab lists the driver version and gives a link to download Saitek’s SST software, which I’ll cover next.
Overall, the basic driver is basically useless except for controlling LED brightness. However, it must be installed and running in order for the Command Unit to function, and the Vista [64-bit] version runs in the background and uses about 1876Kb of memory on my machine.
The SST programming software, on the other hand, is where the Cyborg Command Unit really shines. This piece of software requires 2624Kb of system memory on my Vista [64-bit] machine, and delivers a plethora of programming options.

Yikes, what a menu – it almost makes me wish Saitek included an instruction booklet. Fortunately, general instructions for the Cyborg product line can be found here, and the SST manual can be found here.
Basically, this is showing the six different command sets currently loaded in this profile – three command sets can be accessed via the three-position switch on the Command Unit, the other three are referred to as ‘shiftstates’, and can be accessed by holding down the ‘SHIFT’ button (#21 by default) in each of the three switch positions.
This would mean that for each profile, up to 120 different commands can be programmed – 20 buttons excluding ‘SHIFT’, 6 profiles. However, users can create additional shiftstates with custom key combinations…

Increasing the number of programmable commands to roughly *head explodes*. If you’re wondering just how many more shiftstates can be stored in a single profile, I gave up at 13. With the ability to save and load as many profiles as you want on the host PC, there just isn’t any reason to remember (or have the possibility of remembering) 19 different shiftstates.
Now that we understand the limitless programming power at our disposal, we’ll look at just what kind of macros can be programmed.

I just typed this entire sentence by pressing a single key on the Command Unit. Yup, it’s that crazy. Even mouse buttons can be used in these macros – all five of my mouse buttons were detected, and scroll up/down can be inserted via a right-click menu.
All that’s required to program a macro is to click on the target button and start pressing keys. In order to record mouse buttons, there’s a little red ‘record’ button that must be pressed (I can’t get a screenshot of it because it can only be pressed when buttons are being programmed).
Once a macro has been recorded, the timing can be adjusted by right clicking and selecting either specific commands or the entire macro. Delays can then be set as the user sees fit, however I’ve found that in practice these delays must be very small (about 0.01 seconds or less) and the key must be held down until the macro completes or the macro may get cut short.
I’ve found that an easier way to control timing is by using the advanced command menu, opened via a right-click menu.
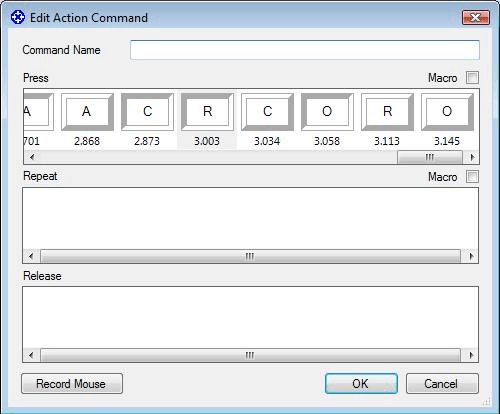
Here, users can program what happens when a button is pressed and released, and can even program a macro that repeats itself as long as the button is held down. Furthermore, timestamps are shown here, making it much easier to keep track of timing. Advanced commands do not get cut off when the button is released unless they are repeating.
As for the joystick, it can be programmed in several ways.

For all intents and purposes, ‘Ministick’ refers to the X-axis, while ‘Y Axis’ obviously refers to the Y Axis. In general I believe that the most useful configurations would be either the one shown in FPS (Green) – where the ministick essentially replaces WASD (and allows for diagonal movement properly) or the one shown in FPS + Shift (Green), where the ministick acts as the mouse, with adjustable sensitivity. Other uses might include flicking the ministick to knife, throw a grenade, cycle weapons up/down, etc.
I have to say that I’m very impressed with the programming-ability of the Cyborg Command Unit, and have no doubt that it will please even the most demanding macro programmers out there. While the programming techniques might require a bit of experimentation, the results are very worth it.
|
|

Support our efforts! With ad revenue at an all-time low for written websites, we're relying more than ever on reader support to help us continue putting so much effort into this type of content. You can support us by becoming a Patron, or by using our Amazon shopping affiliate links listed through our articles. Thanks for your support!