- Qualcomm Launches Snapdragon 4 Gen 2 Mobile Platform
- AMD Launches Ryzen PRO 7000 Series Mobile & Desktop Platform
- Intel Launches Sleek Single-Slot Arc Pro A60 Workstation Graphics Card
- NVIDIA Announces Latest Ada Lovelace Additions: GeForce RTX 4060 Ti & RTX 4060
- Maxon Redshift With AMD Radeon GPU Rendering Support Now Available
Techgage’s Testing Methodologies

Are you curious about how we handle all of the testing in our labs? Well, good news… this is the article you’re looking for. While still a work-in-progress, we so far explain how we go about installing Windows Vista, and also delve into how we benchmark for our graphics card content. In the future, all of our methodologies will be found here, in great detail.
Page 3 – Graphics: Games List Pt. 2
F.E.A.R. 2: Project Origin
Five out of the seven current games we use for testing are either sequels, or titles in an established series. F.E.A.R. 2 is one of the former, following up on the very popular First Encounter Assault Recon, released in fall of 2005. This horror-based first-person shooter brought to the table fantastic graphics, ultra-smooth gameplay, the ability to blow massive chunks out of anything, and also a very fun multi-player mode.
Three-and-a-half years later, we saw the introduction of the game’s sequel, Project Origin. As we had hoped, this title improved on the original where gameplay and graphics were concerned, and it was a no-brainer to want to begin including it in our testing. The game is gorgeous, and there’s much destruction to be had (who doesn’t love blowing expensive vases to pieces?). The game is also rather heavily scripted, which aides in producing repeatable results in our benchmarking.
Manual Run-through: The level used for our testing here is the first in the game, about ten minutes in. The scene begins with a travel up an elevator, with a robust city landscape behind us. Our run-through begins with a quick look at this cityscape, and then we wait for the door to open, killing off two baddies as soon as we enter the room.
Heading towards the only door in the room, another enemy enters, so we finish him off and make our way outside. From here, we immediately have two more enemies to clear out, and with a few steps further, we have yet another two. The guy standing on the highest balcony conveniently has an oil-lamp sitting beside him, so we shoot at it to see some pretty flames.
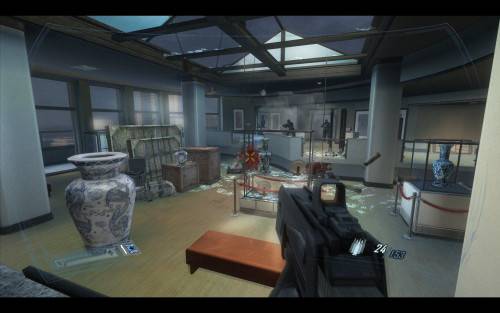
After all of the enemies here are cleared, we wait a few moments for our help to open the door, and then proceed through the linear level until we reach the point you see in the screenshot below. Here, we kill off every enemy in the room and make our way over towards the door on the other side. It’s when we reach that point that we stop recording our FPS.
Loading Test Level: The way F.E.A.R. 2 handles saved games requires a fair bit of patience, so take this as a warning. Because the game keeps just one save at a time, and auto-updates fairly frequently in the game, we have to overwrite our old save in between each run. To make this process easier on yourself, you should first backup your entire F.E.A.R. 2 profile folders (DocumentsWBGames) and store it elsewhere. Once done with our save, you should move it back.
Once you’ve backed up your personal F.E.A.R. 2 folder, download our saved game file and extract it to your desktop. You’ll see a file and the folder, the latter of which can be copied straight into your Documents folder. The other file is a batch file, which aides in the restoration of our saved game file each time a benchmarking run is complete. You’ll need to edit this file with Notepad and change the username to your own, or alter the paths entirely if you are using Windows XP. If the paths in this file match up, each time you double-click it, it will restore the saved game we use for testing.
Grand Theft Auto IV
If you look up the definition for “controversy”, Grand Theft Auto should be listed. If it’s not, then that should be a crime, because throughout GTA’s many titles, there’s been more of that than you can shake your fist at. At the series’ beginning, the games were rather simple, and didn’t stir up too much passion in certain opposers. But once GTA III and its successors came along, its developers enjoyed all the controversy that came their way, and why not? It helped spur incredible sales numbers.
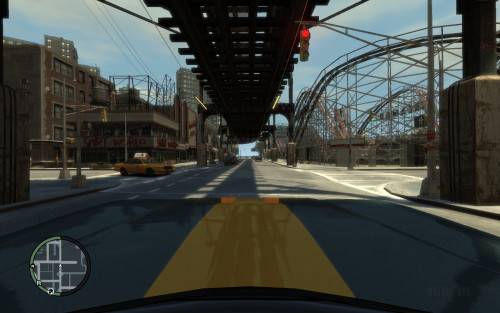
Grand Theft Auto IV is yet another continuation in the series, though it follows no storyline from the previous titles. Liberty City, loosely based off of New York City, is absolutely huge, with much to explore. This is so much so the case, that you could literally spend hours just wandering around, ignoring the game’s missions, if you wanted to. It also happens to be incredibly stressful on today’s computer hardware, similar to Crysis.
Manual Run-through: After the first minor mission is completed, you park your car outside an apartment building, then go in to sleep and save your game. This is where our benchmarking run begins. Once our saved game is loaded, we run through the door and back down the stairs, and through the next door to go outside. Wasting no time, we hop into our car, and hit the gas.
The majority of our run is performed from within this car. From the starting point, we drive to the end of the road and then hang a left, following this road until we meet a split to enter some raised roads. We take the right path, and then the left path when we are greeted by yet another split. We follow this until we have the option to continue on the road or go down the ramp, and do the latter.
At the bottom, we take a right turn and follow the road straight until the end. The road we turn up is, for the most part, straight ahead, but slightly on an angle, and is essentially an upwards hill. At the top of this hill, we continue along, avoiding all the cars in our way, ultimately reaching a slightly inclined road, and then jumping a set of downward roads to hit the bottom. We stop recording our FPS at this point.
Loading Test Level: F.E.A.R. 2 has a poor way of handling your saved games, but GTA IV isn’t any better. To fully create the required folders, you’ll have to enter the game and log into your Games for Windows Live account, and probably update the program. Once you have your account associated with the game, a folder will be created somewhere hidden on your computer.
In Windows Vista, the folder hierarchy will be similar to: C:UsersTechgageAppDataLocalRockstar GamesGTA IVsavegamesuser_eXXXXXXXXXX/. It’s inside that last folder that the saved game file will need to go. Download our saved game file. To avoid overwriting your own saved game files, simply change the number at the end of the filename, to have it sit at the very end of your list. For example, if you have saved games ranging from SGTA400 – SGTA409, name ours SGTA410. The saved game limit is 15, so if you have all 15 (SGTA414) already, you will need to backup one of your own saved games and name ours to replace it.
Race Driver: GRID
If you primarily play games on a console, your choices for quality racing games are plenty. On the PC, that’s not so much the case. While there are a good number, there aren’t enough for a given type of racing game, from sim, to arcade. So when Race Driver: GRID first saw its release, many gamers were excited, and for good reason. It’s not a sim in the truest sense of the word, but it’s certainly not arcade, either. It’s somewhere in between.
The game happens to be great fun, though, and similar to console games like Project Gotham Racing, you need a lot of skill to succeed at the game’s default difficulty level. And like most great racing games, GRID happens to look absolutely stellar, and each of the game’s locations look very similar to their real-world counterparts. All in all, no racing fan should ignore this one.
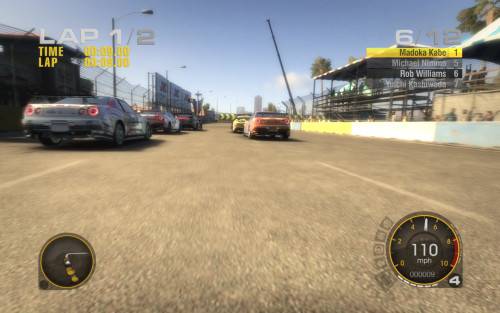
Manual Run-through: For our testing here, we choose the city where both Snoop Dogg and Sublime hit their fame, the LBC, also known as Long Beach City. We choose this level because it’s not overly difficult, and also because it’s simply nice to look at.
There’s not too much to say about how we proceed through the level, but it can be a little tedious at times. Off the line, our goal is to get to the front of the pack as quickly as possible, and to pull this off, the first turn in the race must be executed perfectly. It might seem counter-intuitive that we begin off in the middle of the pack (as shown below), but we do that because don’t want to avoid the car models and smoke entirely. As long as we can get to the front of the pack early in the race, we’re golden until the finish line.
The reason we choose to rid the cars as soon as possible is because if the models are in our frame for any good deal of the race, the end FPS result can vary far more than to our liking. We’re talking 5 – 10 FPS, or even higher depending on the resolution. If we do manage to rid the cars after the first or second turn, then our end result usually settles within 1 FPS… which is obviously much better.
Loading Test Level: As mentioned above, our level of choice is Long Beach. To access, enter the Race Day menu, and make sure the options chosen are as follows: Pro Tuned, Nissan Skyline GT-R Z-Tune, Long Beach, Classic Circuit, 2 and Kirby Motorsport. After accepting those choices, change the Grid Position to Middle.
World in Conflict: Soviet Assault
I admit that I’m not a huge fan of RTS titles, but World in Conflict intrigued me from the get go. After all, so many war-based games continue to follow the same story-lines we already know, and WiC was different. It counteracts the fall of the political and economic situation in the Soviet Union in the late 80’s, and instead provides a storyline that follows it as if the USSR had succeeded by proceeding with war in order to remain in power.
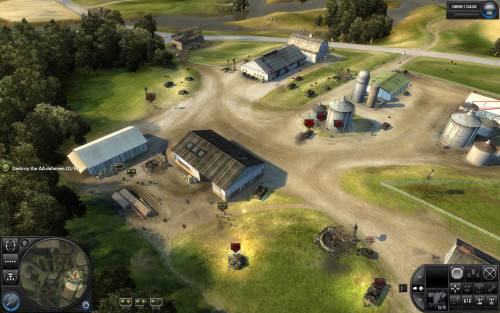
Many RTS games, with their advanced AI, tend to favor the CPU in order to deliver smooth gameplay, but WiC favors both the CPU and GPU, and the graphics prove it. Throughout the game’s missions, you’ll see gorgeous vistas and explore areas from deserts and snow-packed lands, to fields and cities. Overall, it’s a real visual treat for the eyes – especially since you’re able to zoom to the ground and see the action up-close.
Manual Run-through: The level we use for testing is the 7th campaign of the game, called Insurgents. Our saved game plants us towards the beginning of the mission with two squads of five, and two snipers. From the beginning, we take our entire squad and move them towards the center of the map to infiltrate the enemy.
There isn’t too much variation in our run here, as you’d expect for an RTS. What we do is basically hover the camera left to right while eyeing the action, taking any steps we need to keep our squad alive. Usually we’ll summon another squad once we’ve accrued enough points, and have them added to the battle. At one point, we zoom in on the action for about five seconds, and the run ends after the action dims down. The entire run takes between three and four minutes to run.
Loading Test Level: Download our saved game file and extract it to your desktop. Take the .WICSAVEGAME file inside the folder and copy it to the WIC saved games folder. On our machine, the path was DocumentsWorld in ConflictSavegames. To access, open the game and go to the Campaign menu. In the “Current Campaign” drop-down menu, “Deathspawner” will become available. Access it, then go to the saved games section up top, and load the “Techgage Benchmark” listed below.
Support our efforts! With ad revenue at an all-time low for written websites, we're relying more than ever on reader support to help us continue putting so much effort into this type of content. You can support us by becoming a Patron, or by using our Amazon shopping affiliate links listed through our articles. Thanks for your support!


