- Qualcomm Launches Snapdragon 4 Gen 2 Mobile Platform
- AMD Launches Ryzen PRO 7000 Series Mobile & Desktop Platform
- Intel Launches Sleek Single-Slot Arc Pro A60 Workstation Graphics Card
- NVIDIA Announces Latest Ada Lovelace Additions: GeForce RTX 4060 Ti & RTX 4060
- Maxon Redshift With AMD Radeon GPU Rendering Support Now Available
Social & RSS Feeds
Latest Videos


Latest News
Teratrend TS432U 4-bay RAID Enclosure Review
by Tom Roeder on July 14, 2014 in Storage
Unlike most NASes, RAID enclosures have as simple a featureset as possible. They’re designed to give you robust external storage potential, without breaking the bank. It’s been ages since we last took a look at a RAID enclosure, so to break that dry spell, we’re taking Teratrend’s TS432U for a spin. Let’s see how it fares.
Page 2 – Setup, Testing & Final Thoughts
There are many different ways that you could use this device for mass storage. As I said before, it all comes down to your needs, and as I have no way of knowing what your needs are, I will cover my personal use of the device.
Firstly, I don’t have 4 matching HDDs lying around, so I collected what I had and installed them into the enclosure. This is another accolade worth mentioning about a RAID enclosure – you do not need to have matching HDD’s. They do not need to match brand, size, or specs.
Firstly, I installed the accompanying software. Personally, I found the software to be a little “clunky” in appearance, but it did everything I wanted it to do, and did it well. You will not be spending much time in this software once you have everything setup to your liking.

Here you will see the first screen when you install your blank HDD’s. The software quickly identified all 4 of my drives, their make, model, capacity and current state. Since I recently formatted all of the drives before installing them, they are all showing as “Unreleased”.
The second icon down is the event log. We really haven’t done much yet, so there is no need to review the log at this time. The next icon down is for settings, the basic RAID configuration screen. Here you will need to select the RAID configuration that best suits your needs. My setup is a bit sloppy, not having four matching drives, but there are still several options to choose from.

You can choose from RAID 0, LARGE, 3, 5, or 10 – you also have the option to use the drive “Clone” feature at this time.
For my setup, I am choosing to utilize the LARGE option, which will lump all of my disks into one large drive. When I use this, I have absolutely no redundancy, meaning if I have one HDD fail, all my data stored on this array will be lost. For this reason, LARGE is not a great option if data protection from drive failure is important to you. This setup gives you the most “bang for your buck” as far as MB cost goes.
Once the TS432U has completed building the RAID array that you selected, you must then initialize the disk. Here I will show you how to do this in Windows 7 – you first must right-click on “My Computer”, then click on “Manage”. This will bring you into the “Computer Management” screen. From there, you will move your mouse to the left of the window, and almost to the bottom you will find the “Disk Management” icon under “Storage”. Click on this, and you should see a dialogue box telling you that you must initialize the new disk so that Disk Manager can access it. Note, in Windows 8 you can right-click your Start button to access Disk Management quicker.

If you are creating a volume larger than 2TB and you want it to show up as one physical drive with one partition, it is important that you select “GPT” (GUID Partition Table) as I have done here. If not, it will split the drive into 2TB or less partitions.
Once you have successfully completed the initialization of the drive (give yourself a pat on the back), you can now see that the drive is visible in “Computer Management” as one large physical drive, but we aren’t done here just yet. The drive is in one large chunk, but we must still tell the disk what type of volume we want it to be, and then format it.

Next you will need to right-click on the area that shows the drive’s size information, and then click on “New Simple Volume”. If you don’t see this when you right-click, make sure you have clicked on the longer portion to the right of the box that says “Disk xx Basic xxxxGB Online”.
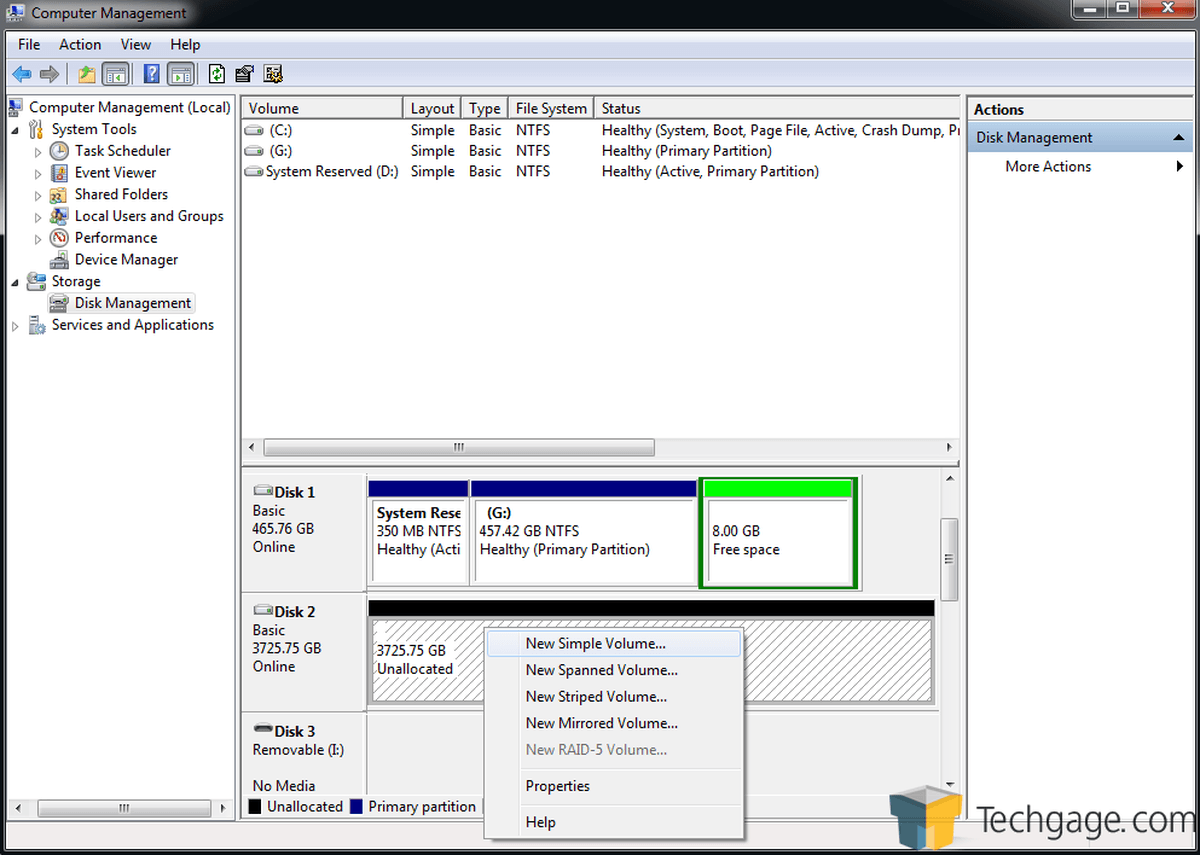
Click on “New Simple Volume” and the wizard will launch. Click on the “Next” button, which will bring you to the part where you can change the volume size. This should by default be very close to the array’s capacity, so if it is, just click next.

Here you can assign the drive the letter of your choice; here I am using the default “E”, but you can select whatever you want that’s available.

The next window will be giving you the choice to format the drive, and how to format the drive. You will want to make sure that NTFS is selected (it should be by default), use the default allocation unit size, name the volume if you want to, and select whether or not you want a quick format. The only real difference between a quick format and the long format, aside from time, is that the quick format will simply remove the data from the drive, while the long format will remove the data from the drive and scan it for bad sectors. Unless you have a lot of time to burn, or if you are not completely confident as to the health of the drives that you are using, go with the quick format.

Once the format is complete, you should get the “AutoPlay” dialogue box, asking you what you want to do with your fancy new drive. Now you can give yourself a big pat on the back, as you have successfully built your RAID array, and made Windows recognize it as one physical drive!
Now that we have our big shiny drive, how fast will it transfer? For this test, I used large files, stored locally and over my network. The speeds were consistent, at an impressive transfer rate of between 90-110 MB/s.

One thing that I don’t care for is that this device by default will spin the drives down after 5 minutes of inactivity. This is actually a smart feature, as it lowers your power consumption, which means less work on your drives, theoretically giving them a longer life. Personally, though, I hate lag, so if I want to access the drive, I do not want to wait for the drives to spin back up. This is just a preference thing; you may choose to change the amount of time of inactivity for the box to go to standby. To change this, you will need to go to the Teratrend software, under “Advanced Mode”, the icon on the bottom left will allow you to change the time value.

While we are looking in the “Advanced Mode” menu, let’s check out the other features as well. The top icon is the “Email Notification and Event Settings” – what this will do is email you if there is a problem with your array. If an HDD crashes, or if the raid fails and the drives get hot, among many other events, you can be notified.
The next icon down is the “Advanced Raid Configuration” – this gives you more control over the array, but it’s not something that most people will be frequenting. The third icon down is the “Firmware Information” – and this is exactly what it says. Here you can identify your firmware version, and update if needed.
Final Thoughts
Now, how you’re going to take advantage of the RAID setup the Teratrend TS432U helped you setup is up to you, but there are certainly a myriad of options. It is my opinion that no matter how you utilize your storage, you won’t be disappointed with having set it up with this Teratrend enclosure.

Overall, and after so much testing, I can call myself a big fan of the TS432U, and feel comfortable in awarding it an Editor’s Choice award. That being said, there are a couple of things that could be improved. The software, for instance, looks like it was developed in 1998. We really need to let this sort of rock-bottom UI design just die. A simple dialog box would have looked more attractive than this software. Further, rather than require users to configure their drives with Windows’ Disk Management, it would have been nice if after configuring your RAID with the software, it provided you an option to take care of the format right there.
Admittedly, the software won’t be used after the initial setup more than likely, so it’s almost unfair to gripe about it too much. Outside of the software, the TS432U hardware is very good. It’s built extremely well, and its fan is almost silent. This is the kind of build quality we’ve come to expect of SilverStone, which owns the Teratrend brand. Beyond that, the performance is good, but will vary depending on your drive configuration.
At about $200, the TS432U isn’t cheap, but given that it’s a 4-bay model, offers many different RAID configurations, is built very well, and performs just as well, I highly recommend it to anyone who needs a large external storage solution – or redundancy – but don’t need all of the features a NAS provides.

Teratrend TS432U 4-bay RAID Enclosure

Support our efforts! With ad revenue at an all-time low for written websites, we're relying more than ever on reader support to help us continue putting so much effort into this type of content. You can support us by becoming a Patron, or by using our Amazon shopping affiliate links listed through our articles. Thanks for your support!