- Qualcomm Launches Snapdragon 4 Gen 2 Mobile Platform
- AMD Launches Ryzen PRO 7000 Series Mobile & Desktop Platform
- Intel Launches Sleek Single-Slot Arc Pro A60 Workstation Graphics Card
- NVIDIA Announces Latest Ada Lovelace Additions: GeForce RTX 4060 Ti & RTX 4060
- Maxon Redshift With AMD Radeon GPU Rendering Support Now Available
Social & RSS Feeds
Latest Videos


Latest News
Test Driving Windows 11 Ahead Of Release On Your PC Or Virtual Machine
by Rob Williams on September 9, 2021 in Software
With Windows 11’s launch approaching soon, you may wish to give the OS a test-drive before deciding whether or not it’s worth committing to. In this article, we’re going to go over the many ways you can install Microsoft’s latest OS, either to a PC directly, or to a virtual machine.
If you happened to check out our recent visual tour of Windows 11, you may be finding yourself tempted to install the OS so that you can get a proper hands-on look. In this article, we’re going to explore how you could do this on a dedicated PC (not recommended for most people), or inside of a virtual machine (recommended for everyone).
Before we get started, there are a few things that you must be aware of before taking the testing plunge. If you plan to install Windows 11 to your own PC, or even a spare “test” PC, you must be willing to reinstall Windows 10 if you end up not liking the upgrade. While Windows 11 does allow you to downgrade to Windows 10 (we’ve been successful), these scenarios are finicky, so you can’t be surprised if they fail to work. Virtual machines are the best option for testing out Windows 11 without interfering with your own Windows install.

An important thing to be aware of is that Windows 11 has stricter system requirements than we’ve seen with previous releases. In an attempt to make its upcoming OS as modern as possible, especially on the security front, Microsoft requires PCs to support Trusted Platform Module (TPM) 2.0. You should be able to Google search your motherboard model to see if it has it, or check out the support page for your specific CPU vendor: AMD, Intel, or Qualcomm. Note that Microsoft admits Windows 11 should be installable to “unsupported” systems, but your mileage may vary.
Guide Index
1. First Things First: Deciding How To Test
2. Installing Windows 11 Via The Insider Preview Program
2a. Upgrade To Windows 11 With Windows Update
2b. Install Or Upgrade To Windows 11 With An Insider Preview ISO
3. Installing Or Upgrading Windows 11 Via UUP dump
4. Copying A Windows 11 ISO To Flash Drive
4a. Creating Bootable Flash Drive With Rufus
4b. Creating Bootable Flash Drive With diskpart
5. Testing Windows 11 Inside Of A Virtual Machine
First Things First: Deciding How To Test
You have a couple of options here, as mentioned above. You could install Windows 11 to a preexisting Windows 10 PC via the Insider Preview program, which would allow you to upgrade in-place. Or, if you don’t want to bother with registering for the Insider Preview, you could instead download a Windows 11 ISO and upgrade by running the setup from inside the image.
Again, we don’t recommend installing the Windows 11 preview to a standalone PC unless you’re an experienced user, and are willing to manually reinstall Windows 10 should anything go awry. An exception to this would be if you had a spare PC that you don’t mind using for experiments.
For most folks, we’d recommend installing Oracle VirtualBox or VMWare Workstation Player to run Windows 11 as a guest OS inside of your native OS. Considering the fact that Windows 11 demands a modern PC, chances are good that your PC could pull off virtual machine use without any issue.
Installing Windows 11 Via The Insider Preview Program
To install Windows 11 the official way, you will need to register for Microsoft’s Insider Preview program, which can be done at the Insider Preview homepage. Afterwards, you will be able to upgrade to Windows 11 from within your current Windows 10 install. Or, you could also download a clean ISO that you can install from directly, or flash to a thumb drive (or burn to DVD), or use to install Windows 11 inside of a virtual machine.
Upgrade To Windows 11 With Windows Update
To install directly from inside of a Windows 10 install, you will want to open the Settings app, and travel to Update & Security > Windows Insider Program to opt-in:
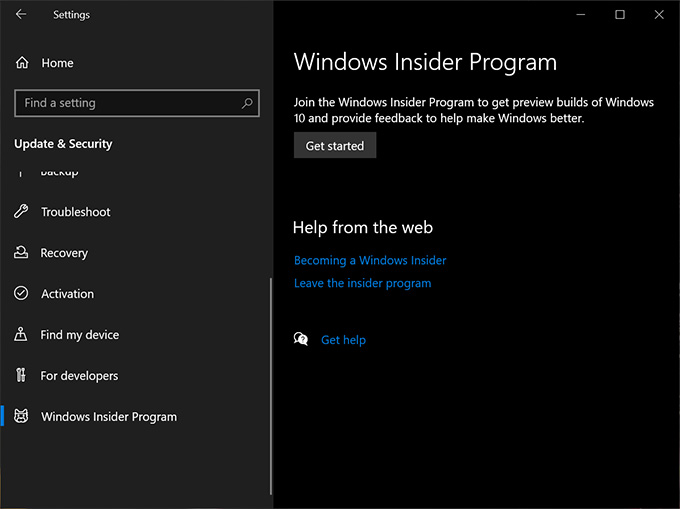
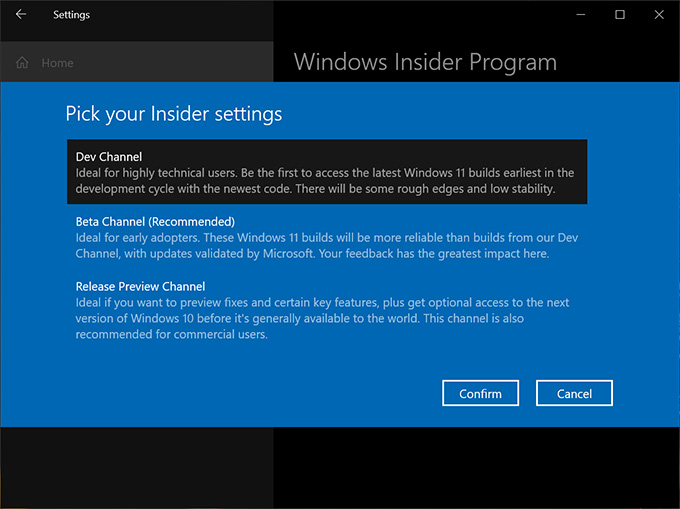
After clicking “Getting started”, you will need to verify your Microsoft account, and choose whether or not to use the Dev or Beta build. The Dev build is the most up-to-date, but also potentially the most buggy. You will note that only Dev and Beta will fetch Windows 11; the Release Preview sticks to Windows 10:
After choosing your path, you will need to reboot. The next time you load up Windows Update and click “Check for updates”, you’ll be able to see Windows 11 reflected:
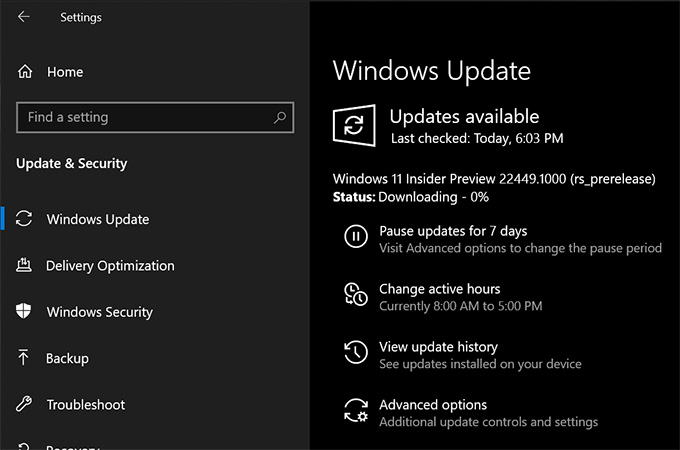
Allow Windows Update to do its thing, and before long, you’ll be inside of Windows 11.
Install Or Upgrade To Windows 11 With An Insider Preview ISO
If you’re going to go the ISO route, you can grab the latest available copy from the Insider Preview downloads page. When you scroll down that page, you will see a drop-down menu that will allow you to grab any one of the currently-available Insider ISOs:
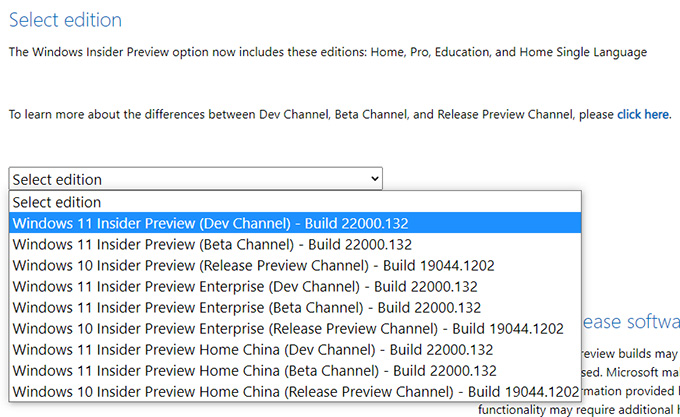
As of the time of writing, the Microsoft-provided ISO is actually a bit behind the latest build (22000.132 vs. 22449.1000). If you install the slightly-aged build from Microsoft directly, you’ll be able to upgrade to the latest build once the OS is installed. If you want to create media of your own of the latest build, check out the next section instead.
Installing Or Upgrading Windows 11 Via UUP dump
Because the ISOs Microsoft itself provides are not always representative of the most updated build (sometimes the Beta version lags behind the Dev version), website UUP dump can be used to fetch the latest bits, and then use integrated tools to build the ISO. After hitting the front page of the UUP site, you will see a current builds list like this:
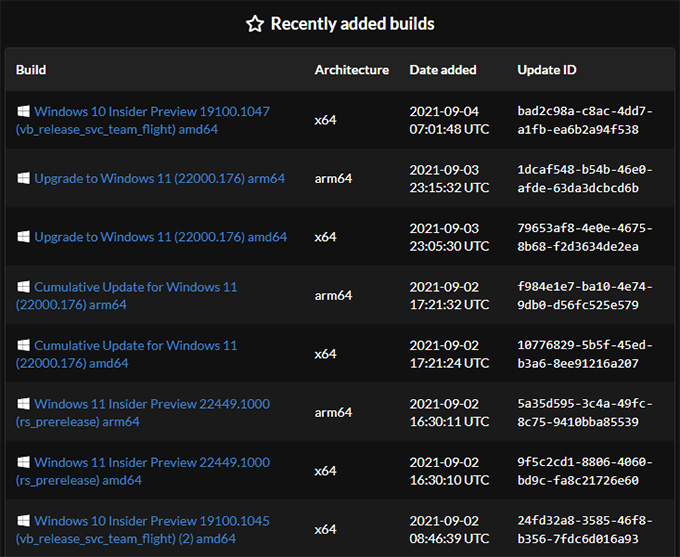
From here, you’ll want to find “Windows 11 Insider Preview” with the latest build number, something you can verify at the official Insiders Preview blog. Once you’ve found the correct entry, you’ll want to pay attention to the architecture provided. Don’t make the same mistake we did and accidentally download the Arm64 version when you meant to grab the x64, or else it won’t boot!
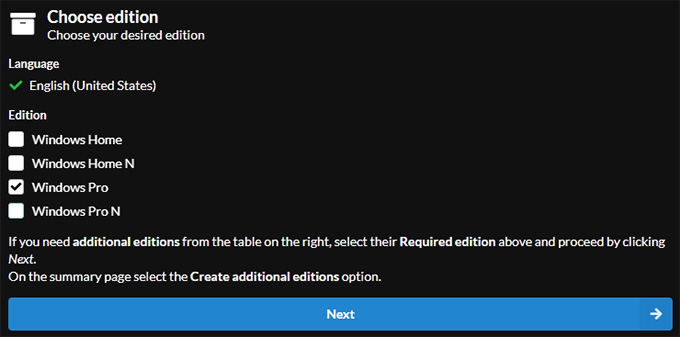
After clicking through to the correct version, you can simply click “Next” over and over until you reach the download; or, if you’re an experienced user, you can customize a few different settings. If you want your ISO to be as lightweight as possible, you’ll at least want to deselect the Windows editions you’re not going to be using. If you’re only going to use Windows 11 Pro, for example, your edition list should look like this:
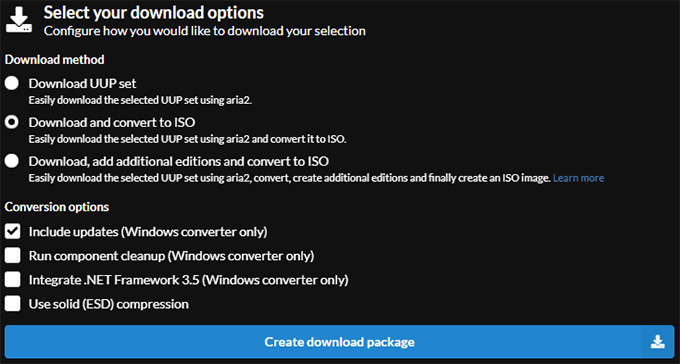
You’ll eventually reach a set of options that include additional tweaks you don’t likely need. To install via ISO as normal, make sure the “Download and convert to ISO” option is selected on the final screen, and then click “Create download package” to get things underway:
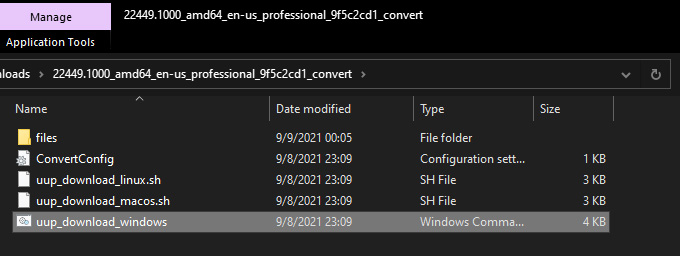
After the small zip archive is downloaded, you will want to extract it, and then open the resulting folder. If you’re running Linux or macOS, you can run the script via the command-line; in Windows, you can simply double-click the ‘uup_download_windows.cmd’, and wait a few moments for the script to fetch the required data, and build the ISO for you, all in one fell swoop:
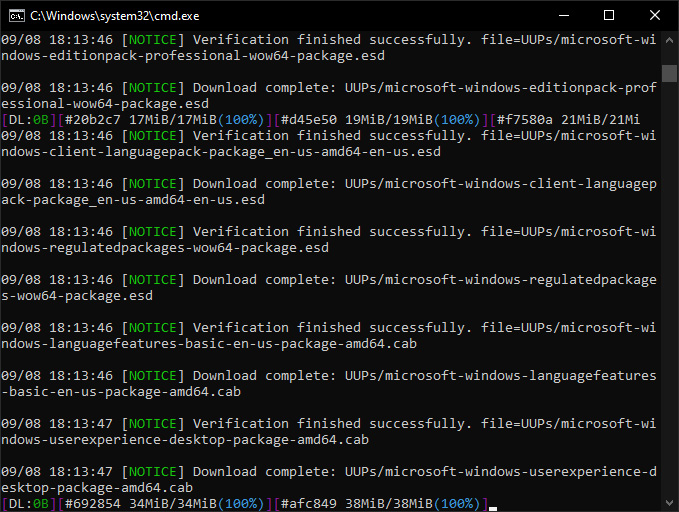
Once this process is completed, you’ll find the multi-gigabyte .ISO file inside of the same folder. You can now use this ISO to install the OS inside of a virtual machine, or flash to a thumb drive. You can also use it to upgrade to Windows 11 inside of Windows 10, even if you’re not part of the Insider Preview program.
Copying A Windows 11 ISO To Flash Drive
Creating Bootable Flash Drive With Rufus
One of the simplest ways to copy (or “flash”) any OS install .ISO to a thumb drive is with Rufus. You’ll of course need a USB thumb drive to get the process underway, one that you don’t mind losing all of your data on. Once your thumb drive is plugged in, you should see it at the top of Rufus, in the “Device” drop-down, like below:
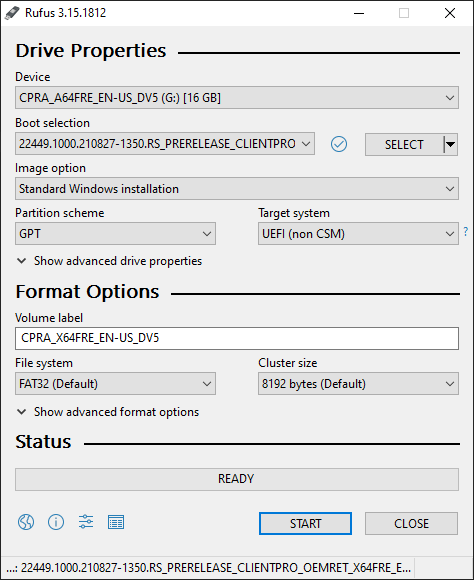
If you don’t see your drive reflected, you may just need to restart Rufus. You need to make absolute sure that the appropriate thumb drive is selected, in case the default is an unintended target. After verifying that, you need to click “Select” in the “Boot selection” area, and find and double-click your Windows 11 ISO. You’ll then see that ISO reflected by name in the “Boot selection” drop-down, as seen in the same shot.
Creating Bootable Flash Drive With diskpart
If Rufus doesn’t work for your drive (which seems unlikely), you could try using the diskpart tool built right into Windows instead. To access it, you must open command prompt as Administrator; the easiest way is to hit Start, search for cmd, and then right-click the application to tell it to open as Administrator.
With the open command prompt, you’ll want to type in diskpart and hit enter. You’ll then be brought to a different command line where you can manually format your thumb drive.
Here’s the entire process to reformat the flash drive:
list disk – shows available disks, look carefully for the one that looks like your flash drive
select disk # – change # to the disk (flash drive) you wish to use
clean – removes existing partitions
create partition primary
select partition 1
active
format fs=ntfs quick
assign
exit
When you run the list disk option, your thumb drive should stand out, as it will likely be the smallest drive in your system. If your thumb drive isn’t easily identifiable in this list, you should right-click the Start menu icon and open Disk Management. From inside there, you will be cross-compare the drive letter that’s been assigned to the drive (eg: G:\), and then see its respective disk # to the left. In our case, our G:\ thumb drive is disk 4:

After the drive is fully prepared, you can double-click your ISO to mount it. You then need to hit Ctrl + A to select all of the ISO’s files (as seen in the shot below), and then simply drag them to your newly-blanked flash drive:

Once the transfer is complete, you should right-click the drive in “This PC” (Win + E) to safely remove it, or do so by clicking the USB icon in the system tray. Booting up with this flash drive will allow you to install Windows 11.
Testing Windows 11 Inside Of A Virtual Machine
To test out Windows 11 in the safest manner possible – which, is to say, to not interfere with your current Windows install – you will want to use a virtual machine. We’d recommend downloading Oracle VirtualBox, as it’s free-to-use, and gets the job done. It’s also pretty easy to use and follow. While trying to use VirtualBox, if you receive any errors about lack of virtualization acceleration, you will want to make sure the feature is enabled in your BIOS/EFI. You may need to refer to your motherboard manual to see where the option is found. Google might be able to help with more specific errors.
Once VirtualBox is open, you’ll want to click the “New” icon, or hit Ctrl + N. You’ll then need to name your virtual machine, make sure the destination path is a-OK, and then make sure Microsoft Windows is the type chosen – either Windows 10 64-bit or Other Windows 64-bit can be selected:

On the next screen, you’ll need to choose the amount of memory (RAM) the virtual machine will have dedicated to it. We’d recommend 4096MB for the best performance, especially since that’s the minimum recommended amount by Microsoft (though you may be able to get away with less). If your PC doesn’t have much memory, you may need to close other open applications while using the VM.
As you continue through the options, you’ll want to 1) create a virtual hard disk, 2) use VDI format, 3) choose dynamically allocated storage, 4) change the disk size to at least 50GB, and finally, 5) click to “create” the VM. Once finished, you will be left with something like this:

From here, you’ll want to click the “Settings” icon, and navigate to the “Storage” tab on the left, and then click on the DVD-ROM icon in the newly-revised area. To load your Windows 11 ISO, you can click the small DVD-ROM icon on the right, and choose to load from file, and then locate and choose the correct one. You’ll be left with this:

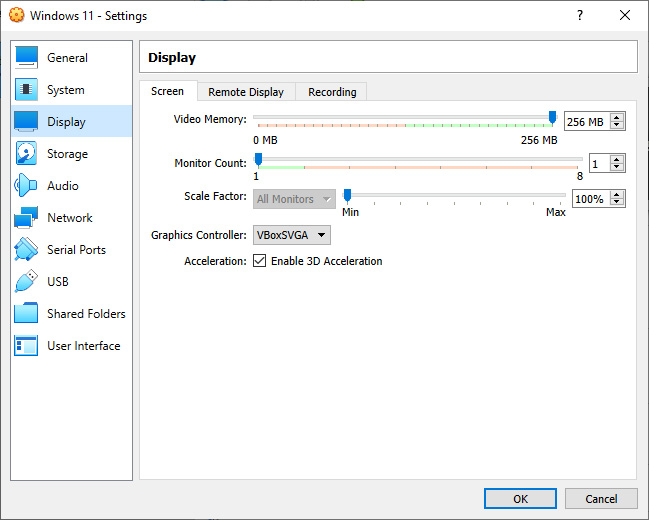
One last thing: The default video memory settings will not allow Windows 11 to install, so before exiting this configuration, you’ll want to click on the “Display” tab, choose VBoxSVGA for the adapter, enable 3D acceleration, and then drag the VRAM slider to its max value of 256MB. Once you click OK, you’ll be good to roll.
Now, you will be able to click the “Start” icon to boot into the Windows 11 installable media. Because your new virtual machine is in a fresh, completely blank state, the Windows media should boot right up. Otherwise, you may have to hit F12 after starting the VM to choose the fake DVD-ROM from the boot menu.
The Windows install process is pretty straight-forward, so we won’t cover the individual steps here. Because you’re installing to a virtual machine, you don’t need to fuss over anything going wrong, because it will only affect the virtual machine. When the setup gets you to clear the hard drive partitions, it won’t affect your real drive. If anything does go wrong (seemingly unlikely), you could just reboot the virtual machine and boot back into the ISO.
Once you’re finished installing, you should be greeted to a clean Windows 11 desktop:

By default, the “Guest Additions” package isn’t installed with a VM, so window frames in the Windows 11 VM won’t be curved like they should be. Once the OS has booted, you can click “Devices” in VirtualBox, and then “Insert Guest Additions CD image”. Once you do that, you can hit Win + E to open up the file explorer, double-click the new virtual DVD on the left side, and follow the on-screen instructions.

If you’re not satisfied with the default resolution options VirtualBox gives you, you can head to “File” > “Preferences” in the main VirtualBox window, and then head to “Display”. You can change the drop-down for “Maximum Guest Screen Size” to “None”, which will largely uncap the resolutions you can change to.

You can also choose “Hint”, and then manually type the maximum resolution in, but be warned, we haven’t been able to get a perfect 16:9 aspect ratio without having to go full-screen. It’s an odd issue, but sufficient enough for testing purposes.
Final Thoughts

Hopefully by now, you’re well on your way to getting Windows 11 running. If you end up hitting any issues, feel free to leave a comment below. It will be interesting to see all of the sorts of issues different people run into. As covered at the top, Windows 11 is a much different sort of release than we’re used to, especially with regards to requiring such modern hardware, and not to mention the overhauls under and over the hood – so who knows what new bugs people will bump into!
In any event, good luck in your testing!

Support our efforts! With ad revenue at an all-time low for written websites, we're relying more than ever on reader support to help us continue putting so much effort into this type of content. You can support us by becoming a Patron, or by using our Amazon shopping affiliate links listed through our articles. Thanks for your support!

Rob Williams
Rob founded Techgage in 2005 to be an 'Advocate of the consumer', focusing on fair reviews and keeping people apprised of news in the tech world. Catering to both enthusiasts and businesses alike; from desktop gaming to professional workstations, and all the supporting software.


