- Qualcomm Launches Snapdragon 4 Gen 2 Mobile Platform
- AMD Launches Ryzen PRO 7000 Series Mobile & Desktop Platform
- Intel Launches Sleek Single-Slot Arc Pro A60 Workstation Graphics Card
- NVIDIA Announces Latest Ada Lovelace Additions: GeForce RTX 4060 Ti & RTX 4060
- Maxon Redshift With AMD Radeon GPU Rendering Support Now Available
The Basics of Multi-Monitor Gaming

The world of multi-monitor gaming is a small but ever growing community of dedicated individuals who enjoy a rich and immersive game-play experience. Multi-monitor gaming can be a complicated transition, however, this how-to guide is here to help ensure you have as few problems when you decide to pass through the veil of multi-monitor gaming.
Page 1 – Introduction
Multi-monitor gaming began with external hardware solutions, it was a tremendously expensive and complicated mess but now it’s all at your finger tips with one video card, with usually little to no effort on your part, however, strange things can happen if you don’t like doing a lot of research.
This guide is meant to cover many of the surprises that might come up when you decide to join the world of multi-monitor gaming. I currently only have an NVIDIA rig that I can work with but this doesn’t mean that many of these facts will not also play true with an AMD setup either.
To begin, let’s get one thing clear and out of the way; not all of your favorite games (past or present) are going to support multi-monitor properly. The thought of this may sound unnerving but there are many games that do properly support multi-monitor, we even took a look at the benefits of multi-display gaming here at Techgage a few years ago, showing off how some of these games would look.
The community over at Widescreen Gaming Forum does an excellent job at giving you all the information you need to get your game running and what it would look like on your multi-monitor setup, this includes games that might not natively support multi-monitor as well. There are times when a game might need to be bent into shape to display the in-game information correctly. The WSGF community has done much to address the lack of support with such programs as Flawless Widescreen and Widescreen Fixer, but they are not always perfect because they change the game’s programming in memory, while it is running.
*DISCLAIMER* I have been running these programs since their inception and I have not been banned from a single game in multiplayer, be it games that use Steam’s VAC or proprietary anti-cheat technology such as Battle.net. This does not mean it will not happen to you, but I know many other users who have been using them since day one and they’ve not had a single ban either. This is because we only use one of these programs to correct whatever maybe wrong when using multi-monitor resolutions in multiplayer. We do not use any other third party programs to alter the game in any other way at the same time, and if you choose to do this it could lead to you being banned. Thus we take no responsibility for any problems that may arise with use of these programs.
Now that we have the most shocking bits of information out of the way, you’re going to have to decide what video card manufacturer you are going to buy, be it either AMD or NVIDIA. For the sake of simplicity and continuity I am going to reference the NVIDIA 680/670 and the AMD 7970 for rest of this guide. The AMD 7970 has a two different models out on the market; one unit has one DVI-I and the other unit has two DVI (one DVI-I and DVI-D) ports. I will reference the one with a single DVI-I port since it is the most common.
The simplest solution in my opinion would be to go with NVIDIA; not because it’s the only platform that I can personally talk about, but because they don’t require you to obtain an active DisplayPort adapter. If your monitor doesn’t have a DisplayPort (DP) or if your AMD video card does not come with one of those adapters in the package, it will set you back another $30 to $100 depending on your monitor’s resolution. I will talk about this resolution cost difference more in-depth a little later on when I specifically go over monitors.
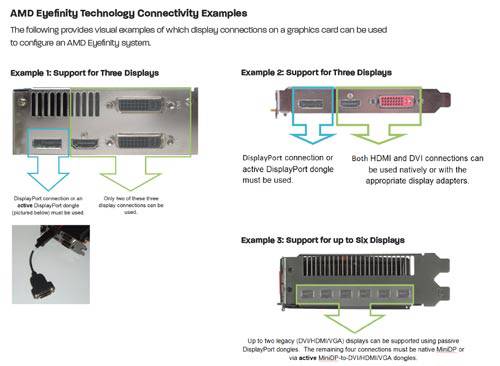
The 7970 can be setup a number of ways to drive your Eyefinity setup; it does require that you connect at least one your monitors to a DisplayPort connection and there is no way around it. Another reason that might cause your cost to go up is that the 7970 now uses Mini-DisplayPorts instead of the full size connection. Just like the active display adapter, some video cards may come with an adapter, but some do not. The configuration options are as follows:
- 1 DVI > 1 HDMI > 1 Mini-DisplayPort
- 1 DVI > 2 Mini-DisplayPort
- 1 HDMI > 2 Mini-DisplayPort
The following picture does not reflect how the back of your 7970 will look; this is from a generic how-to guide on AMD’s website.
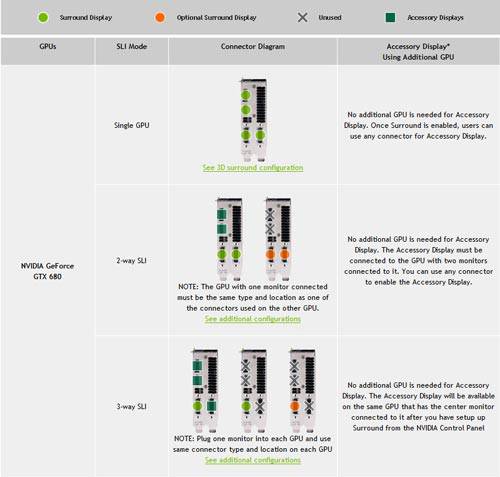
The NVIDIA GTX 680 and 670 are both configured the same exact way for Surround. The configuration options are as follows:
- 2 DVI > 1 HDMI
- 2 DVI > 1 DisplayPort
- 1 DVI > 1 HDMI > 1 DisplayPort
The DisplayPort adapter is required if your monitor doesn’t have a DisplayPort connection, but you DO NOT have to use DisplayPort to run Surround. The active DisplayPort will still cost between $30 to $100, again I will cover this when I specifically go over monitors. When running Surround in SLI the DisplayPort and HDMI ports are no longer used for Surround, now all of your monitors will be connected to the multiple DVI ports and those connections will vary if you run 2 way or 3 way SLI.
At this point I would like to encourage you to keep all of your connections to your monitors the same, thus I recommend you buy a cheap HDMI to DVI adapter for both of these multi-monitor solutions. Now, a question you might ask is, “Why don’t I just use HDMI if my monitor supports it and not spend more money on another adapter?” The answer is simple; there are certain monitors out there that allow you to access all of its features via DVI or DisplayPort, but not HDMI. Making these changes on your monitors is recommend, rather than using your video card’s software; any changes you make with your video card’s software might not be saved when you update your drivers. This is more about convince than anything else.
Personally, I would prefer to spend $10 and not worry about the hassle at a future date. If you choose to run SLI, you then do not have to worry about this adapter because DVI is required for Surround in SLI mode.
Support our efforts! With ad revenue at an all-time low for written websites, we're relying more than ever on reader support to help us continue putting so much effort into this type of content. You can support us by becoming a Patron, or by using our Amazon shopping affiliate links listed through our articles. Thanks for your support!


