- Qualcomm Launches Snapdragon 4 Gen 2 Mobile Platform
- AMD Launches Ryzen PRO 7000 Series Mobile & Desktop Platform
- Intel Launches Sleek Single-Slot Arc Pro A60 Workstation Graphics Card
- NVIDIA Announces Latest Ada Lovelace Additions: GeForce RTX 4060 Ti & RTX 4060
- Maxon Redshift With AMD Radeon GPU Rendering Support Now Available
Social & RSS Feeds
Latest Videos


Latest News
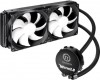
Thermaltake WATER3.0 Extreme Liquid CPU Cooler Review
by Rob Williams on August 23, 2013 in Cooling
Need big cooling performance behind that big CPU? That’s exactly what Thermaltake’s WATER3.0 Extreme has been designed for. Featuring a double-length radiator design and strapped with two 120mm high CFM fans, the Extreme is preparing itself for a good fight, whether it’s against an overclocked quad-core, or brawny six-core.
Page 2 – Installation, Testing & Final Thoughts
I’ll try my best to explain the installation process here, and hopefully portray what sort of simple experience it really is. The install process does require you to study the included install sheet, however, to know which parts you need for which socket-type. If you find it a little hard to make out some of the pieces on the included sheet, I’d recommend downloading a PDF version from the support site as it allows you to zoom in without quality loss.
The easiest platforms to install the Extreme on are Intel’s highest-end, as the base is pre-installed on the motherboard. For mainstream platforms, a base will need to be placed underneath the motherboard – possibly requiring you to remove it from the chassis if you can’t easily get behind it. This base will require four small silver inserts which will accept the screws on the other side.
Dealing with the radiator and fans is an absolute breeze – I was rather impressed. You first install the fans on the rad in the orientation required, securing them completely. Then you place the back of the radiator against the part of your chassis that accepts it, and then secure it. You’re nearly done at this point.
After constructing the ring that will secure the pump to your socket, and then clip the large O-ring underneath the finished product, you’ll secure the pump to the socket. If this is the first cooler like this you’ve installed, it might take a few minutes to figure everything out, but it really is quite simple overall. With everything in place and secured, you can connect the two fans to the pump, and then the pump to an available 3-pin fan header.
Behold, my installation:

The biggest downside to a cooler like this is that it will result in extra cables dangling in front of it, as seen in the above shot. I admit that I’m not too fond of this, but it can’t be helped. The biggest hassle is having to maneuver around them when replacing the GPU, but admittedly that is a problem few people have to deal with. I think the end-result looks quite good.
Also in the picture, and at the bottom of the board, you can see the unit’s USB 2.0 connector plugged-in (blue port, half cut-off in the photo). I have this running through to the right of the motherboard, around back and up through the bottom, to help keep the visible wires to a minimum as much as possible.
With that all taken care of, let’s get to testing. But not without an obligatory specs table first, of course:
| Intel LGA2011 Test System | |
| Processors | Intel Core i7-3970X – Six-Core, 3.50GHz |
| Motherboard | ASUS P9X79-E WS (1003 BIOS) |
| Memory | Kingston HyperX Beast 4x8GB – DDR3-2133 11-12-11-31 |
| Graphics | NVIDIA GeForce GTX 770 (GeForce 326.80 Driver) |
| Audio | Onboard |
| Storage | Kingston HyperX 240GB SSD |
| Power Supply | Cooler Master Silent Pro Hybrid 1300W |
| Chassis | CM Storm Trooper Full-Tower |
| Cooling | Thermaltake WATER3.0 EXTREME Liquid Cooler |
| Et cetera | Windows 7 Professional 64-bit |
With the included software, I recorded the temperatures at idle and load with the “Custom”, “Silent” and “Extreme” fan presets. Idle temperatures were recorded 10 minutes after system boot (in an ambient environment of around 24°C), while load was recorded 10 minutes into a high-quality video encode (using CyberLink MediaEspresso > Best Quality).
Idle Temperatures
) Idle – “Silent” |
) Idle – “Custom” |
) Idle – “Extreme” |
|
Overall, no real difference here, with the liquid temperature differing about 1°C overall, and the same applying to the individual core temps. Let’s check load:
Load Temperatures
) Load – “Silent” |
) Load – “Custom” |
) Load – “Extreme” |
|
Much different results here, with temperatures generally scaling as we’d expect – 61°C core #1 temp with Silent, and 55°C with Extreme. Admittedly, not a great difference overall, which is rather impressive given the noise levels between the three modes is certainly noticeable. If your ambient room temperature is comfortable, you should be able to run the Extreme using its Silent mode without the CPU heat ever becoming a real problem. If it does, Custom can take care of that, and still retain quieter noise-levels.
Overclocked Performance
With our particular i7-3970X chip, I found 4.5GHz to be the max stable frequency I could hit (I wouldn’t be surprised if it could go higher, but I’m far from being a great overclocker). At this frequency, the chip performs like a champ:

End results as recorded with the help of AIDA64 through the entirety of our high-quality video encode (10 minutes idle + 50 minutes encode time):
| Stock (3.7GHz) | OC (4.5GHz) | |
| Room Temp | 24.1ºC | 24.5ºC |
| Idle | 36ºC | 39ºC |
| Load | 61ºC | 81ºC |
| Thermaltake’s “Custom” fan profile used for these tests. | ||
Given just how quiet the PC was overall at stock speeds using the “Custom” setting, I’m extremely pleased with the performance here. We’re dealing with one of Intel’s beefiest chips, after all – six cores under the hood. Our overclocked result isn’t quite as impressive, reaching 81ºC at peak.
I should note that these temperatures could be improved with a better chassis configuration. At the moment, there are no fans at the front of the chassis to suck cool air in, nor are there fans installed on the doors. These results are from the rad’s dual fans and the lone 120mm fan at the back of the chassis. That’s it. Plus there’s the fact that this was run using the “Custom” profile, and not “Extreme” – though fan noise still did become noticeable during load.
Final Thoughts
With the results seen above, I have no problem in recommending Thermaltake’s WATER3.0 Extreme. Intel’s six-core offerings are notorious for being heaters, but Thermaltake’s cooler manages to keep them to modest levels – 60°C is just fantastic at full-tilt. Once more fans are installed in this machine for a more optimized setup, I look forward to doing a little more testing.
At $110, the Extreme isn’t going to be for everyone, and it really isn’t for everyone if you have a modest chip and / or overclock. I’d recommend this cooler most for those equipped with six-cores (even at stock), or quad-cores boosted with good overclocks. There’s no reason whatsoever to get a cooler this robust if you’re running a stock quad-core, even something like the i7-4770K. The Performer would be quite suitable there, while the Pro would be a second option for overclocked quad-cores.
The Extreme’s biggest benefit is being able to keep big chips cool while also keeping noise-levels modest. While things can get loud. they don’t have to if you don’t mind your chip running a little hotter (and by that, I mean 65°~70°C).
Overall, a great cooler from both a performance and ease-of-use standpoint. It’d be nice if the fans were a bit quieter at full-tilt, but it seems we can’t have it all.

Thermaltake WATER3.0 Extreme Liquid CPU Cooler

Support our efforts! With ad revenue at an all-time low for written websites, we're relying more than ever on reader support to help us continue putting so much effort into this type of content. You can support us by becoming a Patron, or by using our Amazon shopping affiliate links listed through our articles. Thanks for your support!

Rob Williams
Rob founded Techgage in 2005 to be an 'Advocate of the consumer', focusing on fair reviews and keeping people apprised of news in the tech world. Catering to both enthusiasts and businesses alike; from desktop gaming to professional workstations, and all the supporting software.


