- Qualcomm Launches Snapdragon 4 Gen 2 Mobile Platform
- AMD Launches Ryzen PRO 7000 Series Mobile & Desktop Platform
- Intel Launches Sleek Single-Slot Arc Pro A60 Workstation Graphics Card
- NVIDIA Announces Latest Ada Lovelace Additions: GeForce RTX 4060 Ti & RTX 4060
- Maxon Redshift With AMD Radeon GPU Rendering Support Now Available
Social & RSS Feeds
Latest Videos


Latest News
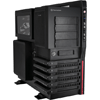
Thermaltake Level 10 GT Full-Tower Chassis Review
by Ryan Perry on July 4, 2011 in Cases & PSUs
When Thermaltake released its Level 10 chassis, it was unique in both its design and price-point – the latter of which kept it out of the hands of the regular enthusiast. Enter the Level 10 GT, a ~$270 variant that retains much of the aesthetic appeal of the original, but is easier to build with and has other cool features added to boot.
Page 3 – Installation & Testing
Installing gear in the Level 10 GT was a breeze and it turned out to be one of the fastest builds in recent memory. The power supply slid in on the braces cleanly and there was enough room through one of the cable management areas to run all of the power leads without the grommet pulling away from the motherboard tray as some cases are prone to doing. Also, all front and top panel connections were long enough to reach the correct connector, including the front panel audio header that is along the bottom back edge of the motherboard.

Hard drive installation was also a snap, even though both required tools to secure them to the trays. Our test system uses a hard disk drive but in order to take the hot swap feature for a spin a solid-state drive was installed and immediately picked up by the operating system. There is however the fact that requiring tools to unmount the drives somewhat negates the hot swap ability seeing how users can’t just pop the drive out and slap it into an enclosure.

There were no problems with the optical drive either. Pulling back on the lock allowed the drive to slide right in until it clicked. The lock was then pushed forward and held the drive in place firmly with no give either way.

Installing the optional headset holder was easy enough as well. Just remove the rubber stopper and hook the plastic holder into the slots to help keep a headset within reaching distance.

The inclusion of two metal loops that can be used to keep peripherals safe is also a welcome bonus to those who may be taking their system to a LAN party. That coupled with the ability to lock hard drives and the left door adds up to peace of mind when nature calls.

I have to question Thermaltake’s choice of including a strange little cover plate on the PCI slots. In order to add or remove anything a little cover plate needs to be removed by loosening two thumbscrews, also from the outside. It’s a necessity due to the flat design of the rear panel but it’s another step in adding or removing components, albeit a brief one. A typical rear layout would have eliminated the need for this cover.

One thing that made me a bit wary was that the metal fingers used to hold cables in place on the backside of the motherboard felt as if they could snap if they are stressed to many times. Think about how break away PCI slot covers are removed by twisting them back and forth until the metal weakens. It felt like the same situation here when I had to pull back hard on one of them that looked to be pushed in too far at the factory. I’d exercise caution when using them over and over again.

So what can users expect for an end result? Well, even without a great deal of cable management, this was what I ended up with using a fairly light system. I left the included cables secured behind the motherboard tray just as the case ships from the factory but could have gotten an even cleaner look if I rerouted some of them or pulled them tighter. These cables are the perfect length for a build using an ATX motherboard so it looks like Thermaltake is trying to help speed along the build process a bit. Regardless, there’s nothing that would hinder airflow.

On the back of the motherboard tray, things don’t look nearly as nice. Cables are everywhere, but if users take the time to properly route and secure cables, things will look much nicer in the end. Even with this mess, the right panel went on without any problems although space does seem limited and those with beefy systems may run into problems.

Testing
All of our testing is performed in a near steady 20°C ambient environment with readings taken before and after with a standard room thermometer. AIDA64 Extreme Engineer is used for monitoring and recording all system temperatures throughout the testing process.
Windows is allowed to sit idle for 10 minutes after startup to ensure all services are loaded before recording the idle CPU and GPU temperatures. CPU load temperatures are generated by performing a 20 minute run of OCCT LINPACK using 90% of the available memory, while GPU load temperatures are generated by OCCT’s built in test, also for 20 minutes.
Stock CPU settings were obtained by setting the AI Tweaker option with the BIOS to Auto and the maximum stable overclock frequency of 4.0GHz was obtained after extensive testing to ensure stability. The final clocks for the GPU are 760MHz on the core and 1000MHz QDR (4000MHz relative) for the memory with the voltage increased to 1.087V using MSI’s Afterburner overclocking utility. As with the CPU overclock, testing was done prior to ensure full stability.


The components used for testing are:
|
Component
|
Techgage Test System
|
| Processor |
Intel Core i5-661 – Dual-Core (3.33GHz)
|
| Motherboard |
ASUS P7H55D-M EVO mATX – H55-based
|
| Memory |
Corsair Dominator 2x2GB DDR3-1600 7-8-7-20-2T
|
| Graphics |
EVGA GeForce GTX 470
|
| Audio |
On-Board Audio
|
| Storage |
Western Digital 2TB Green
|
| Power Supply |
Antec TP-750 Blue
|
| Chassis |
Corsair Obsidian 650D Mid-Tower
Corsair SE White 600T NZXT H2 Sentey Arvina SilverStone Raven 03 Thermaltake Level 10 GT |
| CPU Cooling |
Corsair H60 (Exhaust Configuration)
|
| Et cetera |
Windows 7 Ultimate 64-bit
|


Now this is what I’m talking about! The Level 10 GT comes out on top if almost every respect by at least two degrees or ties the highest performing competitor. Seeing how this case has an adjustable vent, all tests were run with it wide open to ensure the fan is pulling in the most air possible.
I can’t say as I’m really surprised by the results though. The inside of the case is cavernous and features a ton of airflow thanks to the three 200m fans and one 140mm fan. It’s a good thing such a high-end case performs so well; it may just help offset the cost in the minds of some potential buyers.
All of these large fans, even when running at full clip, remained very quiet with the loudest one, the 140mm exhaust fan, making only 16 A-weighted decibels according the official specifications. Let this be a lesson to all of the manufacturers out there – bring on the big’uns and keep ’em quiet!
So what do you think, buyers? Have I twisted your arm enough to send you running to the store?

Support our efforts! With ad revenue at an all-time low for written websites, we're relying more than ever on reader support to help us continue putting so much effort into this type of content. You can support us by becoming a Patron, or by using our Amazon shopping affiliate links listed through our articles. Thanks for your support!