- Qualcomm Launches Snapdragon 4 Gen 2 Mobile Platform
- AMD Launches Ryzen PRO 7000 Series Mobile & Desktop Platform
- Intel Launches Sleek Single-Slot Arc Pro A60 Workstation Graphics Card
- NVIDIA Announces Latest Ada Lovelace Additions: GeForce RTX 4060 Ti & RTX 4060
- Maxon Redshift With AMD Radeon GPU Rendering Support Now Available
Using a Thumb Drive to Install Windows 7

Microsoft may be selling Windows 7 exclusively on DVD’s, but did you realize that it takes very little effort to create a bootable thumb drive and install from that? We’re taking a look at two popular methods of accomplishing this, and as you’ll see, it couldn’t be easier to install Microsoft’s latest OS onto a PC with no DVD-ROM. It’s faster, too!
Page 3 – Using Diskpart
If for some reason Microsoft’s tool doesn’t work as you planned, or you simply prefer to do things the command-line way, we’re going to cover an alternative option, diskpart. There’s yet another option that involves using a tool called bootsect, but due to potential issue of using a 64-bit ISO on a 32-bit operating system, we will stick to using the second, and preferred method.
First, you will need the Windows 7 ISO file. Second, you will need either WinRAR, 7-Zip, or another utility that can extract ISO files. Either program will allow you to right-click and extract the ISO’s contents.
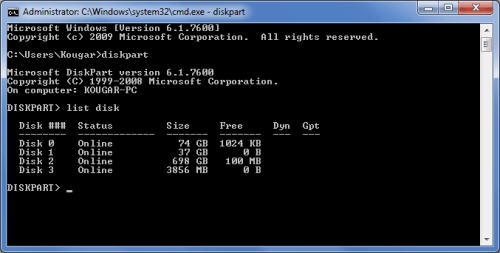
Open the Start Menu and type ‘cmd’ into the search box, without quotes. Once it’s shown in the results, either hold Shift and click the cmd link, or right-click and select “Run as administrator”. Either way, you will want an Administrator-level command prompt. Once here, with the command prompt open and your USB drive plugged in, type “diskpart” sans quotes and wait a few seconds for it to poll the USB devices.
Make careful note of which disk number belongs to the USB flash drive or device you wish to use, as we are sure that you really would not wish to find out you just wiped out your entire C: drive or backup drive’s contents! Below, disk 3 is the 4GB flash drive we want to use.
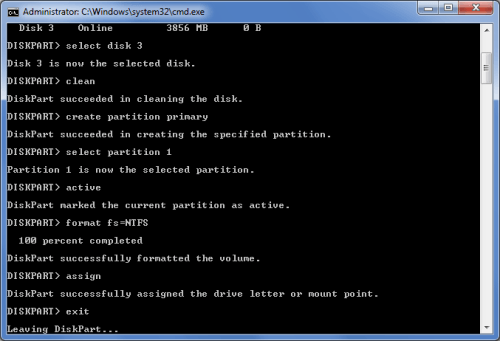
Next, type the following commands in order without quotes, hitting enter after each one:
select disk #
clean
create partition primary
select partition 1
active
format fs=ntfs
assign
exit
Of course, the # in the ‘select disk #’ represents the actual number of the disk, which in our case was 3. What clean does is completely removes all of the existing data and partitions, while active activates the partition, and assign creates it a drive letter.
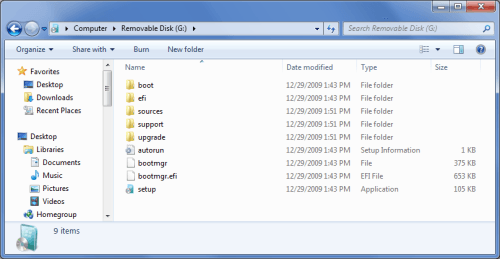
Now the only thing left to do is copy all the files over from the extracted Windows 7 ISO. Navigate back to the extracted files as shown above, and then either CTRL+A or use the mouse to select all folders & files and drag them over to your USB device. Presto, you’re done and ready to boot to your install disk!
All thumb drives are a bit different, and some are a little more complicated to deal with than others. If for some reason you try either of our steps here, and still can’t get your drive to boot, please feel free to post in our related forum thread below and we’ll help you out. Also, while we didn’t delve into the bootsect method in our guide here, 2Tired2Tango from our forums did, so I recommend reading his guide as well if neither of these two techniques above work.
Good luck, and happy installing!
Discuss this article in our forums!
Have a comment you wish to make on this article? Recommendations? Criticism? Feel free to head over to our related thread and put your words to our virtual paper! There is no requirement to register in order to respond to these threads, but it sure doesn’t hurt!
Support our efforts! With ad revenue at an all-time low for written websites, we're relying more than ever on reader support to help us continue putting so much effort into this type of content. You can support us by becoming a Patron, or by using our Amazon shopping affiliate links listed through our articles. Thanks for your support!


