- Qualcomm Launches Snapdragon 4 Gen 2 Mobile Platform
- AMD Launches Ryzen PRO 7000 Series Mobile & Desktop Platform
- Intel Launches Sleek Single-Slot Arc Pro A60 Workstation Graphics Card
- NVIDIA Announces Latest Ada Lovelace Additions: GeForce RTX 4060 Ti & RTX 4060
- Maxon Redshift With AMD Radeon GPU Rendering Support Now Available
Getting Rid Of Intel’s “ITBM Driver Not Available” Error In Windows 10
Update May 2018: We can confirm that this trick works both with Windows 10 RS3 (build 16299) and RS4 (April Update, build 17134).
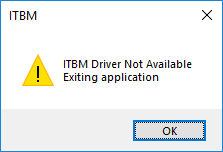
I run a handful of Intel PCs in the lab, but only one gives me a nagging problem that’s driven me nuts for months. On an Intel X299-based platform, every single Windows 10 boot would (yes, “would”) result in an Intel Turbo 3.0 error box telling me that a driver is missing (eg: “ITBM Driver Not Available”). The driver isn’t actually needed, as Windows itself takes care of those duties (unless you’re trying to run legacy mode).
Getting rid of a simple dialog box sounds easy, but in this case, it wasn’t. Google searches have told me that I’m not alone. The number of times I saw people say a fix worked for them only once is kind of ridiculous, and highlights just how persistent this piece of software can be.

You can uninstall it, of course, but it will come back. You can disable automatic hardware install, but that won’t matter. You can disable the task in Task Scheduler, but that won’t last beyond a reboot. You can disable the service in the Services application, but… you guessed it… it won’t make a difference. But… there’s caveats.
As of the time of writing, I’ve managed to keep this nagging dialog box away, and I believe it’s only because I applied basically every fix I could find at once. If you miss a step, whatever’s left over will trigger everything else, and usually undo every configuration change you made in the first place. Frustrating, to say the least.
In a nutshell, this is what you need to pull off before rebooting:
- 1. Disable the task in Task Scheduler.
- 2. Disable the “Intel Turbo” in the Services application (services.msc on the run line).
- 3. Clench your fist.
- 4. Uninstall the software.
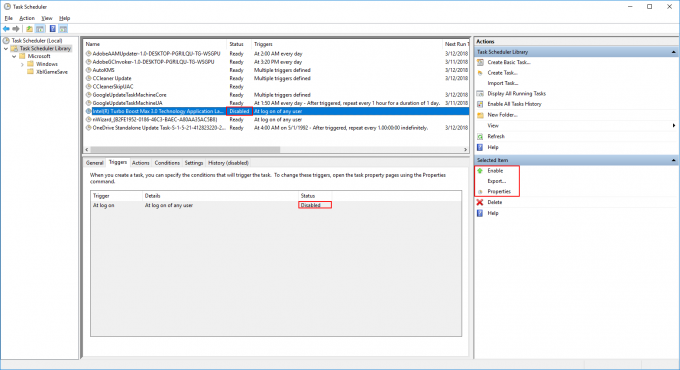
First, search for and open Task Scheduler, and click on Task Scheduler Library on the left side. You should then see Intel’s Turbo Boost Max 3.0 listed, and it’s this you want to disable. You first must right-click the option and tell it to “End”, and then right-click it again and choose to “Disable”. Double-clicking the listing will allow you to change the only entry found in “Triggers” to a disabled state.
Ultimately, this is what things should look like once you’re done:
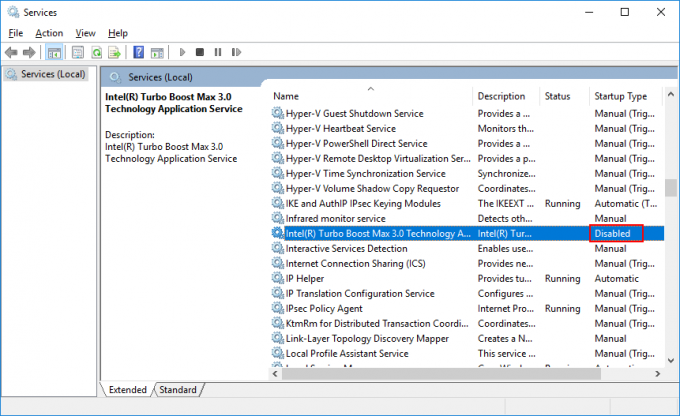
After you’re finished with the Task Scheduler, you can open up the Services application by searching for it. Once again, you’ll want to look for Intel’s Turbo Boost Max 3.0, and then double-click it to change its properties. Again, disable the entry, and close it up to make sure it matches this:
Your last step, and this may not be necessary, is to uninstall the entire application (right-click the Start menu and choose Apps and Features at the top).

This software did return for me at some point after uninstalling it, but for some reason, it never reintroduced the issue of the nagging error. Normally, anything could trigger an effective unfurling of settings you spent time changing, but for me, at least right now, the problem seems gone for good.
If you try all of this, and the problem still persists, holler in the comments, because I’m curious to see if something else can cause it to be even more persistent for others. Sometimes, you can check your “Startup” in Task Manager to disable a service, but there’s no entry there for me. I never had to go a registry edit route either, but you may, in the absolute worst case. But hopefully not.


