- Qualcomm Launches Snapdragon 4 Gen 2 Mobile Platform
- AMD Launches Ryzen PRO 7000 Series Mobile & Desktop Platform
- Intel Launches Sleek Single-Slot Arc Pro A60 Workstation Graphics Card
- NVIDIA Announces Latest Ada Lovelace Additions: GeForce RTX 4060 Ti & RTX 4060
- Maxon Redshift With AMD Radeon GPU Rendering Support Now Available
Social & RSS Feeds
Latest Videos


Latest News
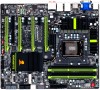
GIGABYTE G1.Sniper 3 Motherboard Review
by Rob Williams on May 3, 2013 in Motherboards
The motherboard market is loaded with options targeted squarely at overclockers and the general enthusiast, but finding a board – much less an entire series – dedicated to gamers is difficult. GIGABYTE realized that back in 2011, and thus its G1 series was born. In this article, we’re taking a look at the company’s current Z77 offering, the G1.Sniper 3.
Page 1 – Introduction, Specifications & Hardware Tour
When GIGABYTE launched its G1 series of motherboards in 2011, it had a single audience in mind: gamers. Often, vendors that release high-end motherboards tout an excellent experience for overclockers, the general enthusiast and of course, gamers. But GIGABYTE decided to tone-down the overclocking focus for G1 and instead design a solution top-to-bottom that any gamer would like to have in their rig.
Thus far, we’ve taken a look at a couple of G1 motherboards, and overall, we’ve liked what GIGABYTE has done with them. The aesthetics might be a bit overdone as far as some folks are concerned, but this is a gaming product. Past that, the addition of gamer-targeted networking and audio makes the overall package rather sweet.
With its G1.Sniper 3, GIGABYTE continues the G1’s ongoing success and improves-upon a couple of things at the same time – to be expected, of course. It targets the Z77 platform, so that means current-gen LGA1155 are fully supported. Because Intel’s next-gen platform is seemingly right around the corner, this isn’t the timeliest review, but given GIGABYTE’s trends, if you like what you see here but would rather wait for Intel’s 4th-gen Core series, you can expect more of the same – and hopefully additional features tacked on.

It might not have the gun heatsink of the G1.Assassin 2, but the G1.Sniper 3 is still quite a nice-looking board – especially if you happen to dig green and black color schemes.
One of the first things I look for on any boards I review are A) the number of fan headers, B) their locations and C) if they are 3-pin or 4-pin – the latter tends to give better overall fan control, and really, if you have a 4-pin fan but your motherboard only offers 3-pin headers, that’s a problem. On the Sniper 3, there are 5 headers total, all 4-pin. Two are located at the bottom, next to the front panel connectors; two are found at the top (one at the left, the other to the right) and the final one is snuggled in beside the DIMM array.
I have no complaints here, although I personally would prefer one of the bottom fan headers to be situated closer to the I/O panel. Lately, I’ve been using AIO liquid CPU coolers with dual fans, and that means I need two fan connectors. Few motherboards lately have given me a hassle when trying to plug both of these fans in, but this board would. I’d require an adapter or an extension to make it happen. On the other side of the coin, though, your particular setup may favor this design. The only way vendors could cater to everyone is to put 2 fan headers on all sides of the board, but that’s easier said than done since each addition to a motherboard requires a rethinking of the trace design. That = $$$.
I’d also personally like to see a CMOS reset button on the back I/O panel rather than inside. If all you need is a simple EFI clear, it really sucks having to fish around inside of your chassis for the right button (which here, is crazy small).
For those interested, a rundown of the G1.Sniper 3’s specs and features:
| GIGABYTE G1.Sniper 3 | |
| Architecture | Intel Z77 (LGA1155) |
| Form-Factor | ATX (12″ x 10.4″) |
| Memory | Up to 4x8GB DDR3-2800 |
| Multi-GPU | 4-way NVIDIA SLI 4-way AMD CrossFireX |
| Expansion | 4x PCIe 3.0 x16 (Dual x16 or x16+x8+x8+x8) 2x PCIe 3.0 x1 1x Legacy PCI |
| Storage | 2x SATA 6Gbit/s (Intel) 4x SATA 3Gbit/s (Intel) 4x SATA 6Gbit/s (Marvell 9172) 1x mSATA Onboard |
| Network | 1x Qualcomm Atheros Killer E2200 Gigabit 1x Intel 82579V Gigabit 802.11 a/b/g/n Dual-band Wi-Fi |
| Wireless | Bluetooth 4.0 |
| Audio | 5.1-Channel Creative CA0132 “Sound Core 3D” Input/Output + S/PDIF |
| USB | Back-panel: 2x USB 3.0 (Intel), 4x USB 3.0 (Via) Internal: 4x USB 2.0 (Intel), 4x USB 2.0 (Via) |
| Back I/O | 2x 1Gbit/s LAN, 6x USB 3.0/2.0, 1x Optical S/PDIF, 6x Audio Jacks, VGA, DVI, HDMI, DisplayPort |
| Features | @BIOS, Q-Flash, Xpress Install, Xpress Recovery 2, EastTune, eXtreme Hard Drive, Auto Green, ON/OFF Charge, Q-Share, 3D Power, EZ Setup |
For the sake of not being redundant, I won’t discuss the table directly, but instead tackle all of the components as we come across them with the help of our photos below.
First stop, the bottom right-hand side, where we are greeted to 10x SATA ports; 2 of which use Intel’s fantastic controller, and 4 using Marvell. For your OS drive, it’s important to make sure you’re plugged into Intel’s ports, as Marvell’s controllers are seriously lacking in SATA 6Gbit/s performance in comparison.

Also at the bottom here is a USB 3.0 internal header, mSATA port (to the left of the gray SATA ports), TPM connector and the two bottom fan headers.
Moving to the upper right-hand corner we can see the DIMM slots (to be expected, I’m sure), the second USB 3.0 internal header, EFI status LED (always gets a thumbs-up from me), power and reset switch along with a CMOS clear button.

In the shot below, we can see a relic from the past: a PCI slot. Why GIGABYTE feels the need to include such a thing on a gamer board, I’m not sure. We’ve reached a time when I can’t even remember the last time I used a PCI component – am I alone? Alongside that slot we have 4x PCIe x16 and 2x PCIe x1. Dual FireWire (another oddity) can be found at the bottom along with dual USB 2.0 headers and the front panel connectors.

This next shot exists for no other reason than to look good. And it does look good, doesn’t it? To justify it’s existence further, here we can see mounting holes, capacitors and chipsets. Exciting stuff.

As you’d expect, the area surrounding the CPU socket is sufficient for installing small and bulkier coolers alike.

At the back, we can find six USB 3.0 ports (two are Intel, four are VIA); a VGA, HDMI, DVI and DisplayPort for use with the IGP or Lucid’s Hydra; 2x LAN (one Intel, one Killer NIC); and a bevvy of audio ports. Oh – and continuing the legacy theme from earlier, a PS/2 port. This is one I can actually agree with, however, as USB buses can at times be finicky things, and the last thing you want to happen is to lose keyboard support when trying to troubleshoot a machine.

GIGABYTE’s G1.Sniper 3 comes in a larger-than-life box, and it’s because there’s quite a number of accessories packed in. Below, you can see the collection of paper materials, which includes the manual, some stickers and a poster.

Six SATA cables are also included alongside every possible graphics bridge you’ll need. Seriously – that’s quite the collection GIGABYTE has packed in here. For those who prefer to keep as much dust out of their PC as possible, there’s also the expected I/O protector.

It might be a gamer board, but there’s one thing the G1.Sniper 3 includes that most gamers don’t immediately think of: wireless. With this add-in card, you’ll be able to take advantage of the board’s dual-band Wi-Fi, which is quite nice. I’m currently dealing with a net issue as I just moved apartments and my ISP is slow, so it’s times like these when I really wish my board came with wireless as well so that I could, ahem, borrow a connection with greater ease.

For the sake of expansion, GIGABYTE includes both a 2.5-inch accessory and one for an internal slot. The first is to add two additional USB 3.0 ports to the front of your chassis, while the others add eSATA. I tend to appreciate these being modular when I don’t actually want them, but if I do, they tend to add clutter to the inside of your case. It’s a love it or hate it sort of deal.

Like ASUS’ P9X79 PRO motherboard that I tackled a couple of weeks ago, I’ve been using the G1.Sniper 3 for about two months and have sunk some good time into it. In all that time, I haven’t had an issue worth speaking of. Installation went fine, features worked as expected, and the configuration of the EFI was smooth – a subject we’ll tackle next.

Support our efforts! With ad revenue at an all-time low for written websites, we're relying more than ever on reader support to help us continue putting so much effort into this type of content. You can support us by becoming a Patron, or by using our Amazon shopping affiliate links listed through our articles. Thanks for your support!

Rob Williams
Rob founded Techgage in 2005 to be an 'Advocate of the consumer', focusing on fair reviews and keeping people apprised of news in the tech world. Catering to both enthusiasts and businesses alike; from desktop gaming to professional workstations, and all the supporting software.


