- Qualcomm Launches Snapdragon 4 Gen 2 Mobile Platform
- AMD Launches Ryzen PRO 7000 Series Mobile & Desktop Platform
- Intel Launches Sleek Single-Slot Arc Pro A60 Workstation Graphics Card
- NVIDIA Announces Latest Ada Lovelace Additions: GeForce RTX 4060 Ti & RTX 4060
- Maxon Redshift With AMD Radeon GPU Rendering Support Now Available
GIGABYTE G1.Assassin 2 Review
If you’re a gamer looking to build a high-end multi-GPU PC, GIGABYTE’s X79 G1.Assassin 2 deserves a look. Built from the ground up for gamers, it features onboard Creative X-Fi audio and Killer NIC solutions, supports three GPUs, has a proper EFI and sports aesthetics that perfectly complement the goals of the board.
Page 1 – Introduction
Are you a serious gamer? If so, GIGABYTE’s G1 series of motherboards is sure to pique your interest. Designed from the ground up to act as the perfect base to an enthusiast gaming PC, G1 motherboards pack in better-than-average audio and LAN chipsets, and has the looks to boot.
First available as high-end X58 boards, GIGABYTE has since spread the G1 love around to mid-range gamers with a couple of Z77 releases, while still retaining a top-tier model, this time based on X79. As the title of this article suggests, that’s the board we’re taking a look at here.
Being a gamer-focused board, GIGABYTE had some clear rules and goals with its Assassin 2. At the forefront, it offers support for tri-SLI and tri-CrossFireX and makes it happen with PCIe Gen. 3 slots. A common issue with 3-way GPU setups is that it prevents a discrete audio and network card from being used, but with the onboard Creative X-Fi and Killer LAN, that problem is made nonexistent. We’ll tackle those features later.
I should note right off the top that this is not going to be a usual motherboard review. We’ve adopted this board as the base to our updated GPU testing rig and wanted to produce a “hands-on” look at it, explaining what makes it cool, and also give our thoughts on some of its features. As a result, this review will be lighter than most of our other upcoming X79 and Z77 ones.
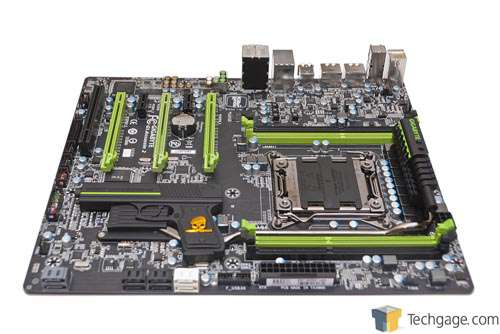
Any motherboard can be called a “gamer motherboard”, but the G1. Assassin 2 looks the part, as can be seen in the shot below. Like all of the G1 boards to date, it features a black PCB and a mixture of green and black components, such as with the PCIe and DIMM slots. Taking things a step further, the southbridge features a pistol heatsink. This is something that a lot of people seem to be divided on, as it can either look cool or tacky depending on your view, but again, it definitely suits the goals of the board (unless you loathe shooters, perhaps).
If the pistol heatsink wasn’t enough, how about a cartridge heatsink for the PWM area? As much as I’d love a bullet to come flying out in the event of a failed overclock, I can understand why GIGABYTE skipped over that idea.
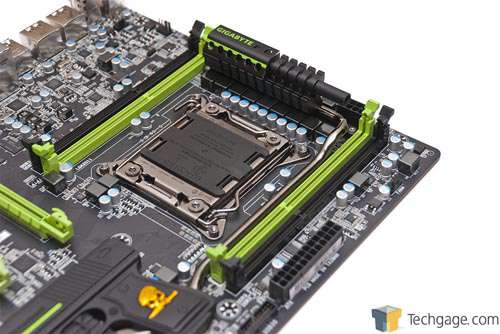
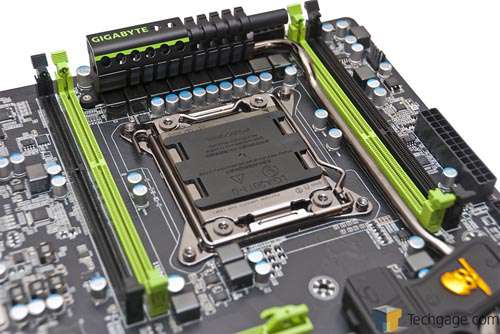
To leave sufficient room for other board components, GIGABYTE opted to include only 4 DIMM slots. It supports up to 32GB in a 4x8GB configuration, but I’d have to imagine the most common configuration would be 4x4GB – which we happen to be using. Supported speeds range from 1066MHz to 2400MHz.
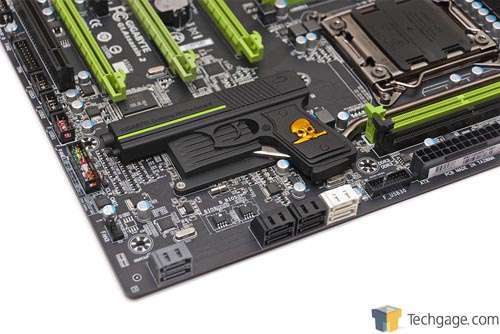
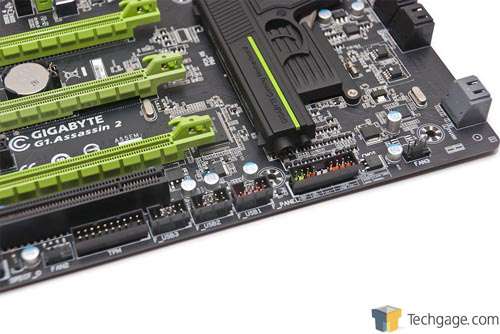
The Assassin 2 supports up to 8 internal SATA connections; four SATA 6Gbit/s and four SATA 3Gbit/s. The white connectors are 6Gbit/s and run from the X79 chipset, while the black are all 3Gbit/s. The bottom gray ports are 6Gbit/s running from a Marvell chipset. As we’ve discussed in a previous article, these should not be used for 6Gbit/s purposes unless the Intel-run ones are occupied.
Also present in this area is an internal USB 3.0 header, along with the usual slew of other internal connectors lacing the bottom of the board.
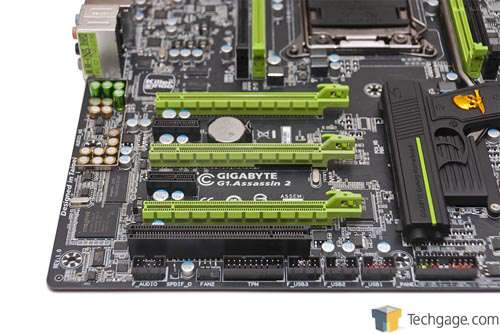
As mentioned at the outset, the Assassin 2 supports tri-GPU configurations. If that configuration is used, there will be no remaining accessible ports unless one or more of the cards are single-slot. This is unfortunate, and I do wish GIGABYTE could have put one extra PCIe 1x or 4x slot above the top PCIe 16x.
To the left of the shot below, you can get a glimpse at the on-board X-Fi chip, and directly above the top PCIe slot, you can see the Killer E2100 chipset. Proud of the company’s origin, we can see a “Designed in Taipei” label to the left (this might stand out to me as Computex is right around the corner and I am not going!).
Here’s a closer look at the CPU socket area. I find the design of this area to be rather impressive as there’s nothing missing, but it’s super-clean. The area is wide-open around the socket, so even the largest CPU coolers will be able to be used. With the PWM located right at the top of the board, heat should have no problem escaping with effective airflow.
In addition to the USB 3.0 header to the right of the board, there are 3x USB 2.0 headers at the bottom, along with the internal ATX chassis connectors and a connection for a TPM module.
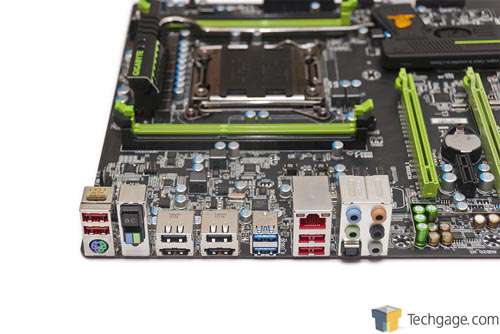
Turning to the back panel, we see 8x USB connectors, two of which are 3.0, 2x eSATA connectors, a LAN, full audio, a PS/2 keyboard or mouse port and two more buttons related to overclocking. The “OC” button overclocks the CPU, while the blue/green button will allow the board to boot into the backup BIOS in the event your OC settings don’t fare well. The bottom and difficult-to-see button clears the CMOS.
For those who want to geek up their room or computer, GIGABYTE includes a poster and a set of stickers with the Assassin 2.
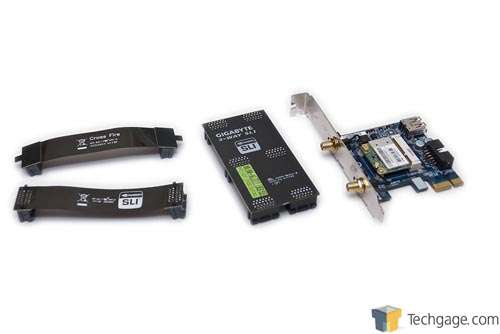
To assure that you will have the right connector for your multi-GPU setup, GIGABYTE includes both a dual-GPU SLI and CrossFireX bridge and also a 3-way SLI bridge. Next to those in the shot is a WiFi add-in card. Given this is a gamer-focused board, the inclusion of WiFi strikes me as a bit odd (few gamers are going to prefer wireless for the sake of online gaming), but GIGABYTE aimed to make this board as well-rounded as possible, and the inclusion of this makes that happen.
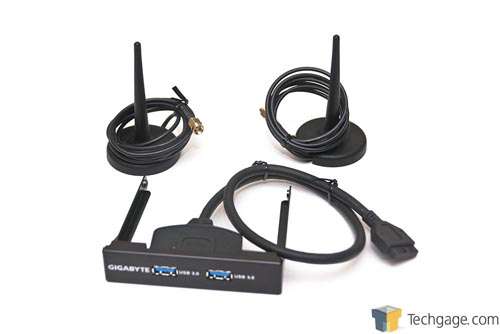
Two antennas are included for the wireless card. These should be located on your chassis or desk, or wherever they can stretch that will give them a clearer signal to the router. Also included for good measure is a 2.5″ USB 3.0 bay, which takes advantage of the USB 3.0 internal header.
To say that I am impressed with this board on the surface would be an understatement. It looks great, has a solid layout, and is thoughtful with the placement of the four fan headers. Despite being packed with features, the board still offers a lot of room for a huge CPU cooler. These are just some of the reasons we decided to use this board as the base to our GPU testing rig. Next up, a look at the board’s EFI.
Support our efforts! With ad revenue at an all-time low for written websites, we're relying more than ever on reader support to help us continue putting so much effort into this type of content. You can support us by becoming a Patron, or by using our Amazon shopping affiliate links listed through our articles. Thanks for your support!


