- Qualcomm Launches Snapdragon 4 Gen 2 Mobile Platform
- AMD Launches Ryzen PRO 7000 Series Mobile & Desktop Platform
- Intel Launches Sleek Single-Slot Arc Pro A60 Workstation Graphics Card
- NVIDIA Announces Latest Ada Lovelace Additions: GeForce RTX 4060 Ti & RTX 4060
- Maxon Redshift With AMD Radeon GPU Rendering Support Now Available
Social & RSS Feeds
Latest Videos


Latest News
Securely Erasing Your SSD with Linux: A How-To
by Rob Williams on July 22, 2013 in Software, Storage
Tired of dealing with slowed performance or some bizarre partition error with your SSD? Sometimes, the solution is as simple as a secure erase – that is, to bring the drive back to its innate, factory-fresh state. Thanks to Linux, getting this job done is easier than ever. Join us, as we cover multiple methods for getting the job done.
Whether for slowed performance or some other issue that’s crept up, sometimes securely erasing your SSD is the solution needed. While there are a number of ways to get the deed done, most solutions are hit-or-miss, and are generally not that elegant. In my personal experience, the easiest way to secure erase a drive is through Linux, and as the title of this article suggests, that’s exactly the route we’re taking here. The best part? You don’t need to understand Linux to follow this guide.
First things first: if you don’t already have a version of Linux installed, you’ll need to download a distro and create a bootable CD-ROM or flash drive. If your intention is to only secure erase an SSD, it’s recommended you download Parted Magic, a distro designed around managing storage. If you’d rather have a bootable Linux environment that’s setup like a real desktop, then another distro can be used, such as Ubuntu, Fedora, and openSUSE. For this article, I’m using Linux Deepin, in addition to Parted Magic.
Update: Since this article went live, the developer of Parted Magic began charging $4.99 for the software. Given all that the live CD can do, I believe it’s well-worth the cost-of-entry. However, if you are merely looking to secure erase your SSD, you might feel that any fee is a bit much. If that’s the case, forego grabbing Parted Magic and check out the other options below for secure erasing your SSD.
Once your chosen ISO is downloaded, you can burn it to a CD-ROM or go the flash drive route. When given the choice, I recommend using a flash drive, as it’s more flexible, and faster to boot (no pun). To create a bootable flash drive, you’ll want to grab UNetbootin, run it (no install necessary), click the “Diskimage” option, search for your ISO, select the proper drive, and hit “OK”. Once all of the files are copied over, you’ll be able to boot into that flash device.
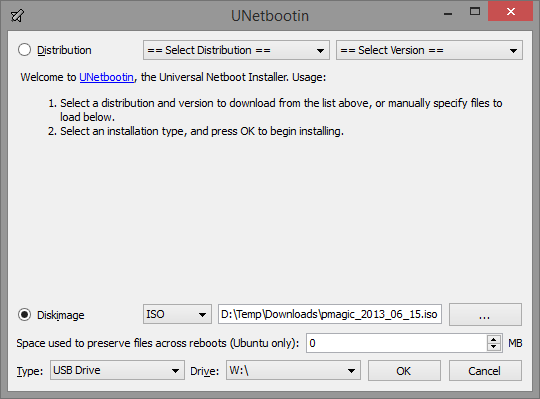
Use UNetbootin to create a bootable Linux OS
Because there’s no one secure erase solution that will work for everyone, we’re giving you three options here, ordered from easiest to most difficult (though no solution is that difficult). You can feel free to jump to any section that you need, but for absolute beginners I’d recommend continuing with the first section below.
Jump to:
- Preparing the SSD & Enabling Hotplugging
- Discovering the Appropriate Drive in Linux
- Secure Erase with Parted Magic
- Secure Erase with Command-line (Simple)
- Secure Erase with Command-line (Advanced)
Preparing the SSD & Enabling Hotplugging
Hotplugging is the act of connecting an SSD (or an HDD, for that matter) to a machine that’s powered-on. Some chassis have this support built-in with special bays, and if you happen to have one, you can use it if the SSD in question is not already installed internally. For everyone else, you’ll need to take the side off of your computer, and while its powered-down, disconnect the SATA data cable for that drive from the motherboard, leaving the SATA power cable plugged into the drive.
Most BIOSes do not offer hotplug options, but most EFIs do. You can see an example of the option in the EFI below, taken from GIGABYTE’s Z77X-UP4 TH motherboard.

Hotplug option inside of an EFI
If you happen to know the exact port number you’re going to be plugging the target drive into, you can enable hotplugging for that one port. Otherwise, you can enable hotplugging for every available port; there are no downsides to this, performance or otherwise. Set the options that are needed, save and reboot.
Can’t Use Hotplugging? A lot of modern USB HDD/SSD docks can manage the ATA commands required to secure erase, so it’s worth trying to use one for the purpose if you have one around. Thermaltake’s BlacX is an example of an enclosure that can be used to secure erase an SSD.
Discovering the Appropriate Drive in Linux
Boot into either your installed Linux desktop or the live environment you’ve prepared earlier. Once you’re booted to the desktop, connect the SSD’s SATA data cable back to the appropriate motherboard port.
Once ready, open GParted. With Parted Magic, double-click “Partition Editor” on the desktop; for other distros, search through the main menu, or hit Alt + F2 and type ‘gparted’ to (hopefully) bring it up as a search result. If you’re not doing this through a live environment, you will have to enter your password.
![]()
GParted can be found in most Linux distros
With GParted open, navigate to the drop-down menu near the top-right corner and find the drive that you wish to be securely erased. If the density isn’t enough to tip you off as to whether or not you have the correct drive selected, its partition layout should be.

GParted showing an SSD before secure erase
With the proper drive selected, note its “/dev/sdX” value, which is its drive letter (think C:\ in Windows).
#1 – Using Parted Magic
Parted Magic offers the easiest method of securely erasing a drive, as it negates the need for a command-line. However, it might not work for all systems, so for that reason we give more advanced methods later.
At the main desktop, double-click the “Erase Disk” icon, and with the tool loaded, click “Internal Secure Erase command writes zeros to entire data area”.

Parted Magic has a useful tool called ‘Erase Disk’
The process is simple at this point; click on the SSD in question, and then “OK”.
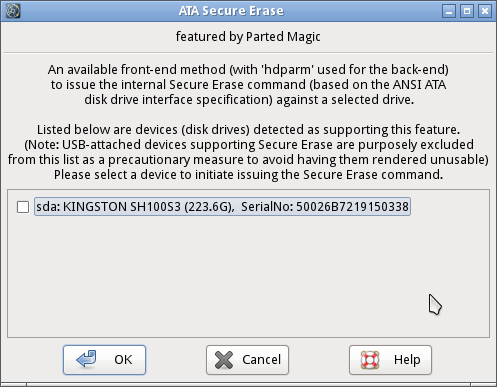
A secure erase is just a step away
After a second or thirty, the SSD will be as clean as a whistle. If not, you’re likely looking at a dialog box that recommends putting the PC into a sleep state, so that you can have a second chance once the PC wakes back up. It’s worth giving that a chance, but don’t expect it to work.
If the process did in fact work, the drive is clean; you can now open GParted (via the “Partition Editor” on the desktop), and with the correct drive selected, click on “Device” at the top, then “Create Partition” and finally, “Apply”. This step is not necessary, but it can prevent potential complications when trying to install an OS.

Creating a fresh partition table
If this Parted Magic method doesn’t work for you, it’s time to move onto step #2.
#2 – Command-line Simple Secure Erase
Open up a command-line (terminal) either through the OS menu, or by hitting Alt + F2 and typing in “terminal”. If for some reason “terminal” yields no results, you’ll be forced to navigate the OS menu and find its replacement (eg: ROXTerm, gnome-terminal, Konsole, et cetera).
Useful commands (which require root (su) or sudo (sudo -s, or just type “sudo” before each command):
- hdparm -I /dev/sdX – Displays all information about a drive.
- hdparm -I /dev/sdX | grep Model – Displays the drive brand and model.
- hdparm -I /dev/sdX | grep frozen – Displays whether or not the drive is frozen (“not” is required).
- hdparm –security-erase PASS /dev/sdX – Simple command to secure erase a drive with no hassle.
Note: There are two dashes before the user-master and security- commands. The info commands above use a capital i, not a small L.
An important command here is either the first or third. We need the drive to be “not” frozen, and if that’s the case, then it’s a matter of running the fourth command:
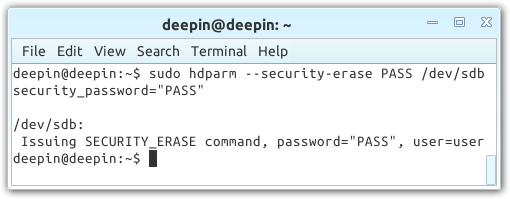
Performing a simple secure erase
If the result matches what’s seen in the above screenshot, you can now open GParted (via the OS menu or Alt + F2 and typing in “gparted”), and with the correct drive selected, click on “Device” at the top, then “Create Partition” and finally, “Apply”. This step is not necessary, but it can prevent potential complications when trying to install an OS.
Creating a fresh partition table
If the process spawns an error about a password being required or otherwise, move onto the next method.
#3 – Command-line Advanced Secure Erase
Open up a command-line (terminal) either through the OS menu, or by hitting Alt + F2 and typing in “terminal”. If for some reason “terminal” yields no results, you’ll be forced to navigate the OS menu and find its replacement (eg: ROXTerm, gnome-terminal, Konsole, et cetera).
Useful commands (which require root (su) or sudo (sudo -s, or just type “sudo” before each command):
- hdparm -I /dev/sdX – Displays all information about a drive.
- hdparm -I /dev/sdX | grep Model – Displays the drive brand and model.
- hdparm -I /dev/sdX | grep frozen – Displays whether or not the drive is frozen (“not” is required).
- hdparm –security-erase PASS /dev/sdX – Simple command to secure erase a drive with no hassle.
- hdparm –user-master u –security-set-pass /dev/sdX – Sets a password.
- hdparm –user-master u –security-erase /dev/sdX – Securely erases the SSD.
Note: There are two dashes before the user-master and security- commands. The info commands above use a capital i, not a small L.
The important command here is either the first or third. We need the drive to be “not” frozen, and if that’s the case, then proceed to password the drive via the fifth command; it doesn’t matter what is, but the same text needs to be used for both commands. Once that’s done, run the sixth command.

Identifying the SSD and performing a secure erase
If the result matches what’s seen in the above screenshot, you can now open GParted (via the OS menu or Alt + F2 and typing in “gparted”), and with the correct drive selected, click on “Device” at the top, then “Create Partition” and finally, “Apply”. This step is not necessary, but it can prevent potential complications when trying to install an OS.
Creating a fresh partition table
If for some reason this or the earlier commands are not getting the job done, I’d recommend going with the earlier suggestion of attempting the secure erase with the help of an external USB enclosure, such as Thermaltake’s BlacX. If that’s not possible, you might unfortunately be out of luck, short of using one of these methods on another PC.
Questions and comments are welcomed. We might not be able to get your SSD securely erased if none of the above methods work, but we can sure try.

Support our efforts! With ad revenue at an all-time low for written websites, we're relying more than ever on reader support to help us continue putting so much effort into this type of content. You can support us by becoming a Patron, or by using our Amazon shopping affiliate links listed through our articles. Thanks for your support!

Rob Williams
Rob founded Techgage in 2005 to be an 'Advocate of the consumer', focusing on fair reviews and keeping people apprised of news in the tech world. Catering to both enthusiasts and businesses alike; from desktop gaming to professional workstations, and all the supporting software.


