- Qualcomm Launches Snapdragon 4 Gen 2 Mobile Platform
- AMD Launches Ryzen PRO 7000 Series Mobile & Desktop Platform
- Intel Launches Sleek Single-Slot Arc Pro A60 Workstation Graphics Card
- NVIDIA Announces Latest Ada Lovelace Additions: GeForce RTX 4060 Ti & RTX 4060
- Maxon Redshift With AMD Radeon GPU Rendering Support Now Available
Social & RSS Feeds
Latest Videos


Latest News
Turning Up The Dials On Intel’s NUC – Overclock And Overpower
by Jamie Fletcher on July 16, 2015 in Systems
With our review of Intel’s NUC5i5RYK complete, it was time to have a little fun. With the power limiter unlocked, some minor memory overclocking available, and a fire extinguisher ready, we find out what the latest generation of NUCs are really capable of when the heat is on!
Page 1 – Turning Up The Dials – Intel’s NUC Overclocked and Overpowered
During our initial review of the NUC5i5RYK, we noticed some rather odd behavior; something just wasn’t quite right with the clock speeds when under load. It was through experimentation that the problem became pretty clear – power.
The GPU built into the i5-5250U, the HD 6000, likes to put undue stress on the poor CPU. The NUC has a power limiter to keep it within the 15-20W TDP, so when the power-hungry brute of a GPU takes over, it starves the CPU, restricting its clock speed in the process. This puts the GPU in a predicament; the faster it runs, the slower the CPU. If the CPU is too slow, it can’t feed instructions to the GPU fast enough. This results in a saw-like pattern of base clocks as they jump around to accommodate. So what can be done?
With the previous generation of NUCs, Intel introduced some EFI options to allow users to play around with the power limiter, effectively letting the CPU pull more power when under load. This made for some interesting testing, as we’ll see throughout this article.
On top of the power limiter options, there is some minor overclocking available, namely that of the memory multiplier – base clock and latency settings, and some control over the GPU multiplier. The CPU offers nothing except for turbo options with a fixed upper limit. Both the CPU and GPU offer voltage offsets, positive and negative, so we’ll see if playing around with those will give us some more headroom in the turbos.

Before we get into the power adjustments, we’re going to look at memory. For the most part, faster RAM doesn’t help with system performance; jumping from 1600MHz to 1866MHz really doesn’t do a lot for the overall system. However, there is an exception: that of integrated GPUs. When AMD and Intel started to integrate the GPU into the CPU, some compromise had to be made, and it was memory. Both the CPU and GPU have to share the same memory pool.
Standard DDR technologies are geared towards low latency, unlike graphics-based DDR, which is all about bandwidth. The difference is subtle, but distinct. GPUs need to move huge assets around (textures), but the timing isn’t as critical, since it’s only generating frames every few milliseconds. So how do you get more bandwidth for the GPU? A quick and easy solution, faster RAM, i.e. more MHz.
Setting up for Overdrive
Before we get to the results, we’ll cover the processes used to set up the NUC for overclocking and overpowering. We took a progressive approach in order to maintain stability. Some initial testing was done during our original review of the NUC5i5RYK, but was mostly limited to 3DMark. This time we are doing a wide variety of tests that concentrate on GPU-focused and balanced workloads, as this is where the main benefits will be. For the sake of time, we will not be including SPEC and SANDRA.
The Overclock
While options are limited, we can still try our hand at some overclocking, with memory being at the forefront. The same system specs carry over from our original review, namely the 2x8GB 1600MHz Ballistix RAM. We originally reaffirmed our results to make sure the baseline was the same, then proceeded to turn up some dials, starting at 1866MHz. The system proved stable with the timings adjusted to 10-10-10-27-2N, but that isn’t exactly an overclock to shout about. We decided to take things further.
Next we set the multiplier to 16x, or 2133MHz and… well… no go. In fact, the system wouldn’t even POST, even with the timings adjusted to something obscene such as 17-17-17-40-3N. Reading around at some other memory settings used with the NUC, this may in fact be a limit of the NUC itself rather than the memory, as even native 2133MHz memory wouldn’t work with the NUC.
The good news is that we still have some maneuvering in the form of the base-clock. Switching from 133MHz to 100MHz gives us some more room in the multiplier, and in our case, we set it to 20x and managed to get a stable system of 2000MHz 11-11-11-30-2N. So, we managed to take 1600MHz RAM to 2000MHz, which is definitely a more interesting overclock, but what about the results?
Initially, we did some conservative testing to confirm stability – multiple passes of 3DMark, PCMark, etc – and the results were largely what we expected since most of the tests will be CPU weighted and thus the memory timings don’t provide a huge impact, typically 5%. On the real-world tests, namely games, the benefits of faster memory are more easily shown – getting somewhere around a 10% boost in frame rates. Unfortunately, since the frame rates were so low to begin with, this only equates to 1 or 2 frames per second. However, this is only the start. Full results will be listed later on.
There is an option available in the EFI to adjust the GPU multiplier. This is calculated as half the base clock times the multiplier, with the default multiplier being 19x, or a total GPU clock of 950MHz. Unfortunately, no matter what we tried with various voltage increases and different multiplier settings, values largely stayed the same or in some cases dropped. So, changing the GPU multiplier is not worth it, which is unfortunate.
Overpower
This is when things get interesting. The NUC is a very heavily power-throttled device, to keep both the power and heat low for such a small package. There are a number of options to take it out of the 15-20Watt TDP via three main settings: CPU current, sustained power and burst power. Sustained and burst are easy to explain, since these offer a direct link with how much power the processor can pull; burst power being over a short period of time (~30 seconds).
Determining the CPU current limiter’s effect on the system is a little tricky. The EFI help for this option is thin and simply states that it relates to the CPU turbo. Through testing, it improves the CPU turbo stability, effectively keeping the turbo higher when the GPU is active. This is all well and good, but comes with a serious drawback: heat.
Through extensive testing, we could not set the current limiter to more than 36 Amps for extended periods (default is 32 Amps). At 37 Amps, even with the total power reduced, the system would eventually go into thermal shutdown when under load. Thermal shutdown conditions is set at 105C – which is extremely hot. Even with the current limiter set to 36 Amps, temperatures would hit 90-95C.
We progressively upped the power limits on the processor and took note of the scores as we did, paying particular attention to the CPU clock, to see whether the turbo was engaging. 3DMark’s Fire Strike demo showed some interesting characteristics.

As we showed in our review, the CPU is severely restricted in its ability to scale up the turbo when the GPU is heavily challenged, barely hitting 2.0GHz when it’s capable of 2.5GHz. It spends a fair bit of time hovering at just 800MHz. Once we start enabling the power options, we can see that the CPU is able to hit higher turbos.
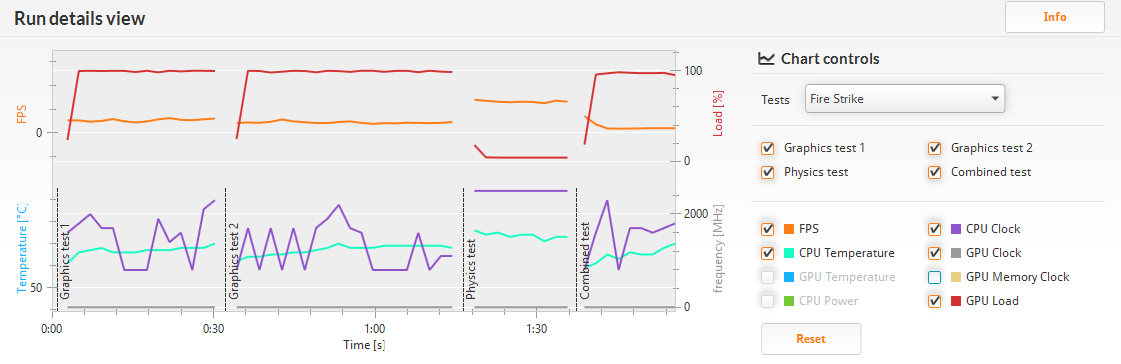
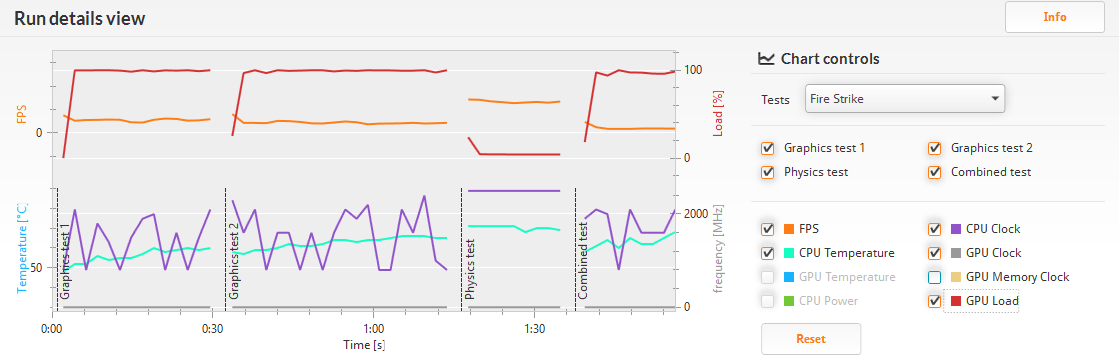
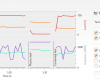
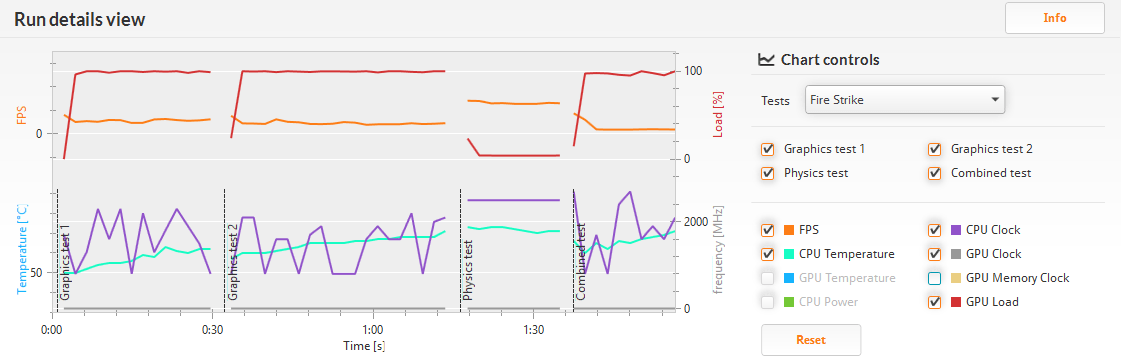
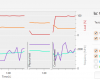
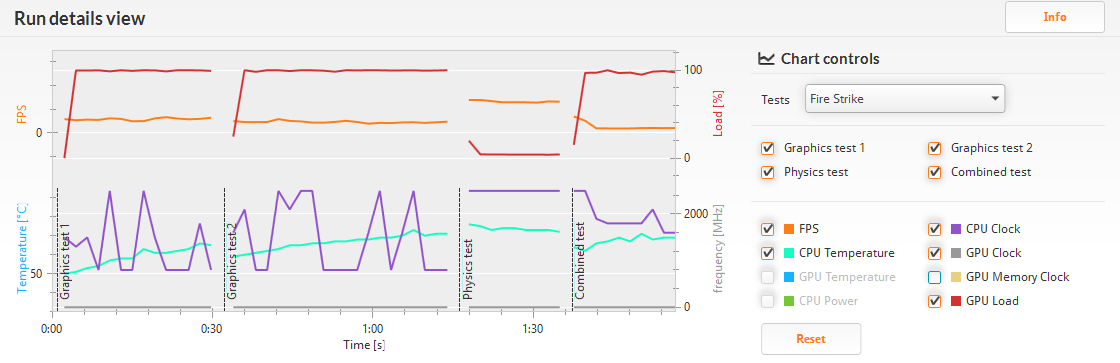
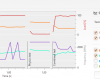
Follow the purple line and you’ll see that the CPU steadily climbs with each boost in power, until the last slide where you can see it hitting 2.5GHz repeatedly. It’s still a saw-like motion and there is not much else that can be done with such a small cooling solution. Anyone have a spare LN2 kit lying around?
Since we’re after best results, 36 Amps was used as the upper limit for CPU current, but for long-term, 34-35 Amps should be the upper boundary. As for total power, we went and turned the dials up to maximum – 35 Watts sustained and 40 Watts burst over 32 seconds, effectively more than doubling the power draw for the processor at stock.
With the settings dialed in, it’s time to buckle in and see what this NUC is capable of!

Support our efforts! With ad revenue at an all-time low for written websites, we're relying more than ever on reader support to help us continue putting so much effort into this type of content. You can support us by becoming a Patron, or by using our Amazon shopping affiliate links listed through our articles. Thanks for your support!

Jamie Fletcher
Jamie has been abusing computers since he was a little lad. What began as a curiosity quickly turned into an obsession. As senior editor for Techgage, Jamie handles content publishing, web development, news and product reviews, with a focus on peripherals, audio, networking, and full systems.
