- Qualcomm Launches Snapdragon 4 Gen 2 Mobile Platform
- AMD Launches Ryzen PRO 7000 Series Mobile & Desktop Platform
- Intel Launches Sleek Single-Slot Arc Pro A60 Workstation Graphics Card
- NVIDIA Announces Latest Ada Lovelace Additions: GeForce RTX 4060 Ti & RTX 4060
- Maxon Redshift With AMD Radeon GPU Rendering Support Now Available
Social & RSS Feeds
Latest Videos


Latest News
For Those Who Like Their PCs Naked: Puget Test Bench EATX Version 1 Review
by J.D. Kane on September 8, 2014 in Cases & PSUs
Open test benches are not for everyone, but for those who need to deal with their PC’s components often, they could prove to be a boon to efficiency. Puget Systems is a company that benefits greatly from using test benches, but it had a problem: None were perfect. So, the company decided to create its own, and that’s what we’re looking at here.
Page 1 – Introduction
I don’t know about you, but I think PCs set up on an open-air test bench are awesome.
There used to be a time when the only people who would opt for a test bench were the most hardcore overclockers around. I’m talking about those folks who pour liquid nitrogen or dry ice into pots and chase after extremely high clock speeds, often in competition with each other. These days, though, there is a small but dedicated subset of enthusiasts who would choose to use an open test bench over a conventional PC chassis.
Some of them opt for a test bench simply because they need ready and easy access to a computer’s innards. Say you’re a PC hardware reviewer, and you need to swap parts quickly with the minimum of fuss. This is precisely the reason why my Techgage test rig was built onto a Danger Den Torture Rack test bench.
But then there is also that group (to which I also belong, actually) who genuinely think test benches are just great to look at. I know quite a few people who don’t review hardware or use their PCs to benchmark parts or settings until Armageddon, but yet still have built their systems onto an open test bench. They’d openly admit that they just want to look at their PCs’ naughty bits, or perhaps admire their handiwork (custom water-cooled set-ups are especially pretty). That’s perfectly legit to me.
So I was quite chuffed when Techgage High Muckamuck Rob Williams arranged to have Puget Systems send me a sample of its Test Bench Kit EATX Version 1 to review. I believe it’s a bit of a first for Techgage, too, since a quick search of our archives reveals we’ve never actually reviewed a test bench before (unless you count this, which I personally wouldn’t).
Now if the name “Puget Systems” rings a bell, it might be because the company is one of the more renowned boutique PC builders around. The company’s been doing its thing for fourteen years now, and it is one of those names I was in awe of back in the days when I didn’t know how to build my own PCs and could only dream of someday buying an über-spec machine. The company is still thriving these days, continuing to build on its well-earned reputation with some of the finest, most powerful PCs both for play and for some serious work – think CAD/CAM-capable workstations and the like.
As its Test Bench Kit EATX Version 1 proves, the company has even branched out, offering a test bench as a distinct product all its own.
Let’s have a look at it, then, shall we? I apologize in advance for less-than-stellar photos – this was the hardest chassis I’ve ever had to photograph, given it’s largely see-through nature.

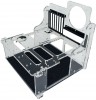
And here it is, all built up, ready to host a fully functional system.
Unfortunately, that’s not how it came from Auburn, WA.

Now normally Techgage doesn’t show product unboxings, but I thought this would be one of the few times we should. The Test Bench Kit is just that, a kit that needs to be assembled. This is exactly how the package looked when I cut the tape off and opened the box.
After examining the state of the constituent parts for possible damage during shipment (I found none), it’s time to start putting the kit together. So let’s get into that first.
Thankfully, Puget Systems has done a superlative job with its instruction manual. If you can handle LEGO, you can build the Test Bench EATX Version 1. Indeed, the only tools you’ll need are a fine Philips screwdriver and a pair of pliers.
The instruction manual specifies ten distinct assembly steps (plus one optional step). What I’ll do, though, is condense the construction into five major steps, photographing the assembly process after every few steps in the order that makes the most sense visually. You’ll get a good idea of how this all comes together through my photos, but I still advise you to follow the superb instruction manual.

The first couple of steps are all about the bench’s floor. You basically just have to install the rubber feet and the foam sheet on the top side of the floor panel. If you have any excess foam overlapping the sides, trim it off with a sharp knife. Also, make sure no foam overlaps the cutouts on the sides of the floor panel.
A note about the screws: Puget Systems very wisely suggests not tightening these down fully until the whole bench has been put together. Just screw them down about half-way; this will allow the panels some play, which will ease assembly.
Next we’ll build up the sides and install the motherboard tray. Be mindful of the motherboard tray panel’s orientation as there is only one correct way to install it (see the manual for the one, true way).

The I/O shield + expansion slot panel needs to be affixed to what Puget Systems calls the Front Panel, so the following photo shows what your work should look like when you’re done. This is one step where tightening the screws down completely won’t hurt at all.
The next two steps involve installing the front panel to the rest of the assembly. By the end of this phase the assembly phase is almost complete. You can also fully tighten all of the screws down at this point; be mindful to not screw them in too tightly, though, since the acrylic might crack if you do so.

Now we’re down to two final steps:

You need to install the power switch on the front panel, and then…

…the standoffs.
At this point you can be done with assembling the Test Bench. However, if you want to do this properly (assuming you’ll be swapping motherboards like most people do underwear), you’ll want to take the optional step of adding two-to-four plastic pegs on some of the standoffs. I’d recommend putting these pegs on the corner standoffs.

You always have the option of using the usual screws to secure your motherboard onto the system.
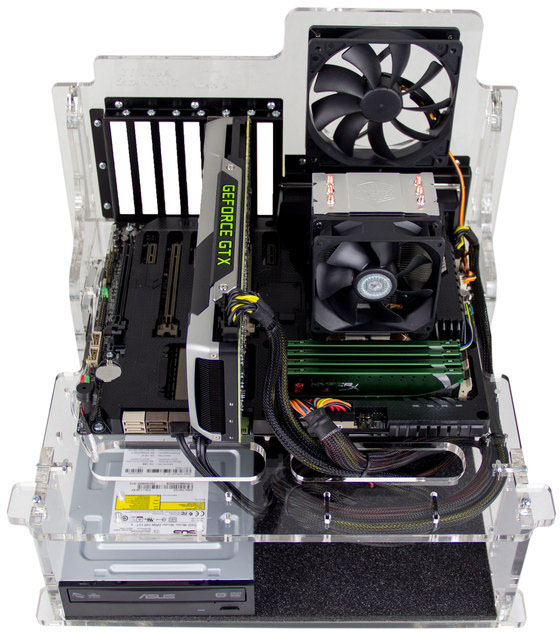
Now that we’ve put the Puget Systems Test Bench EATX Version 1 together, let’s move our system’s components onto it.

Support our efforts! With ad revenue at an all-time low for written websites, we're relying more than ever on reader support to help us continue putting so much effort into this type of content. You can support us by becoming a Patron, or by using our Amazon shopping affiliate links listed through our articles. Thanks for your support!