Techgage logo

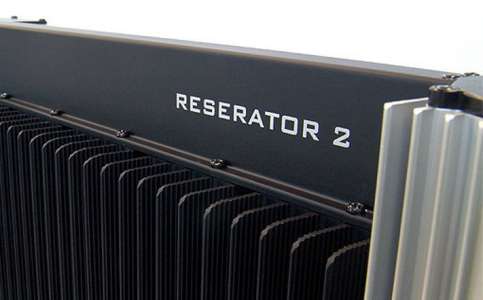
Zalman Reserator 2 Fanless Water Cooling

Date: February 15, 2007 - Author: Greg King

Sporting a longer box design rather than the slender tower, the Reserator 2 provides far more surface area than its older brother. With Matt’s opinion of the first generation product in mind, we are now set to work with the second round of liquid cooling from Zalman. Can the new design improve on performance over the original product? Let’s take a closer look to find out.


Introduction

In the PC community, there are only a few names that continually come up when there are talks of cooling. One of these companies is Zalman. While their products have been widely used by overclockers, their primary focus has always been on delivering a computing experience as close to silent as possible. Founded in 1999, Zalman has grown from a manufacturer of quality mainstream cooling components to a widely respected maker of high performance coolers.

Back in October, we took a long look at Zalman’s Reserator 1 V2. Throughout that review, Matt found the Reserator easy to install and it's performance to cool the system better was better than an air alternative. With the experience that Zalman gained from the original Reserator, they set out to design a more efficient water cooler but insisted on retaining the silent operation that the original design mastered. The culmination of this research and development is the aptly named Reserator 2.

The Goods

The Reserator 2 comes packaged in a plain brown box and is secured with a pair of shipping strips. These are either to make sure the box stays closed while in transit or to help in moving the package around. Either way, they are not coming off by themselves.

With the box opened, we see the retail packaging enclosed in the original brown box. This ensures that the retail box remains presentable during shipping so it can be moved to a store shelf if needs be.

Once out of the shipping box, the Reserator box is colorful and informative. Our first impression of the packaging was that it was large. Standing at roughly the same height as most PC towers, the Reserator box is large.

The last picture we have of the packaging is of the thick Styrofoam shell that the hardware comes packed in. The size of the box is more to accommodate the protective shell than it is indicative of the size of the Reserator itself. Sealed with Zalman packing tape, the shell holds all of the important hardware.

Once everything is out of the box, we see the tubing, along with the manual on the backside of the Styrofoam in a recessed area of the packaging. The manual is surprisingly very informative and readable in several languages. The tubing that Zalman has decided to use with the cooler is 3/8" PVC and they generously give you roughly 4 meters, or 12 feet for us Yanks.

Once opened up, we see the hardware that comes with the Reserator 2. Included is a pair of feet to stabilize the unit, a bottle of Zalman’s anti-corrosion coolant, one CPU water block, one GPU water block and the hardware needed to put it all together. One interesting piece is a jumper cable to run your power supply without hooking anything up. In the past, I have just used a paper clip but not to allow anything to chance; Zalman provides this piece for you. Small but appreciated none the less.

Starting with the unit’s “feet”, they are milled out of aluminum and bolt onto the bottom of the Reserator to stabilize it. To protect the surface that will support the cooler, as well as reduce any vibrations that might be caused by the pump, there are rubber feet on the bottom of the feet. Being secured onto the coolers main chassis by two small screws each, the ease of installation is great.

Moving onto the provided liquid, this is something that Zalman has produced themselves. The anti-corrosion coolant as they have labeled it is diluted with water and poured into the Reserator itself. Being anti-corrosive, the coolant will help prolong the life of the pump and the blue tint should certainly look good in any windowed PC case.

The parts included in the kit contain everything one will need to get their Reserator installed and up and going. The only downside is that that’s it. They have provided the exact amount of screws and parts to get the hardware installed and nothing more. With the mounting screws being so small, you might want to install this on a flat surface and not a carpeted floor because if you loose one of the screws, you’re out of luck. This is something that Zalman should consider including in future kits and it wouldn’t cost anything at all. Also included is a PCI backing plate to route the power cable and tubing into the case, as well as the above mentioned power supply jumper and a degaussing tube.

Waterblocks

Included in the bundle is a pair of water blocks. One block is for the CPU while the other one is intended for, you guessed it, the GPU. Zalman also offers blocks for the motherboard chipset as well as one for your video card’s RAM. In this review, due to the limitations of the hardware, only the CPU water block will be used. More on this later though.

To start off with, the CPU water block comes in its retail packaging as well. The package is colorful, informative and easy to open. Included with the block are all the necessary adapters for AMD socket 939, 940 and AM2 as well as Intel’s 478 and vastly popular 775. Also included is a set of clamps to hold the tubing securely around the inlet and outlet on the top of the water block itself.

Along with everything else, there is also a kit of paper washers for the motherboard bolts, some Zalman thermal paste as well as the adapters to hold the waterblock down on the CPU.

The waterblock itself consists of a pure copper base and a clear plastic top. The copper is coated with gold to prevent corrosion but this also gives the block an incredible look with an almost perfect mirror finish. On the inside of the block, Zalman has designed it with rows of small cube shaped towers to increase the surface area greatly. This will allow more water to flow over more area of the block, taking more heat with it as it does.

As with any water block, the inlet should be in the middle with the outlet being the nozzle closer to the side. This allows the incoming water to flow directly onto the center of the CPU, presumably where the most heat is being generated, thus resulting in a better cooling effect.

Flanking the center nozzle, 2 small threaded holes can be seen. These are where the mounting brackets are attached to the block itself.

The following picture is a prime example of the near perfect finish that Zalman has machined the base of the waterblock to. With the tubing clamp just in front of the block, an almost perfect reflection can be seen. Kudos to Zalman for taking the effort and going the extra mile.

The GPU waterblock, while not as attractive as the CPU block, is a solid piece of hardware none the less. With a blue anodized aluminum top and a silver aluminum bottom, the ZM-GWB3, as Zalman so lovingly refers to it as, fits almost every video card known to man. While not listed on their site, we cannot say with 100% certainty that this block will fit on NVIDIA’s series 8 cards.

Also coming in the retail packaging, the ZM-GWB3 was built for kits like this in mind.

Being a GPU block, the barbs cannot come straight out of the top. This is solved with a pair of 90 degree angles that allow the user to run a line from their CPU, around the side of the video card and then into the GPU block itself. This also makes the entire setup slimmer, allowing it to fit into spaces without taking up any more slots than it has to.

As we can see, there wasn’t near as much attention paid to the GPU waterblock as there was to the CPU. The bottom surface is smooth, but not near as much as it’s CPU cooling counterpart. While this isn’t a huge deal, the difference between the two, appearance wise, is night and day.

The Reserator 2

As stated earlier, the Reserator 2 retains the original’s ideas, but differs in the total design. Instead of tall and cylindrical, the second version sits shorter but extends far deeper than the first one does. Sitting 17 inches deep, 14 ½ inches tall and just 3 inches wide, the Reserator looks like a small PC tower, only much thinner.

Out of the packaging, we see that the Reserator 2 is essentially just one very large heatsink. Even on the end where the pump is housed, the hollow area that acts as a reservoir has fins that extend off of the piece itself to further dissipate heat. The body of the cooler is lined with 25 small fins that stick out, each with small grooves etched in them to maximize surface area, allowing as much heat to escape as possible.

As we move towards the back of the unit, we get to the area that houses the pump. The back of the Reserator is hollow and the removable top is held on by 4 small screws. To seal the lid onto the top, Zalman has used a large black o-ring. This will prevent leaks should the Reserator ever get knocked over.

Glancing down into the reservoir, we can see the pump at the bottom. Rated at 150 liters per hour and with a maximum lift or just one meter, the pump is by no means a work horse but for the purpose of cooling, it should provide ample water movement.

Along the bottom of the case, on either side, run 2 cords. One is a power cord that plugs into any AC wall outlet. This is obviously to power the Reserator. On the other side, there is one 2 pin standard molex cable that runs through the provided PCI slot adapter and into your case. It plugs into any free 4-pin molex connector that you have and relay to the Reserator that the PC is on and that the pump should start doing it’s job.

One thing that would have been nice would have been to design the Reserator with both cords on one side or the other. This would allow you to position the unit at such an angle to allow both cords to be hidden behind the tower. This isn’t something to lose sleep over, but another easy thing to do to add to an already beautiful piece of hardware.

Moving to the front of the Reserator, there is a small brushed aluminum button that toggles the internal blue light on and off as well as resets the internal beeper that warns of loss of water flow. Below this is a clear window with a flow meter inside. This is the easiest way to confirm that water is actually moving inside the cooler. The last thing anyone wants is for their hardware to burn up because the cooler failed. With the flow meter and the buzzer, unless you are not in the house, your pretty safe should something inside the Reserator fail.

One more thing to point out, and this is an important one, is the quick disconnect couplers that Zalman has used on both versions of their Reserators. These are rather simple but something that I wish all water kits had on them. They are clearly marked with an in and an out on them so you do not confuse your tubes and have your water flow traveling the wrong way. These also allow the user to connect and remove the tubing without having to deal with all of the liquid in the reservoir and tubes.

Installation

Installation of the Reserator should prove to be no harder than any other installation I have done. With all Intel installs, the first step is to remove the motherboard. Once removed, we will need to install the provided mount and back plate.

As you can see, the top mount sits rather close to the capacitors but clears them all. The back plate is also open in the center to deny heat the ability to build up on the back side of the motherboard.

From here, we will not be using the provided thermal interface material (TIM) and instead use Zalman’s high end ZM-STG1 thermal paste. This is conveniently packaged in a small fingernail polish type bottle and has a small brush on the inside of the cap. This makes it easy to “paint” on the thermal paste and get a thin, even coat across the top of the E6600.

Once the paste is painted on, the block fits nicely down in the mounting bracket. One thing I would like to suggest is to install the two mounting arms prior to setting the block down onto the CPU. This saved me a fair amount of time as I was not fighting with the small screws inside the case, but rather attached them on the desk and then set the entire piece onto the CPU.

Testing, Final Thoughts

With everything installed, we are now ready for testing. To test the Reserator 2, temperatures with the CPU running idle and under 100% on both cores will be taken. This will be done at stock clocks as well as under overclocked conditions. The Intel E6600 will be overclocked to 3.29 GHz at 1.35v. To get the CPU up to 100% load, instances of CPU Burn-In will be ran, one for each core. This will be done for 45 minutes and the temperatures (in Celsius) will be recorded. Ambient temperature in the office is set at 75 degrees Fahrenheit (23.8 Celsius).

Before we get into the results, let’s take a look at the test system.

Conclusion

There it is. While not as powerful as a custom water kit from some of the larger water companies, the Reserator performs exceptionally well. It should be mentioned though that it was never Zalman’s aim to supplant the likes of Asetek, Danger Den and Swiftech, but to rather provide a complete, easy to install option. Zalman has accomplished this all while making a perfectly silent product. In fact, the Reserator is so quiet that unless I placed my ear to it, I couldn’t even tell it was running. I would be willing to bet that 99% of all users have enough ambient noise around them, no matter how quiet it may be, that they wouldn’t even know the Reserator was on if it weren’t for the flow meter in the front of the unit.

Installation of the Reserator took just under 2 hours and that was with me taking pictures throughout the process. This included taking the benching PC and placing it in a computer tower as well. If you take the silent operation, the better than air cooling capacity and the classy design, you get one solid product that for the price is a viable choice for those who need a quiet PC. Something like this would be absolutely perfect for people with their PC in their room. I have read articles that suggest that this would make a great cooler for an HTPC machine but for me, I don’t care for the external design and would not want this setup in my entertainment center. That is just one man’s opinion though.

The uses for this cooler are vast. I personally like how this looks on my desk, next to my PC. The soft blue light, which can be turned off and on for those of you who keep their PC in their bedroom, looks nice in the dark and ultimately adds to the overall feel the Reserator. With that said, my only main complaints are the lack of extra screws and the external nature. One or two extra screws aren’t going to kill anybody is it?

With a street price of just over $300, the Reserator 2 isn’t cheap but with all of the benefits that come with it, Zalman managed to squeeze every pennies worth into the cooler. With all things considered, the Zalman Reserator 2 earns a solid 8 out of 10. The coolers not perfect, but it’s pretty darn close. Well done Zalman.

Discuss in our forums!

If you have a comment you wish to make on this review, feel free to head on into our forums! There is no need to register in order to reply to such threads.


Copyright © 2005-2008 Techgage Networks Inc. - All Rights Reserved.