- Qualcomm Launches Snapdragon 4 Gen 2 Mobile Platform
- AMD Launches Ryzen PRO 7000 Series Mobile & Desktop Platform
- Intel Launches Sleek Single-Slot Arc Pro A60 Workstation Graphics Card
- NVIDIA Announces Latest Ada Lovelace Additions: GeForce RTX 4060 Ti & RTX 4060
- Maxon Redshift With AMD Radeon GPU Rendering Support Now Available
ASUS Rampage II Extreme – The Definitive Overclocking Board?
ASUS has long supported overclockers with their motherboards, but the Rampage II Extreme takes things to the next level. In addition to an even more robust BIOS than what we’re used to, we’re given the ability to put our multi-meters to good use with the help of easy-access board contacts. When all said and done though, is the RIIE really worth the $400 asking price?
Page 1 – Introduction
Although it’s a little difficult to believe, it has already been a month since we first took a look at Intel’s Core i7 platform. Since then, much has happened. On the site side of things, we followed-up with a look at memory efficiency on the platform, where we tried to answer your questions of “how fast?” and “how much?”.
Since Intel’s official launch just two weeks ago, the availability has improved quite a bit also. Directly at launch, the components selection (aside from the CPUs themselves) was weak, but that’s not so much the case right now. Taking a look at any popular e-tailer will prove that, with the latest entrants in the motherboard scheme of things being both eVGA and Foxconn.
Currently, there seems to be ten boards for your choosing, with ASUS and Gigabyte offering us three each (it’s more like two with ASUS though, as two models are almost identical). MSI also has two, while Intel has their DX58SO. Since eVGA and Foxconn have finally brought their own boards to market, we have ten to choose from, with price ranging from $240 all the way up to $400.
We’ve taken a look at three boards so far, including ASUS’ own mainstream P6T Deluxe, but today, we’ll be putting their higher-end Rampage II Extreme to a good test. This is a board that stands out of the crowd, for more than one reason. The most noticeable is the price (at $400), as it’s the most expensive offering currently available. Let’s take a deeper look and see if ASUS did enough to actually warrant such a high cost of entry.
Closer Look at ASUS’ Rampage II Extreme
ASUS has been a long-time supporter of the overclocking scene, and it’s been proven in the past on this site many times. We’ve taken a look at each one of their most-popular “enthusiast” boards, and overall, I can honestly state that they are some of the best offerings available. It’s not so much that they overclock to incredible heights (which most of them do), but it’s the ease-of-use that ASUS focuses on that actually makes their boards a joy to overclock with.
As of today, though, it’s hard to look at their previous offerings the same way again. I have a question mark in the title of this article, but in all reality, it could easily be an exclamation mark, because after you see what steps ASUS has taken to build their RIIE as the ultimate overclocking board, you might very-well agree that it deserves one.
We’re going to tackle the majority of the overclocking-related information on the respective page, but for now, let’s take a trip around the board itself and see what it offers even before we boot up.
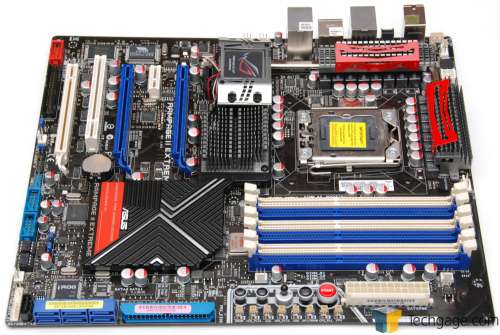
For the most part, the Rampage II Extreme borrows from many of the design aesthetics of the original, which we evaluated way back in September. Besides the obvious differences in architecture, the RIIE is about two inches wider than the original, but that won’t stop it from fitting inside a standard mid-tower chassis. For the ultimate of cooling though, a full-tower is definitely recommended (more so if you are actually “extreme” overclocking).
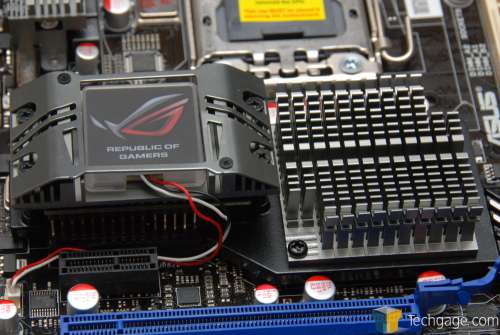
The same gunmetal gray heatsinks have returned, with the “Ferrari” red shields. The Southbridge cooling is handled by a completely flat heatsink with an attractive fin design. That same heatsink has a spot for you to sign your name, if you wish to do so (high overclocks do instill a sense of pride, after all). From a general design standpoint, nothing strikes me as being out of the ordinary, except the placement of the on-board overclocking control buttons, but I’ll tackle this more on our overclocking page.
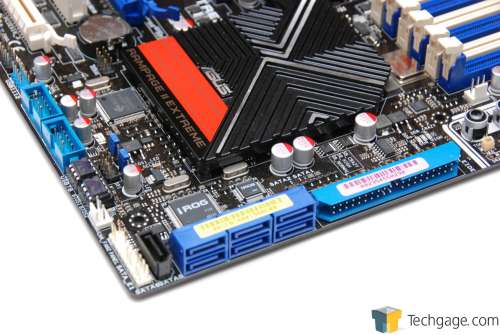
At the bottom right-hand corner of the board, we’re greeted with the usual assortment of storage ports, USB connectors and also the ATX chassis connectors. Included here are 6 S-ATA ports plus another one (black) that’s designed to be used for an e-SATA drive. If one isn’t to be used, a regular S-ATA drive should work fine. For such a high-end board, it would have been nice to see an even larger selection of ports, especially after seeing the ten that Gigabyte’s EX58-UD5 offers. Granted, the overall demand for 10 or even 8 ports would be low, but we are dealing with “Extreme” here.
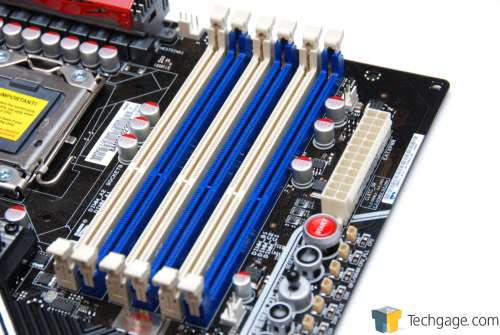
As we’d expect, six DIMM slots are found here, which will offer triple-channel operation with three or six memory modules. This is one area where I’m led to confusion, though. While most other enthusiast X58 boards boast 24GB memory support, this one (and the P6T Deluxe) are labeled to support 12GB. I’m unsure why this is the case, as one specific X58 feature is 24GB support. It’s actually rather doubtful that the board wouldn’t support 24GB if all the rest can, but sadly, we don’t have 4GB DDR3 sticks lying around here to test that theory out.
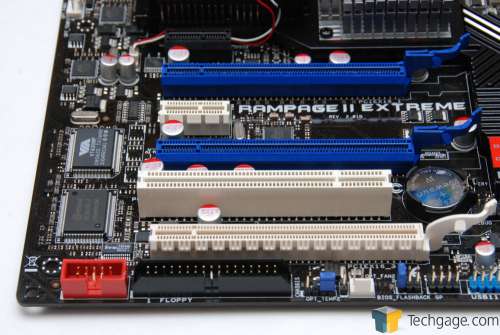
The RIIE includes support for 3-way GPU configurations, so it’s only sensible that it includes three PCI-E 16x slots, which it does. In addition to those, we have two PCI-E 1x and also a single legacy slot. This is probably the least-impressive part of the board, given the choice of only six slots.
The problem is twofold. If you’re building a high-end machine using this board, and are looking for a 3-way GPU configuration, it technically wipes out a total of five slots. Combating this issue might be achieved if you are using water-cooling and the blocks don’t take up more than a slots-worth of space, or if you use three GPUs with single-slot coolers, but that would defeat the goal of ultra-high performance.
In the worst-case scenario, a 3-way GPU solution would wipe out five slots, leaving only the top PCI-E 1x. But that’s still a problem, because due to the Northbridge setup, there’s only room there for a short card. Plus, if you plan on using the onboard audio (and to hear audio in general, you pretty much have to), you are left with all slots filled. So, anything else that needs to be added should be USB based, such as a WiFi adapter.
I admit, the number of people that plan on building a 3-way GPU setup is low, but really, this is a touted feature of the board. The fact is, if you use three dual-slot GPUs, you are left with absolutely no expansion via these slots. Problems still arise if a 2-way GPU solution is used, as the PCI legacy slot would still be covered. But, given the high-end nature of this board and platform, it is somewhat reasonable to agree with the decision to leave a PCI-E 16x slot available if that configuration is used (PCI-E 1x, 4x and 8x cards will work fine in 16x slots).
That tangent aside, let’s get back to what makes this board mean. The Northbridge heatsink looks great overall, but if you aren’t a fan, or you wish to water-cool, the entire contraption is easily removed once a handful of screws are out of the way. The Republic of Gamers logo lights up while the PC is in use, and pulses when the machine is shut down. That feature causes the PC to draw a slight amount of power while the PC is off (around 4W).
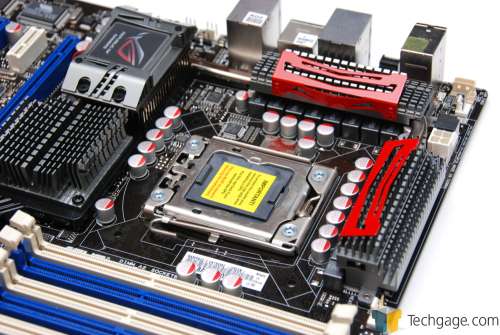
If there’s one thing to be said about the CPU socket, it’s that it’s pretty safe behind the metal walls that surround it. Also surrounding it is the 16 power phase solution, which while “extreme”, should help out with equally “extreme” overclocks.
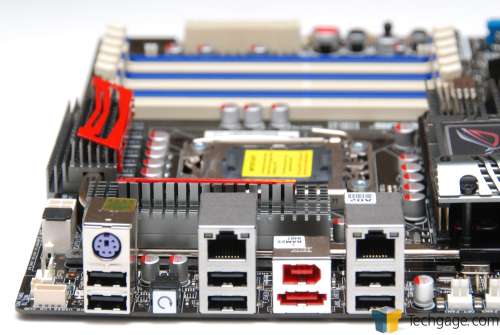
On the back we find six USB, one e-SATA, one FireWire, two LAN, one PS/2 (keyboard) and a BIOS reset button. There’s a lack of audio connectors as the included audio card takes care of them. Note the three fan connectors in this shot alone. You really, really don’t have to worry about airflow with this board.
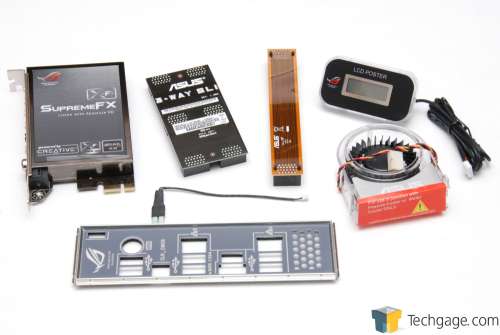
ASUS includes more extras with their boards then most others do. Included here are two different SLI bridges, depending on whether you want a 2x or 3x configuration (ATI CrossFireX bridges are included with the GPUs in the box), an LCD Poster, which gives you instant system information, a heatsink fan and also the back I/O port. This has an extra cable on it that will allow connection straight to the motherboard, which will allow you to plug the LCD Poster directly into it.
The included X-Fi audio card, like previous offerings, is not a true X-Fi card. Rather, it’s a SoundMax-based audio solution that uses software to activate key X-Fi features, such as EAX. What this card lacks is a real X-Fi audio chip and support for EAX 5.0, which is used in some current games. The exclusion of these features is due to cost, as inclusion would raise the motherboard price significantly, and at $400 already, it really can’t be any higher.
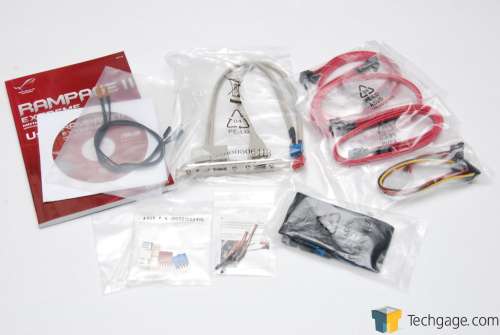
Unless you have more than four hard drives or ODDs, you’ll have no problem installing everything you need to with the included cables. The main addition here is the FireWire/USB bracket that can be installed to a free slot in your chassis. Ideally, since the back I/O port only has one FireWire and six USB to begin with, and lots of free room, there is absolutely no excuse for not being able to locate them there and omit the need for this add-on entirely.
Take note of the very thin cables (or wires) in the bottom center, as they’re easily one of the most unique features of this board. We’ll talk about them briefly on our overclocking page.
With the look at the board out of the way, we can move into a look at the BIOS. You might soon be saying, “What didn’t they include?”, so let’s take a look.
Support our efforts! With ad revenue at an all-time low for written websites, we're relying more than ever on reader support to help us continue putting so much effort into this type of content. You can support us by becoming a Patron, or by using our Amazon shopping affiliate links listed through our articles. Thanks for your support!


