- Qualcomm Launches Snapdragon 4 Gen 2 Mobile Platform
- AMD Launches Ryzen PRO 7000 Series Mobile & Desktop Platform
- Intel Launches Sleek Single-Slot Arc Pro A60 Workstation Graphics Card
- NVIDIA Announces Latest Ada Lovelace Additions: GeForce RTX 4060 Ti & RTX 4060
- Maxon Redshift With AMD Radeon GPU Rendering Support Now Available
Social & RSS Feeds
Latest Videos


Latest News
ATI’s Eyefinity: 18 Games Benched on 3 and 6 Displays
by Rob Williams on May 17, 2010 in Graphics & Displays
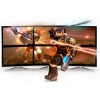
When AMD launched its ATI Eyefinity technology, it helped redefine high-end gaming, and effectively made 2560×1600 look like child’s play. In this article, we put the technology to a good test across 18 different games and on both 3×1 (5760×1080) and 3×2 (5760×2160) display configurations to see just how worthy Eyefinity is.
Page 1 – Introduction
When AMD launched its ATI Radeon HD 5000 series of graphics cards last fall, we saw stark performance increases, DirectX 11 support, superb power efficiency, and a technology that the company made sure was kept secret up until its launch: Eyefinity. At first, it was difficult to understand what made this new multi-display technology special, but today, the reason is clear.
What Eyefinity brought to the table was an effective way to play your games across multiple displays without the need of having to pony up hard cash for a special device (such as a Matrox TripleHead2Go). Instead, if you purchased an HD 5000 series card, you also bought yourself the ability to game on more than one display, even if you had no intentions of doing so.
If there’s one thing I’m sure most people would agree on, it’s that free is better than not free. That of course assumes that the technology isn’t limiting in some way, and in the case of Eyefinity, it’s not. In many cases, it’s better.
In the earlier days of Eyefinity, AMD focused primarily on pushing the technology as a way to power a 3×1 display setup, but with the recent launch of its Radeon HD 5870 Eyefinity 6 graphics card, those who pondered topping their desk off with six displays now had a simple solution. For many, six displays sounds ridiculous, but believe it or not, many of today’s games support the ultra-high resolution of 5760×2160 just fine, so it’s easy to understand why AMD wasted no time in getting the word out there.
In March, AMD sent us its Radeon HD 5870 Eyefinity 6 graphics card along with six Dell P2210H 22-inch displays to allow us to put the technology to a test, and since then, we’ve done a lot of that. In this article, we’re going to touch a little bit on considerations you need to make if you want to dive into Eyefinity, the installation process and other interesting tidbits, along with performance testing across 18 titles in 3×2 and 3×1 display configurations, with and without CrossFireX.
Considerations for Eyefinity
As you might expect, taking the Eyefinity plunge requires a little bit of prep work. Aside from the graphics card, the most important consideration to make is with regards to the displays you plan to use. If you already own 3 or 6 displays, then you will have to work with what you have, but if you don’t, then you need to make sure that the displays you purchase are going to be suitable.
It’s fairly obvious, but regardless of whether you want to go 3×1 or 3×2, you will want to select a display that’s completely flat on the sides and top and bottom – the latter is important only if you are going 3×2, however. Because the bezels literally do split your gameplay into sections, you want to minimize the effect of it as much as possible. If you select a monitor with a slightly round frame, the end result isn’t going to look quite as good.

Although many companies produce monitors that fit the bill nicely for Eyefinity, AMD chose to send along a Dell model as the vast majority of that company’s displays utilize the same clean edges. If you’re able to spot displays that are perfectly rectangle and happen to have thinner bezels, you should heavily consider those.
Thanks to a feature introduced in the Catalyst 10.3 driver, you can now compensate for your bezels with a simple tool that uses a triangle to help you make the entire picture seamless. It’s a simple tool, and effective. In order to have compensation work, your resolution has to be increased, so don’t expect to stick with 5760×2160 for too long. Chances are your end result will be something closer to 6000×2400.
Because Eyefinity essentially turns a bunch of displays into one monolithic display, the resolution you end up with is going to be massive. To calculate the resolution you’ll end up with, you simply need to tally together the widths and heights. For a 3×1 configuration using 1920×1080 displays, the end result is 5760×1080, and for 3×2 configuration using the same displays, the resolution will be 5760×2160.
Seeing as though it’s kind of hard to picture such a resolution without actually seeing it, take the fact that the high-end resolution of 2560×1600 equals 4,096,000 pixels, and 5760×2160 equals 12,441,600 pixels. Yeah, that’s a lot of real-estate right there. Need an even better example? Take a look at this graphic:

Even by today’s standards, the resolution of 2560×1600 is huge, and even a bit overwhelming for a lot of people. But here, it’s completely dwarfed by 5760×2160… there’s just no comparison. Because of this major difference in overall pixels, it means in the simplest terms that for an equal GPU, you’ll only see 33% of the performance at 5760×2160 compared to if you were powering only 2560×1600. That’s not even taking into consideration bezel compensation, which could tack on another 2 million pixels!
The next and also very important consideration to make is choosing a good display mount. If you’re planning to go with a 3×1 configuration, then chances are good that you don’t need any sort of mount at all since you can simply place the displays beside each other (unless you want them on the wall, of course), but for 3×2, special mounts will be required for obvious reasons. I don’t recommend substituting proper mounts for duct tape, either.

For our use, AMD sent along two different mounts from Atdec, from the company’s Visidec line. To kick-start the building process, we used the VFS-Q to prep the first four displays, and then finished things off with the VFS-DV for the final two. I have next-to-no experience with display mounts, so I can’t outright recommend these, although they did the job fine. I did end up cracking a piece that secures one of the displays, but I blame that more on my own impatience than anything (it took me about four hours of actual work to get the entire build completed).
The final piece to the Eyefinity puzzle is of course the graphics card. With almost all Radeon HD 5000-series graphics cards, you’ll be able to hook up 3 displays just fine for Eyefinity, and unless you have a display model that doesn’t offer a wide-range of connectivity ports, you may not even need to spring for an adapter. In a typical 3×1 configuration, two displays could use a DVI port and the last could use either HDMI or DisplayPort, whichever you have available. ¹

The situation gets a bit trickier when moving up to the 3×2 ranks, though, as no common graphics card offers up six display outputs right out of the box. Well, until the Radeon HD Eyefinity 6 came along that is. As you can see from the image above, this unique card features six mini-DisplayPort connections on the back. The reason for AMD’s choosing to go with mini-DP over regular DP is that there is simply no room for six full ports, given that the exhaust is absolutely necessary.
Because mini-DP is hardly a common standard, any Eyefinity 6 card you purchase will include a multitude of dongles in order for you to successfully connect all of your displays. Of these, a few may be DP-to-mini-DP, HDMI-to-mini-DP and so forth. The selection will vary, but whatever is included should suffice for your setup unless you are using low-end displays that happen to offer few connectivity options.
Note that if you are planning to take the 3×2 route, Eyefinity 6 cards demand a $100 premium over regular HD 5870’s. The price is justified, though, as that price includes all of the dongles that are required, along with the fact that Eyefinity 6 cards come equipped with 2GB of GDDR5. If you are planning to go with a CrossFireX setup, two regular HD 5870’s will be suitable as well. You will just need to have the proper dongles/adapters handy. ²
Due to the fact that our room used for testing is quite small, and we had to ghetto-mod two different desks to even handle all six monitors, I’ve omitted additional real-world photos. If you do want to see an example of the setup with a game in action, you can check out this example of NFS: Shift.
By now I believe we’ve covered all of the important aspects and considerations for Eyefinity, so let’s get right into our testing… right after a quick look at our testing methodology, of course.
¹ We were incorrect on this fact. For 3×1 on a regular Radeon HD 5870, you will need to use 2x DVI and 1x DisplayPort.
² This has proven incorrect. AMD has stated that in CrossFireX mode, the ports on the secondary graphics card are disabled, therefore you are limited to the ports the primary card offers. You can still use six displays off of two graphics cards, but CrossFireX will be disabled. It’s one or the other.

Support our efforts! With ad revenue at an all-time low for written websites, we're relying more than ever on reader support to help us continue putting so much effort into this type of content. You can support us by becoming a Patron, or by using our Amazon shopping affiliate links listed through our articles. Thanks for your support!

Rob Williams
Rob founded Techgage in 2005 to be an 'Advocate of the consumer', focusing on fair reviews and keeping people apprised of news in the tech world. Catering to both enthusiasts and businesses alike; from desktop gaming to professional workstations, and all the supporting software.


