- Qualcomm Launches Snapdragon 4 Gen 2 Mobile Platform
- AMD Launches Ryzen PRO 7000 Series Mobile & Desktop Platform
- Intel Launches Sleek Single-Slot Arc Pro A60 Workstation Graphics Card
- NVIDIA Announces Latest Ada Lovelace Additions: GeForce RTX 4060 Ti & RTX 4060
- Maxon Redshift With AMD Radeon GPU Rendering Support Now Available
Social & RSS Feeds
Latest Videos


Latest News
Big Cooling For Little PCs: Corsair H5 SF All In One Liquid CPU Cooler Review
by Ryan Perry on September 1, 2016 in Cooling
Cooling options for those building or upgrading an itty bitty mini-ITX system are few and far between, and even less so if liquid cooling is a must. Fear not small form factor lovers, Corsair is here to save the day with the H5 SF, the mightiest of all mini all-in-one liquid coolers, so read on to see if it can keep up with today’s pint sized powerhouses.
Page 1 – Corsair H5 SF All In One Liquid CPU Cooler Review
Not long ago it seemed like the size of PC chassis was about to spiral out of control. Full towers were all the rage, but would eventually give way to the monstrous ultra tower or super tower. These were chassis so big you could almost use them as a coffee table.
Sure, for those running a high-end rig with a custom water cooling setup, triple or quad GPUs, and/or a ton of drives, they certainly served a purpose, but before too long it’s as if someone flipped a switch and component manufacturers began releasing smaller and smaller hardware, sending us in the opposite direction.
Fast forward to the present day and we now have an abundance of mini-ITX chassis that can house some serious, yet pint-sized firepower.
This is all well and good, but what happens when users want to retain the cooling performance of a larger system while shrinking the overall footprint? Smaller, low profile air coolers would be one solution, but they rarely seem to get the job done, especially in a confined space. Enter the Corsair H5 SF, a unique mini-ITX only, all-in-one liquid cooler that features a design that’s very far removed from what we’ve seen in the past.

The H5 SF, or simply the H5 as we’ll refer to it going forward, is a factory-sealed liquid cooling unit that supports Intel LGA 115x and 1366, and AMD AM2, AM3, FM1 and FM2 sockets. It’s also compatible with all Corsair chassis, although certain allowances might need to be made as you’ll see further on in the review.
Non-Corsair chassis owners will need to do their homework first to ensure compatibility, as will those who use motherboards with risers or extra tall heatsinks, since there could be clearance issues at some point in the build or upgrade.
We start our tour of the H5 by looking at the block and pump unit. Under the shiny plastic top cover is the pump that moves the cooling fluid through a series of micro-channels in the copper block in order to pull heat away from the processor. To show this we’d have to ruin our review sample, but what we can show is the surface of the block that, to our eye, has remained virtually unchanged for as long as we’ve been testing these coolers.
The surface is very smooth with only light machine marks, and is perfectly flat on both axis when checked with a straight edge. Like all Hydro-series coolers, the H5 comes with some pre-applied thermal interface material to help speed along the installation.

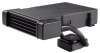
Fluid is moved to and from the the block through a set of flexible, wide-diameter rubber hoses that appear to be the same ones used on beefier coolers such as the H100i. These hoses connect to the unique radiator that measures only 67mm x 40mm x 57mm, and sports a 120mm GPU-style blower fan (or squirrel cage if you prefer) rather than a more traditional high static pressure case fan.
Corsair has the fan listed as running between 1,000 and 1,800 RPM, while pushing a maximum of 24 CFM of air at 42 A-weighted decibels. Power for the PWM-controlled fan is provided by a 4-pin connector, while the pump is powered by a 3-pin connector.

The fan pulls in cool air from all directions across the motherboard and into the shroud where it’s pushed through the aluminum fin array. The now warm air is then exhausted out the port that faces the same way as the motherboard I/O. To ensure that as little warm air escapes into the chassis as possible, a foam gasket has been placed around the exhaust port.

Included with the H5 is the bracket to secure the radiator to the motherboard, a universal Intel backplate, and mounting brackets for Intel and AMD systems. There’s also a set of four thumbscrews to secure the block and pump, a set of metal loops to secure the block and pump to the stock mounts in AMD systems, a set of risers to secure the block and pump unit to the Intel backplate, and a longer set of risers to secure the radiator to the bracket in order to position it above the motherboard.
Finally there’s a detailed installation guide, and the usual papers showing what’s covered under the 5 year warranty and what to do if warranty support is needed. Strangely absent is a fan splitter seeing how many mini-ITX motherboards only have two fan headers and the H5 will use up both of those, potentially leaving any additional case fans unpowered.

Installation
Corsair sent along its mini-iTX Obsidian 250D chassis to ensure we had one that guaranteed support for the H5, but since my daily driver is a mITX system housed in a Graphite 380T, we decided to use it as the basis for our test system and see how the installation went in that chassis as well.
My rig also already housed a Corsair H100i, which uses the same Intel mounting system as the H5, so we decided to install it without removing the motherboard since some potential customers could be upgrading as opposed to building a fresh system.
So, we’ll tackle the upgrade first. After removing the H100i, but leaving the CPU backplate and risers in place, we secured the radiator bracket to the motherboard using the standard mounting holes that run around the perimeter. Then we threaded the three long risers into this bracket, which is where the radiator will sit, directly over the motherboard.

Next we secured the block and pump to the existing mounts with the thumbscrews, and connected the fan and pump power leads to the headers on the motherboard. The final step was to secure the radiator to the long risers resulting in the completed installation shown below.

Not removing the motherboard saved us a bit of time initially, and even with the openness afforded by the 380T, the shorter hoses on the H5 meant that we couldn’t really rest the radiator anywhere while we ran through the installation steps.
This made things somewhat cumbersome at times and a near constant balancing act. This, combined with the lack of working space compared to a standard chassis also meant that we didn’t get proper contact between the CPU and the block on the first try, resulting in 100 degree temperatures during our first round of testing.
In the end we removed the motherboard from the chassis and reseated the block and pump unit to ensure we had even contact. Our little shortcut ultimately wound up costing us extra time, so we recommend removing the motherboard as part of the installation process, even if you already have compatible mounting hardware from another Hydro-series cooler installed.
If nothing else it means you can clean the dust out your system to keep it looking tidy and to keep temperatures as low as possible. Judging by the look of the interior shots of the 380T, I should have done a better job with the housekeeping, so please excuse the dust.
We installed the same system into the 250D to see if there would be any change in temperatures since it has the dual 80mm fan mounts on the rear panel that Corsair recommends for optimal cooling. We won’t let the cat out of the bag yet with regards to any performance differences between the two chassis, but we will show you a shot of the H5 installed in the 250D.
It should be mentioned that in order to install the H5 in this chassis, the optical disk drive tray had to be removed in order to make room for the increased height of the radiator so as always, please do your homework before ordering your parts to ensure the compatibility of all components. Even though Corsair’s website claims that the H5 is compatible with all of its chassis, certain allowances might need to be made as we mentioned before.

With the power and data connections found along the top of the motherboard, we noticed that there was very little room for the hose to fit under the radiator in order to reach the block. While it did fit, we had an uneasy feeling as the unit was secured.

We don’t believe that the hose was pinched or crushed, but it almost looks borderline to us. We also found that the larger connector and thicker cable for the front panel USB 3.0 connection meant that the cable had to be severely bent in order for the radiator to sit properly on the mounts. Again, everything functioned fine, but it was a tighter fit than we would have liked.

Support our efforts! With ad revenue at an all-time low for written websites, we're relying more than ever on reader support to help us continue putting so much effort into this type of content. You can support us by becoming a Patron, or by using our Amazon shopping affiliate links listed through our articles. Thanks for your support!