- Qualcomm Launches Snapdragon 4 Gen 2 Mobile Platform
- AMD Launches Ryzen PRO 7000 Series Mobile & Desktop Platform
- Intel Launches Sleek Single-Slot Arc Pro A60 Workstation Graphics Card
- NVIDIA Announces Latest Ada Lovelace Additions: GeForce RTX 4060 Ti & RTX 4060
- Maxon Redshift With AMD Radeon GPU Rendering Support Now Available
Social & RSS Feeds
Latest Videos


Latest News
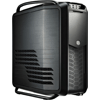
Cooler Master Cosmos II Full-Tower Chassis Review
by Ryan Perry on January 9, 2012 in Cases & PSUs
Huge, feature-rich cases are nothing new, but the Cosmos II from Cooler Master becomes one of the best – if not the best. The company touts it as being an “ultra tower”, and after shoving lots of high-end hardware into one, we’d have to agree. But despite its mega-size and plethora of features, is it worth $349?
Page 2 – Interior
Releasing the latches at the rear of the case allows the doors to swing open on the most heavy-duty hinges that I have ever seen. To say that they’re robust is an understatement. To remove the panels, you simply swing them out at least 35 degrees and then lift them away using the handles along the upper inside edge.

On the inside of both side panels are the removable filters. The left filter doubles as the mounting points for the optional fans and are installed by first removing three screws from the inside so the filter can slide out. Fans can then secured to the filter and the entire assembly secured back onto the side panel.

So without further ado, the innards! Here’s an overall shot to give you an idea of what you’re in for, and there’s a lot.

Since the interior of the Cosmos II has been broken up in two separate sections I’ll start off at the bottom towards the back. This portion of the lower section houses the power supply and features the detachable, pulled-out bracket. Once installed, the power supply sits on a padded riser to ensure there is enough airflow if the unit is installed fan down while absorbing vibrations.

In front of the power supply is a plastic arm that holds two 120mm non-LED intake fans to cool two hard drive cages.

Each of the lower drive cages can house three drives each. Once the release latch at the front is pulled the arm swings out where it can be removed. 3.5″ drives can be installed without tools while 2.5″ drives will need to be secured through the bottom using the included hardware.

The lower drive cages are each held in place by two thumbscrews accessible from the right side. Once those are removed, a plastic tab at the top of each cage can be pressed down while pulling out to slide them free. With the cages and the bottom mounting plate removed this area can hold a 240mm radiator using the included brackets.

Heading on up finds five more hard drive bays like the ones in the lower section. If extra cooling is required an optional 120mm fan can be installed on the side of the hard drive cage facing the motherboard. For those who want less restricted airflow this side of the drive cage can also be removed once two screws are taken off of the backside of the motherboard tray.

Above the upper drive cage are the two hot swap bays with the black power and data connections in place. Only 3.5″ SATA drives can be used in these bays and loaded through front locking covers.

All the way at the top towards the front are the push button locks for the 5.25″ drive bays, each with the Cooler Master logo front and center.

What would normally be the bottom of the case but in the Cosmos II is actually the topside of the divider for the upper and lower sections, features two grommet-lined cable management areas.

Speaking of cable management, the motherboard tray has two rows of grommet-lined openings down the right side and two more openings sans grommets along the top edge. There is also a large cutout around the CPU area to help with installation and removal of aftermarket CPU coolers as well as plenty of loops where cable ties can be used to keep everything pulled up snug.

The top of the case holds the single 120mm fan and the mounting points for the various cooling options mentioned earlier. There is a built-in bracket that holds the front fan in place if a triple 120mm fan setup is to be used.

Most of what could be viewed on the exterior of the back panel is here on the interior with the exception of the thumbscrews used to hold expansion cards in place.

Seeing how the Cosmos II can hold 13 hard drives including the hot swap bays and multiple GPUs, it’s not surprising that there’s about 3.8cm/1.5inches of space between the right side panel and motherboard tray. There’s also more room behind both hard drive locations, so even those with complex systems should have more than enough room to pull off some very nice cable management.

One final point to look at on the right side are the four thumbscrews to release the lower drive cages and the two screws that can be removed to allow for the upper drive cage wall to be removed.

Included with the Cosmos II are brass motherboard standoffs, black screws to hold the motherboard and all of the various drives in place while keeping with the overall colour scheme, and two sets of keys for the two hotswap bays that have also been given a black paint job. There are also five stick-on cable ties, a handful of standard black cable ties, a speaker, an 8-pin extension to ensure users can reach this connection on their motherboard and two brackets used to mount a radiator in the lower hard drive area.

In the past we’ve looked at some other full-tower cases that were designed to house some monster systems such as the Thermaltake Level 10 GT, Cooler Master’s own HAF 932 Advanced and the SilverStone Raven RV03, but none have been as large as the Cosmos II. Is bigger better? We aim to find out as we install our standard test system and also slap some high-end gear in it as well.

Support our efforts! With ad revenue at an all-time low for written websites, we're relying more than ever on reader support to help us continue putting so much effort into this type of content. You can support us by becoming a Patron, or by using our Amazon shopping affiliate links listed through our articles. Thanks for your support!