- Qualcomm Launches Snapdragon 4 Gen 2 Mobile Platform
- AMD Launches Ryzen PRO 7000 Series Mobile & Desktop Platform
- Intel Launches Sleek Single-Slot Arc Pro A60 Workstation Graphics Card
- NVIDIA Announces Latest Ada Lovelace Additions: GeForce RTX 4060 Ti & RTX 4060
- Maxon Redshift With AMD Radeon GPU Rendering Support Now Available
Social & RSS Feeds
Latest Videos


Latest News
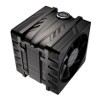
Cooler Master V6 GT CPU Cooler
by William Kelley on September 1, 2010 in Cooling
In the market for the best CPU cooler for the buck? Cooler Master’s V6 GT is the one to look out for. It features a great design that’s both appealing to look at and efficient in doing its job, and despite it taking up less room over all compared to other mega-coolers out there, it offers exceptional cooling ability.
Page 2 – Installation and Testing
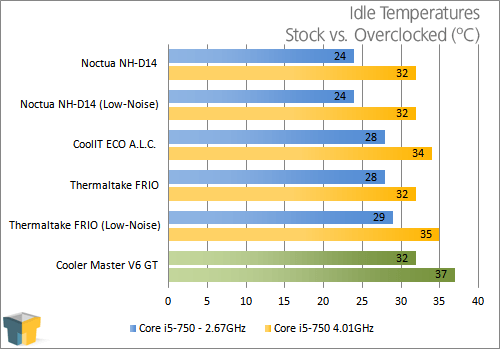
To assure that our results are as accurate as possible, all of our CPU cooler testing is performed under highly-controlled conditions. Our test chassis is kept in a near-steady 20°C ambient environment, with readings taken before and after testing with a standard room thermometer. After we boot up our machine, we allow Windows to settle itself down for 10 minutes to stabilize processes that might be running in the background. Once the PC is completely idle, we record the current CPU temperature as that in our results.
BIOS settings are verified prior to each run, and to help with quick switching of our various profiles, we make use of the motherboard’s ability to store multiple configurations. We primarily use two for our testing here – stock speed, of 2.67GHz, and also a maximum overclock, of 4.01GHz. Stock settings were achieved by using “Load Optimum Default”, and storing those as our stock profile. The maximum overclock was obtained after extensive testing and tweaking to insure it was stable. The BCLK was raised to 191MHz. The CPU’s vCore was raised to 1.400v, and the IMC voltage was raised to 1.30v. The RAM is run at 1.6V and does overclock with the CPU during overclocking testing.
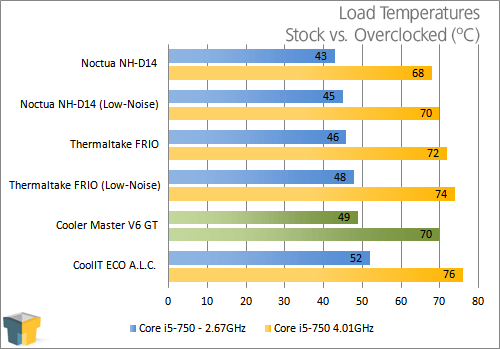
For our monitoring and temperature reporting, we use Everest Ultimate Edition 5, from Lavalys. It allows us to grab the results from each one of the cores, and the CPU has a whole, so we believe it to be indispensable to our toolkit. To help push our Intel Core i5 750 to its breaking-point, we use OCCT Linpack testing. The reason is simple: it utilizes LINPACK. After much testing with various “stress testers” in the past, we’ve found that running a multi-threaded tool that supports LINPACK, such as OCCT (and also LinX), pushes both AMD and Intel CPUs like no other. This results in higher temperatures than others (like Prime95) can muster, and also greater power consumption.
Because our test machine is equipped with 4GB of RAM, we set OCCT to use 90% of the available memory, and then set the test to run 1 hour total. With the help of Everest, the CPU’s various temperatures are recorded throughout all of the testing, and also for a minute after the test ends. The maximum recorded temperature found in the results file is labeled as “Max” in our results.
|
Component
|
Model
|
| Processor |
Intel Core i5-750 – Quad-Core, 2.66GHz
|
| Motherboard |
ASUS P7P55D Premium – P55-based
|
| Memory |
OCZ Reaper PC3-1333Mhz 2x2GB
|
| Graphics | |
| Audio |
On-Board Audio
|
| Storage | Optical |
LG 20X DVD DL
|
| CPU Cooler |
CoolIT ECO A.L.C.
Noctua NH-D14 Thermaltake FRIO |
| Chassis |
Zalman GS1000 (with 2x 64 CFM 120mm Fans)
|
| Power Supply | |
| Et cetera |
As I had predicted, I did find the hardware somewhat clumsy to work with. I wouldn’t say it was overly difficult, but it just took more effort than I would have liked to get things lined up and installed. I did appreciate the ability to offset the mount to the left or right to allow more space on the side needed. You do need to be adept at using both hands to get things attached properly. This install is best left for the motherboard out of the case. Once you install the base hardware you get a better idea of the ability to offset it.

The fan shrouds are easy enough to pry off with a flat bladed screw driver to allow you access to the area for mounting the heat sink. I chose to do my install completely outside the case while you could most likely install the base outside and the rest inside once you install the motherboard. Cooler Master does supply a small screwdriver-driven socket to tighten down the base screws, I found that hand tightening was more than sufficient for a good solid mount.

Once installed it takes a few clicks to reinstall the shrouds with the fans tightly tucked inside. Be sure to pay attention to the airflow direction of each fan as you install it as it is easy to install them in either direction.

The last picture is of the spacing between the body of the heat sink and the memory area. In my experience with many of the competitors, there is usually little to no clearance for taller memory modules. Since most of us do not run low profile memory, this is definitely an issue. I am happy to report there is no issue here unless you do require all four slots to be open. There is ample spacing and if anything the design will help draw some extra air over the tops of your memory modules.

With the installation completed it is time to put the heat to the V6 to see just how well it can handle its job.
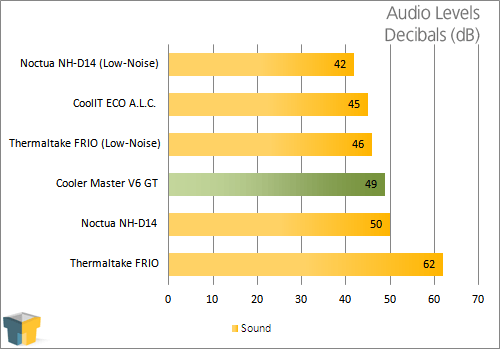
After crunching the numbers I was very pleased with the results. Performance was excellent and on par with the NH-D14 yet it takes up so much less real estate inside your case. While the noise level was higher than I like, it was still within the comfort range of under 50dB. In my mind, the solid design of the shrouding the and effective use of spacing the heat pipes out in a staggered pattern are the two reasons it is able to cool so well with such a small footprint.

Support our efforts! With ad revenue at an all-time low for written websites, we're relying more than ever on reader support to help us continue putting so much effort into this type of content. You can support us by becoming a Patron, or by using our Amazon shopping affiliate links listed through our articles. Thanks for your support!