- Qualcomm Launches Snapdragon 4 Gen 2 Mobile Platform
- AMD Launches Ryzen PRO 7000 Series Mobile & Desktop Platform
- Intel Launches Sleek Single-Slot Arc Pro A60 Workstation Graphics Card
- NVIDIA Announces Latest Ada Lovelace Additions: GeForce RTX 4060 Ti & RTX 4060
- Maxon Redshift With AMD Radeon GPU Rendering Support Now Available
Social & RSS Feeds
Latest Videos


Latest News
GIGABYTE Z77X-UD5H Motherboard Review
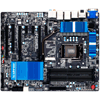
by Rob Williams on September 21, 2012 in Motherboards
For its $180 pricing, GIGABYTE packs quite a bit into its Z77X-UD5H. For starters, it includes 9 internal SATA ports, 4x USB 3.0 ports at the back, and not four, but five internal 4-pin fan headers. On top of it all, there’s an mSATA option and three internal USB 3.0 headers. Does the rest of the board meet our newfound expectations?
Page 2 – GIGABYTE Z77X-UD5H’s EFI
Over the past couple of months, we’ve taken a look at the newest EFI solutions from ASUS, Intel and MSI, and now we’re finally able to see what GIGABYTE has brought to the table. So far, Intel has delivered us what I believe to be the most attractive and usable EFI implementation (which contrasts with the board it’s on being the least-impressive we’ve looked at so far), so GIGABYTE has had a big challenge to deal with to make sure it stands out of the crowd.
Well, I am not sure about standing out of the crowd, but the EFI here is fairly attractive and provides the layout I am most interested in (menu up top, sub-menus below). GIGABYTE was late to the party EFI-wise, and as such didn’t deliver any solution with its P67 products, but it did with its X79 products as we saw with the company’s G1.Assassin 2.
Overall, both EFIs are pretty-much identical, except the one here allows you to capture screenshots to a FAT-formatted thumb drive. I can’t stress how awesome that feature is, and I implore all other board vendors to deploy that ability to all of their motherboards. On one hand, it allows us to provide excellent screenshots for you, rather than horrible photos of a screen, and it also allows overclockers to easily share their configurations. It’s a brilliant idea spear-headed by ASUS a couple of years ago, and one that has got to catch on more.
Upon entering the EFI, you’ll see the screen below. It’s quite simple, but nice in that it immediately provides you some important data, such as the CPU temperature. This is extremely helpful when you just installed a new CPU cooler and don’t want the PC running too long before you can check on its temps.


Another nice feature here is the M.I.T. summary page, quickly showing you your current CPU settings, memory settings, and best of all, per-core temperatures.
The main thing I don’t like about the EFI is the initial page you’ll find yourself on, which I couldn’t screenshot. It’s an overall view of the board, where you can use your mouse or keyboard to navigate various options. If you just want to get inside the EFI quick, you’ll find it to be clunky. Though EFIs enable it, I still haven’t found one that felt right with the mouse – and that will likely always be the case until they can take on the native resolution of the display.
I’ll let the rest of the shots speak for themselves, but will mention that overall, the BIOS is rather easy to deal with and overall quite powerful.


Support our efforts! With ad revenue at an all-time low for written websites, we're relying more than ever on reader support to help us continue putting so much effort into this type of content. You can support us by becoming a Patron, or by using our Amazon shopping affiliate links listed through our articles. Thanks for your support!

Rob Williams
Rob founded Techgage in 2005 to be an 'Advocate of the consumer', focusing on fair reviews and keeping people apprised of news in the tech world. Catering to both enthusiasts and businesses alike; from desktop gaming to professional workstations, and all the supporting software.


