- Qualcomm Launches Snapdragon 4 Gen 2 Mobile Platform
- AMD Launches Ryzen PRO 7000 Series Mobile & Desktop Platform
- Intel Launches Sleek Single-Slot Arc Pro A60 Workstation Graphics Card
- NVIDIA Announces Latest Ada Lovelace Additions: GeForce RTX 4060 Ti & RTX 4060
- Maxon Redshift With AMD Radeon GPU Rendering Support Now Available
Social & RSS Feeds
Latest Videos


Latest News
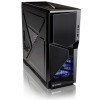
Thermaltake Armor A90 Mid-Tower
by William Kelley on August 9, 2010 in Cases & PSUs
Looking for a mid-tower chassis that offers a big bang for a small buck? Thermaltake hopes to win us over on those claims with its Armor A90, a chassis built from the ground up with military-like design cues in mind, and also one that includes numerous convenience features, superb airflow, and a modest $90 pricetag.
Page 2 – Installation and Testing
All testing is performed under highly controlled conditions to insure accurate and repeatable results. The test chassis is kept in a near steady 20°C ambient environment with readings taken before and after testing with a standard room thermometer. Windows is allowed 10 minutes to stabilize after loading to ensure all services are loaded and the idle temperature is true. The test machine is allowed to cool for 20 minutes between testing sessions.
System settings are verified in the BIOS before every run. I utilize the motherboards ability to store multiple CMOS configurations to store an image for the stock speed of 2.67GHz and for the maximum over clock of 4.01GHz. Stock settings were obtained by using “Load Optimum Default” and then storing those values. The maximum over clock setting of 4.01Hz was obtained after extensive testing and tweaking to ensure it was stable. VCore was raised to 1.4V as well as the IMC voltage to 1.3V. The ram is run at 1.6V and is over clocked with the system bus for over clocking runs.
Everest Ultimate is used for monitoring and recording all results. I use the logging feature to capture all resulting temperatures throughout the test process. OCCT Linpack testing is used to fully stress the CPU. We here at Techgage prefer to use Intel Linpack based stress testing as we feel that nothing else will push the CPU harder and it creates the most possible heat. I run OCCT through five one hour passes utilizing 90% of available ram to get the maximum stress levels. Temperatures are logged throughout the testing and for a minute after the test ends. The maximum recorded measurement is then taken for our results.
|
Component
|
Model
|
| Processor |
Intel Core i5-750 – Quad-Core, 2.66GHz
|
| Motherboard |
ASUS P7P55D Premium – P55-based
|
| Memory |
OCZ Reaper PC3-1333Mhz 2x2GB
|
| Graphics | |
| Audio |
On-Board Audio
|
| Storage | Optical |
LG 20X DVD DL
|
| CPU Cooler |
Thermaltake FRIO
|
| Chassis |
Zalman GS1000 (with 2x 64 CFM 120mm Fans)
|
| Power Supply | |
| Et cetera |
I found the A90 to be an excellent case to work inside of. There was ample room for hands as well as equipment. There were no sharp edges to catch fingers on and everything pretty much fell into place with little effort. While I was not too sure I was happy with the wire management scheme, once built I found everything fell logically out of the way. If you are not lucky enough to have a 24″ CPU power wire like I have then you may need to awkwardly run this connection. Otherwise I had no issue running it around the motherboard and out of the way.

Looking closer at the CPU cooler area you can see there is tons of space, meaning there will be lots of airflow around the CPU socket area to cool everything well. While I had difficulty installing my cooler with the motherboard installed (I will elaborate on this later) there was plenty of space for tools to tighten the motherboard hold-down screws with the CPU cooler pre-installed on the board.

As I noted earlier, the area behind the 3.5″ bays was designed to store all extra and unused wiring. If you have a non-modular power supply like I do, have no fear. You will have more hiding space than needed to store everything out of the airflow path.

I did run into a major issue when trying to install the CPU cooler with the motherboard pre-installed. It seems that the CPU socket opening on the motherboard tray is the S775 spec and my P55 based board had the socket too far out of the window to allow the installation of the back plate and hold-down screws for the cooler. I don’t find this as too big of a deal, but if you do change coolers frequently, this will be a roadblock.

A quick shot of the wire storage area from the backside shows just how much wiring I was able to store effortlessly out of the way. I was initially troubled by this design, but it quickly grew on me and was dead simple to utilize.

You will be happy to know that you can use the biggest heat sinks out there with no fear of clearance issues. The Thermaltake FRIO that I used for this build is right up there with the biggest of the big and there was plenty of room not only between the side panel itself as well as the lower 120mm intake fan area if you choose to install a fan there.

Once powered up, the soft blue glow of the LEDs lights it up well. I would have preferred some sort of switch to have the ability to power the LEDs off if needed, but for me this is no issue as my PC sits under my desk.

Once you push the power button you may do what I did at first which was to look and make sure it was powered on. The fans used are very quiet and only when my GPU cooling fan spun up during post was I able to hear any noise. Once Windows was loaded everything quieted right down to a whisper. Noise levels were impressive at a 33.5dB reading on my meter.
Seeing how it was so quiet, I was also worried the airflow might not be sufficient to keep everything cool. After firing up the test suite I was rewarded with good results:
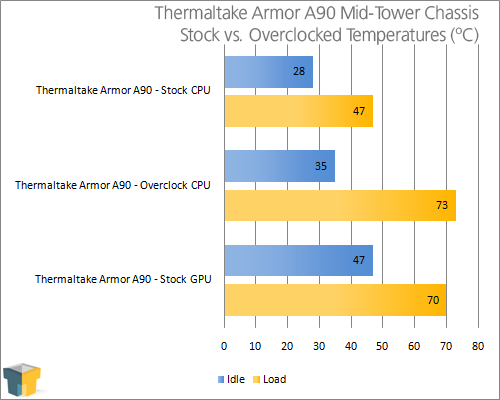
Before you pass judgment on those CPU temperatures, remember this very important point. I ran the CPU cooler fans at their lowest speeds for the least amount of noise. These temperatures reported were attained at 33.5dB of noise. Once I cranked up the fans to their full roar of roughly 60dB I was able to lower that temperature by 11.5°C to sit at 61.5°C! This is the proof I was looking for to show just how well this case flows air. I, for one, truly appreciate the ability to run my PC as silently as possible, so you are definitely in luck here if this is one of your major concerns.

Support our efforts! With ad revenue at an all-time low for written websites, we're relying more than ever on reader support to help us continue putting so much effort into this type of content. You can support us by becoming a Patron, or by using our Amazon shopping affiliate links listed through our articles. Thanks for your support!