- Qualcomm Launches Snapdragon 4 Gen 2 Mobile Platform
- AMD Launches Ryzen PRO 7000 Series Mobile & Desktop Platform
- Intel Launches Sleek Single-Slot Arc Pro A60 Workstation Graphics Card
- NVIDIA Announces Latest Ada Lovelace Additions: GeForce RTX 4060 Ti & RTX 4060
- Maxon Redshift With AMD Radeon GPU Rendering Support Now Available
Social & RSS Feeds
Latest Videos


Latest News
Antec P190 + 1200 Mid-Tower
by William Kelley on August 8, 2008 in Cases & PSUs
Planning a new build and don’t know which chassis to choose? Does the idea of having a feature-packed mid-tower intrigue you? Well, the P190 is just that, with its intuitive design and two pre-installed power supplies, offering you a total of 1,200W of overkill pleasure. Is the case a true winner? Not exactly, but it’s still worth a look.
Page 1 – Introduction
In the world of PC chassis’, Antec has become a well-known name. They have designed some of the best in the business and always seem to have a new one ready for the market. From gaming to servers to the HTPC, their wide range of choice is a force to be reckoned with.
Taking obvious cues from the P182 series, Antec decided to take this case the next step forward. Inside, it is large enough for any current spec motherboard. Cooling is also taken to the same level as the revered 900.
Once you pull the side panels off, the build quality becomes quite evident. The double-rolled side panels and all that steel make for one solid unit. Weighing in at 60lbs out of the box, there is no doubt you are dealing with a serious piece.
-
Specifications
- 1. Dual chambers structure. The power supply resides in a separate chamber to isolate the heat from the system and lower system noise
- 2. Dual-layer sound-deadening panels for Quiet Computing
- 3. Flexible snake light (installed), lights your way while working inside the case
- 4. Cable organizer behind motherboard tray minimizes cable clutter
- 5. Fits up to Extended ATX (12″ x 13″) motherboards to fit your dual processor board, or any other board you could possibly have
- 6. Ports with rubber grommets on the rear for liquid-cooling tubes allow you to easily mount external liquid-cooling hardware
- 7. Neo-Link 1200 Watt dual power supply system: One 650 Watt Neo Power is responsible for powering the motherboard and add-in cards, while another 550 Watt, handles your drives and other peripherals
- 8. Advanced cooling system Even larger fans than previous designs, move more air and turn slower for even quieter operation
- 9. 2 top 140mm Tricolor fan (standard)
- 10. 1 rear 120mm Tricolor fan (standard)
- 11. 1 lower chamber 120mm Tricolor fan (standard)
- 12. 1 side 200mm Big Boy fan with air filter (standard)
- 13. External fan control on the rear panel (for the 2 top fans and 1 rear fan in the upper chamber)
- 14. Front-mounted ports provide convenient connections
- 15. 2 x USB 2.0
- 16. 1 x IEEE 1394 (FireWire, I-Link)
- 17. Audio In/Out (AC’97 & HDA)
Let’s start out by taking a thorough look at the outside. Sporting a top-to-bottom door on the front of the case, the overall style is somewhat bland, yet very functional.

Once open, you get 4 CD/DVD drive bays, and a single 3.5″ bay.

Behind the grills for the dual 120mm (optional) front fan openings sits an easily removable filter. Access is gained with a simple push on the right-hand side.

The side panels are also of the same unremarkable styling as the front. The oversized 200mm fan is poised to suck in just about anything within reach.

There is a welcome filter on the 200mm fan to stop all that dust from being blown all over your parts.

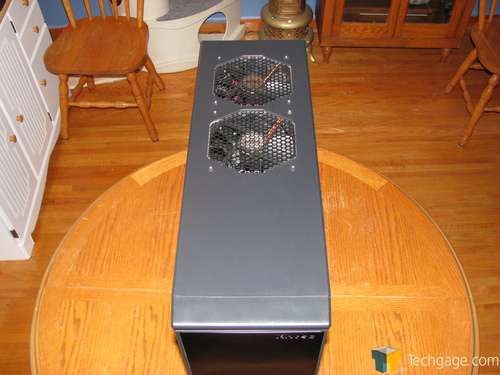
Another really nice feature is the dual 140mm top exhaust fans. I personally believe that these are the most important of all since heat rises. Even on low speed, these fans are sure to let out most of the heat inside the case.
The rear is pretty standard fare except of course for the dual power supplies.

The top and rear exhaust fan speed controls are located at the top of the case as well.

Now, let’s dive into the interior. Here’s exactly what you see when you unpack it from the shipping box:

Antec has supplied you with a lot of extras for installing everything inside. Lots of wire ties, plenty of extra screws and motherboard standoffs and everything needed to install CD/DVD and hard drives as well.

Up front there is room for 6 hard drives to be mounted internally in 2 different cages. You can put 2 in the upper removable cage and 4 in the lower cage. Both cages sit in front of an optional 120mm fan location.

It is worth noting that they have taken some good measures to help isolate noise and vibration from the drives. The rubber grommets do a very good job of keeping the drives floating and are also very easy to work with too. The cages are easily removed with a single thumbscrew each.

A very curious but neat feature is a USB/Molex power work light. All you need to do is either plug it into a free Molex connector or a USB motherboard header and it will light up. While this appears to be useful, I have never wanted to work around inside my PC when it was powered on so I have a hard time seeing this as nothing more than a novelty.

On the backside we see a very high priority paid to attention of detail. There is a large amount of tie downs pressed into the motherboard tray and there is even a small plastic bin on the backside of the top hard drive cage which can hold some small spare parts. The extra wire ties included can be slotted into the many locations on the motherboard tray to hold all your wires down neatly.

On the next page, we’ll take a stab at the installation and testing.

Support our efforts! With ad revenue at an all-time low for written websites, we're relying more than ever on reader support to help us continue putting so much effort into this type of content. You can support us by becoming a Patron, or by using our Amazon shopping affiliate links listed through our articles. Thanks for your support!