- Qualcomm Launches Snapdragon 4 Gen 2 Mobile Platform
- AMD Launches Ryzen PRO 7000 Series Mobile & Desktop Platform
- Intel Launches Sleek Single-Slot Arc Pro A60 Workstation Graphics Card
- NVIDIA Announces Latest Ada Lovelace Additions: GeForce RTX 4060 Ti & RTX 4060
- Maxon Redshift With AMD Radeon GPU Rendering Support Now Available
Social & RSS Feeds
Latest Videos


Latest News
Arctic Cooler Freezer 64 Pro
by Greg King on February 20, 2006 in Cooling
Heat is your computers worst enemy, but luckily enough there are many cooling products to make use of. We are taking a look at a new CPU cooler which uses three heat pipes that can handle heat up to 200w! Let’s jump in and see how it compares to a few other S939 coolers on the market.
Page 1 – Introduction
Cooling is of great concern to most of us in the computer enthusiast community. Heat is the greatest enemy our computers face aside from the random spilt Red Bull onto an open motherboard. But who really does that?
/Hangs head.
Today we have the Arctic Cooling Freezer 64 Pro to look at. Arctic Cooling has been in the computer game for some time. They were started in 2001 in Switzerland and currently have offices in Hong Kong with production facilities in Asia. That’s a fair amount of growth in 5 years I would say. They make premium cooling solutions for video cards and CPU alike and also manufacture computer cases too. They are widely known for their quality so it’s my job to see how their newest cooler stacks up to the rest.
This is basically an enhanced version of their previous A64 cooler, the Freezer 64. While the original Freezer was good, it could have been improved on and thats just what Arctic Cooling did. This time around, they focused on noise and added cooling.
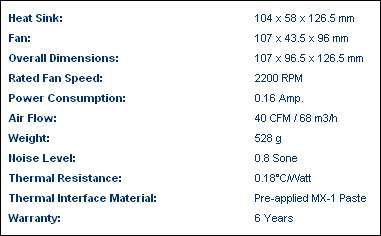
Before we get to the packaging and cooler itself, lets take a look at the specs of this cooler provided by Arctic Cooling themselves.
Packaging
The packaging of this cooler is nice and to the point, a small, square, black package with the Arctic Cooling logo on all of the sides.

Once open, we see the cooler packaged snug in a plastic housing. Also on top are instructions as well as a small case badge for those of you that like others to know what you are packing.

All right, we now have a good feel for what is included in the packaging, let’s take a closer look at the actual cooler and see what is so special about the AC Freezer 64 Pro.
Once outside of the box, we can see the cooler close up and take a look at each feature individually. The first thing I notice, aside form the size, is the 6 heat pipes. There are 3 pipes on either side of the base that run vertically up through the metal fins and stick out of the top of the cooler. These are what will carry the heat away from the CPU and into the fins to dissipate the heat efficiently.


Moving on from the heat pipes, we notice that there is a thermal paste all ready applied to the copper base of the cooler. This first reminded me of the many AMD stock coolers that have a similar paste applied to them. I almost removed this and applied my own AS5 but decided that I would give this a go and see what it had to offer. Upon further review, Arctic Cooling has developed this thermal paste on their own and has named it MX-1. MX-1 differs from AS5 in that it contains no metal particles that could lead to a short if it were to come into contact with any other parts of your PC. This doesn’t concern me much as I am careful, as I am sure you are as well, but good to know none the less. For good measure and to help AC promote their thermal paste, here are their test results.
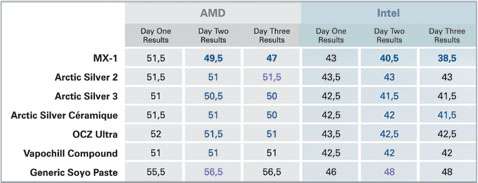
Now I don’t know how exact these results are but they are for an Athlon XP. I also notice that there is no comparison between the MX-1 and some good old AS5. This really isn’t a huge deal as I have all ready decided that I am going to use the MX-1 so I will move on with the review.
There are 42 fins in the cooler with the lowest three being curved at the end so you can move some air over your RAM or your voltage regulators on your motherboard. As said earlier, the heat pipes, run vertically up through the fins and out the top of the last fin. The face of the cooler is flat with a single groove running up the sides of the fins. These grooves allow the fan assembly to clip right onto the cooler.


As you can see in the above pictures, the 92mm fan is build onto the housing and on either sides of the fan, there are little flat prongs that clip into the grooves on the sides of the cooler and snap firmly into place.
Two nice features that I noticed, and used, were the ability to rotate this cooler so it is blowing in one the four possible locations as well as mounting it to my stock mounting brackets. To install your cooler, all you have to do is install it like you would a stock heat sink and your set. You can also turn your cooler 90, 180 and 270 degrees. This is done by removing one screw and setting up the locking toggle on whatever side you would like it to be on. For me, I chose to have the fan blow towards the back of the case into the exhaust fan on the back of my case. Here is a nice picture of the lone screw that needs to be removed to set up the direction your fan will be blowing.

|
|

Support our efforts! With ad revenue at an all-time low for written websites, we're relying more than ever on reader support to help us continue putting so much effort into this type of content. You can support us by becoming a Patron, or by using our Amazon shopping affiliate links listed through our articles. Thanks for your support!