- Qualcomm Launches Snapdragon 4 Gen 2 Mobile Platform
- AMD Launches Ryzen PRO 7000 Series Mobile & Desktop Platform
- Intel Launches Sleek Single-Slot Arc Pro A60 Workstation Graphics Card
- NVIDIA Announces Latest Ada Lovelace Additions: GeForce RTX 4060 Ti & RTX 4060
- Maxon Redshift With AMD Radeon GPU Rendering Support Now Available
Social & RSS Feeds
Latest Videos


Latest News
Disabling Windows Pagefile & Hibernation To Reclaim SSD Space

by Rob Williams on October 20, 2015 in Software, Storage
SSD sizes, even today, can leave a bit to be desired. On a modest SSD, matters can be made worse when Windows hogs a lot of space between its paging and hibernation files. In this article, we take a look at what these files are used for, and see whether or not you’ll be able to free up precious space by altering or removing them.
We’ve reached a point where it can be assumed that most mid-range and higher desktops and higher-end notebooks will ship with solid-state drives as the default option. It’s a good thing, too, since the speed is simply unparalleled versus a standard mechanical hard drive. Use an SSD-equipped machine for a while, and then drop back to an HDD-equipped one, and the differences will not be subtle.
Despite the popularity of SSDs, though, many of us are kicking it with densities that could only be considered “modest”. Even 250GB models could be considered paltry, given the sheer amount of space today’s applications and (especially) games can take up. And if a 250GB drive feels modest, then a wasted 20GB is going to seem huge.
That brings us to the topic at hand: freeing up wasted space caused by two default functions of Windows. The first is the system page file, which by default could weigh 4GB or more, while the second is the hibernation file, which can equal the amount of system memory you have in your PC. Sometimes, one or neither of these will be needed, so why not take simple action and reclaim those gigabytes?
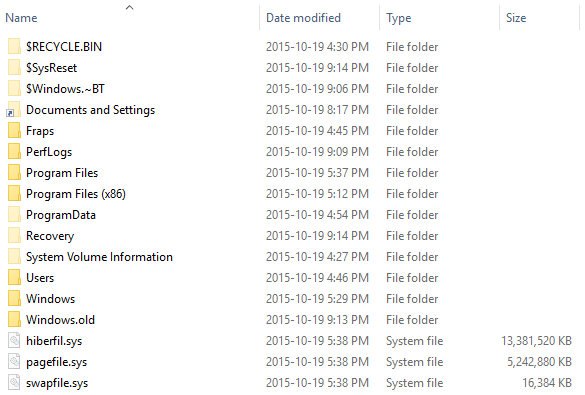
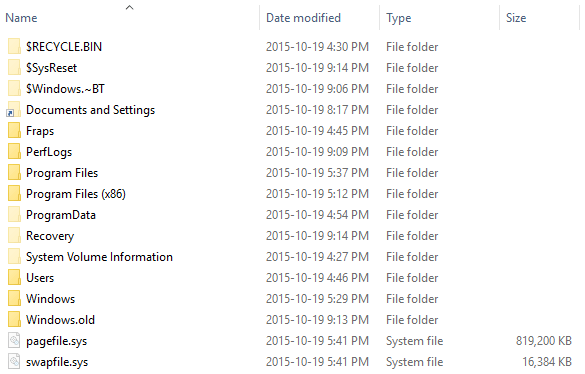
In the shot below, you can see that our test PC has a 5.2GB paging file and a 13.4GB hibernation file. These are ordinarily hidden from view, but can be revealed by going into ‘folder options’ (search for it in Start) and selecting “Show hidden files, folders, and drives” and deselecting the “Hide protected operating system files” option under the view tab. This is not required, and is just for curiosity’s sake. You should always revert these settings when you are finished.
What are these files? A paging file is a blank file that begins to fill up as the system exhausts its memory (RAM). If a paging file does not exist, and the system runs out of available memory, Windows is going to slow to a crawl, and apps will probably crash. A hibernation file is a file that stores the current desktop session so that the system can be shut off entirely and restored later, bringing you right back to where you left off.
For those running systems with a lot of RAM (16GB+) and don’t often run heavy workloads (video editing, image manipulation, et cetera), a paging file might not be needed at all. If it rarely needs to be called-upon, it can be moved to a different hard drive, freeing up space on the SSD. Unfortunately, the hibernation file enjoys no such luxury, as it must remain in the root of the OS drive in order to work. However, if you don’t use hibernation, you can delete the file entirely.
Modifying the Pagefile
If you have a lot of system memory or are certain that you will rarely need to access your paging file, you should move it to a different drive, such as a hard drive that has a lot of available storage. In no case will you ever want to disable the paging file entirely. If you’d rather keep the paging file on the OS (SSD) drive, it can be modified so that it starts out using very little storage, and only expands should the need arise.
With that in mind, let’s proceed:
To access the paging file (or virtual memory) configuration, you can click on Start and search for ‘Advanced System Settings’. In Windows 8 and 10, you can alternatively right-click Start, choose ‘System’ in the menu, and then click on the option in the left pane.
Once the advanced settings dialog is open, you’ll need to click on the ‘Advanced’ tab up top, and then ‘Settings’ in the performance box. With this second dialog open, you’ll once again click on the ‘Advanced’ tab, and then ‘Change’ under the virtual memory box. You’ll ultimately be greeted to a third dialog box that lets you edit your paging file parameters.
For those preferring to go the visual route, I won’t disappoint:
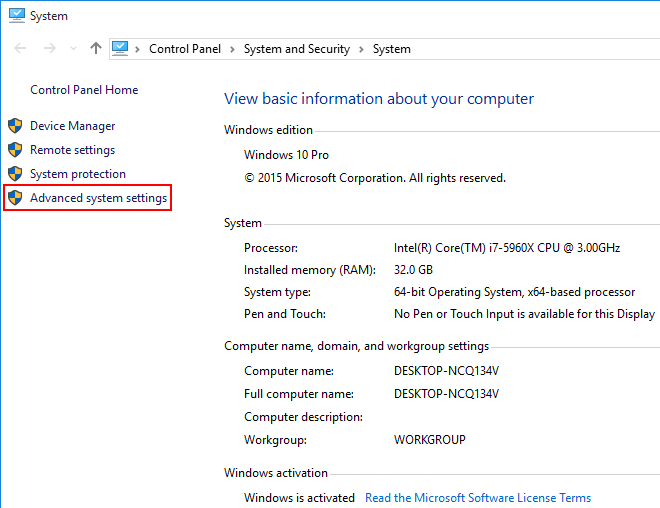
Access Advanced System Settings with the shortcut [Win-Key] + Pause/Break on the keyboard, or through the Windows Control Panel.
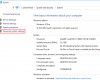

Go to the Advanced tab and select Settings under Performance.
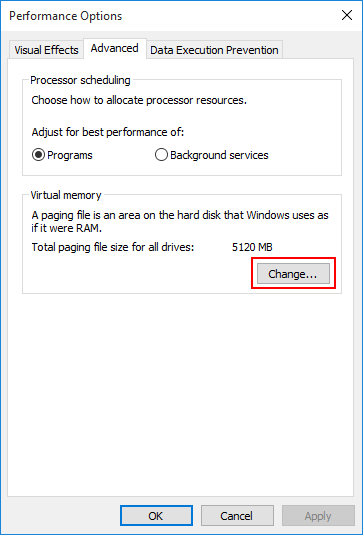
Under Virtual Memory, select Change
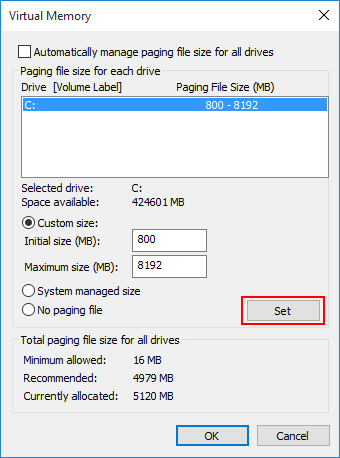
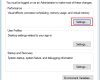
Select the drive with the pagefile, select a custom size, press Set, then reboot for the changes to take effect.
To get to work, the ‘Automatically manage’ option at the top will need to be unchecked. If you have more than one storage drive installed, you’ll see the additional drives listed under C:. After clicking on C: (your OS drive), you can either disable the paging file entirely (if you want to store it on another drive), or edit its parameters if you are keeping it right where it is. As you can see in the screenshot above, I made the minimum size 800MB, as it’s what Windows requires in order to save log information in the event of a crash. I also have it capped at 8GB, because I want to make sure that there’s no chance it’ll ever exceed that.
If you simply want to move the paging file to another drive, disable it on C:, and then click on the drive you want to store it on and either choose “System managed size”, or go the custom route. I’d highly recommend not going with a minimum size smaller than 800MB.
For users that have 8GB of memory or less, I’d recommend keeping the paging file on the SSD, but giving it an 800MB minimum size.
Disabling Hibernation
That takes care of one problem; so what about hibernation? Hibernation, in the simplest terms, stores the current OS image on the storage drive, allowing the PC to be put into a powered-off state while retaining the ability to resume right from where you left off. This is a bit different from sleep, which does the same thing but instead stores the data in the system memory. A thing to bear in mind here is that sleep mode constantly drains a modest amount of power, as the data has to be kept alive in the volatile RAM. This is important for notebooks, as the battery will continue to drain ever-so-slowly even though it appears to be completely off.
Unfortunately, while a pagefile can be located on a non-OS drive, the hiberfil.sys file can’t be. It’s OS drive or bust, so if you do use hibernate, then you’re effectively stuck with this monolithic file. For those who don’t use it, it can be disabled with one simple step. Open up a command prompt either by searching for it in Start and right-clicking it to use it as administrator, or right-click the Start button in Windows 8 and 10 and choose the appropriate option from the menu. Once opened, you can simply type in “powercfg -h off”, without quotes.
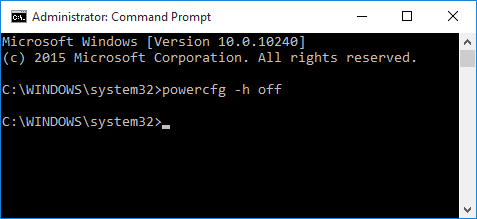
That couldn’t get much easier. Once done, the hiberfil.sys file on the C: drive will cease to exist, freeing up precious space on your SSD.
In the case of this particular test PC, which had a 5.2GB paging file and 13.4GB hibernation file, I was able to cut things down to a simple 800MB. That’s a savings of nearly 18GB! And, because this PC has so much RAM, it should never actually need to grow that paging file.
There we have it. If you have an SSD and want to get the most out of it by getting rid of two things you might not even use, spending a couple of minutes taking care of them can really pay off!
This article was originally published in June, 2011, and has since been updated.

Support our efforts! With ad revenue at an all-time low for written websites, we're relying more than ever on reader support to help us continue putting so much effort into this type of content. You can support us by becoming a Patron, or by using our Amazon shopping affiliate links listed through our articles. Thanks for your support!

Rob Williams
Rob founded Techgage in 2005 to be an 'Advocate of the consumer', focusing on fair reviews and keeping people apprised of news in the tech world. Catering to both enthusiasts and businesses alike; from desktop gaming to professional workstations, and all the supporting software.


