- Qualcomm Launches Snapdragon 4 Gen 2 Mobile Platform
- AMD Launches Ryzen PRO 7000 Series Mobile & Desktop Platform
- Intel Launches Sleek Single-Slot Arc Pro A60 Workstation Graphics Card
- NVIDIA Announces Latest Ada Lovelace Additions: GeForce RTX 4060 Ti & RTX 4060
- Maxon Redshift With AMD Radeon GPU Rendering Support Now Available
Social & RSS Feeds
Latest Videos


Latest News
NZXT Manta Mini-ITX Tower Chassis Review
by Ryan Perry on August 25, 2016 in Cases & PSUs
If you’re on the fence about which chassis to choose for your mini-ITX build or upgrade, we’d like to present the NZXT Manta as a clear contender for your hard earned dollars. It’s well designed, well built, has room for some serious hardware, and has more bells and whistles than many other mini-ITX only chassis. Check it out.
Page 1 – Introduction, Exterior & Interior
It seems like ages since I’ve reviewed a chassis of any kind. Oh wait, it has been. Well then, it seems like even longer since I’ve reviewed a chassis from NZXT. Oh wait, it has been. Well then, it seems like even longer since I’ve rolled around on my big pile of money. Yeah, I didn’t think that would work either, but let’s fix two of these three grievous oversights by taking a look at NZXT’s latest concept chassis turned production model, the NZXT Manta, a rather large mini-ITX (mITX) tower that flies in the face of smaller, more confining chassis that seem to be the norm these days.
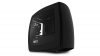
The Manta features curved panels on almost all sides to allow more space to install components and route cables. This, along with the clean exterior and unbroken symmetry makes it hard to pass by without at least a quick once over. Our review sample is the matte black version with a window on the side panel, but the windowed version is also available in matte white with black accents, and matte black with red accents. For those who don’t feel the need to show off their gear, there is also a matte black version available with a solid side panel.

The front panel of the Manta is devoid of any openings and only the NZXT logo is visible near the bottom. Those who hope to use optical drives, a temperature monitoring system, or another device that makes use of a 5.25″ drive bay will be out of luck with this chassis.

Swinging around to the left side we see a very generous window to show off the various components inside the Manta. Both side panels feature captive thumbscrews, which means there’s no chance of losing them while the panels are removed since they remain attached. Just behind the side panel are two mesh accents that add a bit of flare to the Manta while also providing a passive way for air to enter the chassis.


Starting at the top of the rear panel is a vented area that sits above the motherboard I/O opening and the first of three included NZXT FN120 V2 fans, which acts as an exhaust fan in this location. Further down are two PCI slot covers, the power supply opening, and a small tab just below the power supply opening that belongs to a removable dust filter. It’s hard to see and could easily be missed, but above the motherboard I/O opening is a white LED that’s controlled by the small button on the left side of the rear panel. This serves as a way to illuminate the rear panel in low light environments, making it a cinch to see what’s connected.


The right side panel is a solid version of the left, so we’ll head on up to the top panel for a quick peek. At the front is a small white LED accent that sits in front of the power button on the left, while on the right are the microphone and headset ports, and a pair of USB 3.0 ports.

The underside of the Manta shows the integrated case feet that wrap under the chassis and each sports a pair of rubber pads to keep the chassis from sliding, while protecting the surface it rests on. At the front, or rather at the top of this shot is a better view of the front intake area behind the front cover, and at the back is the removable dust filter for the power supply.

Before we cover the interior, here’s the Manta with the front and top panels removed. There’s another removable dust filter on the front that covers a pair of FN120 intake fans, while the top has the mounting points for another pair of optional 140mm or 120mm fans. For those who want to take cooling to the next level, there’s even room on the front and top panels for radiators measuring up to 280mm, potentially making the Manta a cooling powerhouse. The power button and all ports are mounted to the frame of the chassis rather than the top panel, which makes for easy removal since there are no wires to worry about.

OK, it’s finally time to look at the innards, and there’s a fair bit to cover even though the Manta features a traditional tower-style layout compared to many other mITX chassis. We’ll start with the NZXT logo at the bottom, which hides the power supply compartment and can be illuminated using the button that also controls the LED for the rear panel. There’s also enough room to mount a 2.5″ or 3.5″ drive on the floor of the chassis in front of the power supply.
Moving up to the main section finds some ventilation slots over the power supply compartment; the two 120mm intake fans at the front, removable mounting trays for two 2.5″ drives next to the front fans, a raised NZXT emblazoned cover to help hide cables running to and from the drives, some cable management openings that run around the perimeter of the motherboard tray, a large cutout behind where the CPU will sit, and the single 120mm exhaust fan.


The back of the motherboard tray is where we see the mounting points for another 3.5″ hard drive, which is made possible thanks to the curved side panels. There are also cable tie loops found at all of the critical points where cables might be run, but the star of the show is the integrated 8-channel fan controller. This will allow the Manta to be filled with fans without users having to worry about a lack of headers on a mITX motherboard, or having to source a separate splitter cable.
Towards the rear is the circuitry that controls the NZXT logo on the power supply compartment and the rear panel LED. Power for the fan controller and LEDs is provided by a 4-pin Molex connection, and fan speed can be controlled by connecting the correct cable to a spare 4-pin fan header on the motherboard, otherwise all fans will run at full speed.


Included with the NZXT Manta, in an unassuming white box tucked into the chassis are all of the various screws to secure the components, a generous number of cable ties, and an NZXT badge for those who want to show off a bit.


Support our efforts! With ad revenue at an all-time low for written websites, we're relying more than ever on reader support to help us continue putting so much effort into this type of content. You can support us by becoming a Patron, or by using our Amazon shopping affiliate links listed through our articles. Thanks for your support!