- Qualcomm Launches Snapdragon 4 Gen 2 Mobile Platform
- AMD Launches Ryzen PRO 7000 Series Mobile & Desktop Platform
- Intel Launches Sleek Single-Slot Arc Pro A60 Workstation Graphics Card
- NVIDIA Announces Latest Ada Lovelace Additions: GeForce RTX 4060 Ti & RTX 4060
- Maxon Redshift With AMD Radeon GPU Rendering Support Now Available
Social & RSS Feeds
Latest Videos


Latest News
Combine Multiple Game Store Clients Into One With Playnite

by Rob Williams on August 25, 2022 in Gaming
No one likes juggling a bunch of game store clients, so when we recently discovered Playnite, we were kicking ourselves for not finding it sooner. The software acts as a front-end for clients like Steam, GOG, and Epic, and even adds emulation capabilities to the mix. If you’re worried that it will be difficult to set up, don’t be!
Have you ever stumbled on a piece of software that made you kick yourself for not thinking to search for a solution to an ongoing quandary sooner? That’s my experience with Playnite, a front-end for an entire PC gaming library.
As an emulation fan, I’ve tested out a number of different front-ends before, but often gave up quickly because I never wanted to put the time and effort required into making it work and look “perfect”. With Playnite, I had a cool-looking multi-platform library set up within minutes. Yes, even emulators.
Did I just hear you say “Damn!?” Well, you may also enjoy the fact that Playnite is open-source, free-to-all. Users who support the author via Patreon can gain access to new builds two weeks in advance of public release.
Side note: While this article was being put together, I also discovered Heroic Games Launcher, which serves largely the same purpose as Playnite, but doesn’t support emulators, or as many game stores. It does boast the nice feature of being available for Linux and macOS, in addition to Windows, however.

The screenshot above does a good job of highlighting the level of platform coverage in Playnite. Dying Light 2 is Steam, Forsaken is GOG, Tony Hawk’s Pro Skater 1+2 is Epic, and Trackmania is Ubisoft. For emulated games, San Francisco Rush 2049 is Dreamcast, Tony Hawk’s Underground is PlayStation 2, and The Legend of Zelda: Ocarina of Time is GameCube. You can also add standalone games, as I did with Asheron’s Call.
A Look At Playnite
For those who’ve been wanting a solution like Playnite (even if they didn’t realize it until now), this article is going to serve as a quick tour of its initial setup, some of its useful capabilities, and the adding of standalone games.
One thing to make clear from the get-go: Playnite does not replace clients like Steam and Epic; it acts a front-end for interacting with them behind-the-scenes. That includes pulling the info in the first place, creating the ability to launch each game, and of course, downloading them if they’re not installed.
After downloading and running the Playnite installer, you’ll see an option to install it as a portable version:
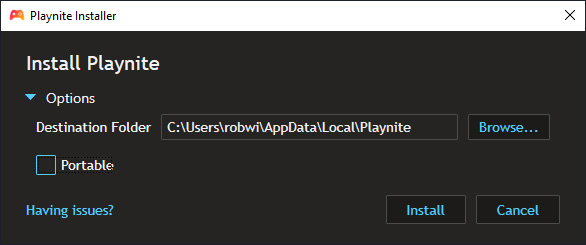
If the portable option is selected, both the software and its configuration will be stored in the same folder; if it’s not selected, the software will be placed in the user Local folder (eg: C:\Users\(Username)\AppData\Local), while the configuration will be put in the respective Roaming folder (eg: C:\Users\(Username)\AppData\Roaming). Both options allow moving the install to another PC with configuration in-tact, but the portable option makes it a little easier.
After the install is complete, a first-time configuration screen will pop-up, with the offer to choose which game stores to add on the second screen. Current options include Amazon, Battle.net, Epic Games Store, GOG, Humble, itch.io, Origin, Steam, Ubisoft Connect, and Xbox GamePass. If a service you want support for isn’t listed on this screen, it may be able to be added later via the add-ons menu.
")

")

")

")

")

")

")

")

")

")
Playnite can only be truly effective if it’s allowed to connect to your game store accounts, so the next set of screens will allow you to log in and authenticate each one. You will want to take note of the “Import not installed games” option; not checking it means that uninstalled games won’t show up, unless the option is changed later. Some connections may have additional options to configure, such as requiring an API key for Steam if a user’s library is set to private.
Once the store configuration is finished, Playnite will begin importing everything right away. This process could be pretty fast, or quite long, depending on how large your connected libraries are. While it imports, Playnite also pulls down respective metadata for each title, including cover art.

While the importing takes place, you can peruse the various sections of the software, and begin configuring it the way you like. If you don’t like the default details view (seen above), you can enable list or grid instead. You can also begin right-clicking the games you don’t want to see to hide them.
You might also want to check out the stats screen:

Anyone who loves analyzing their game stats should fall in love with this screen. Because information is pulled from multiple sources, top-lists can include titles on different platforms. You are also able to further refine the results by choosing a different filter – of which there are many. In the example above, I chose Square Enix in the filter, which showed me only titles from from that publisher.
Configuring Emulators
Once Playnite’s initial importing is done, you may wish to go through and sort your library, hiding games you never want to see again (we all have those regretful purchases), or add some emulators. Adding an emulator is pretty simple, thanks largely to the fact that built-in scanners know what to look for. You can access the emulators configuration with Ctrl + T, or with a mouse navigating through the top-left menu. The screen looks like this:

Here, I already added a handful of emulators – or it might be more accurate to say that Playnite did after a quick scan. If you have one overarching folder with multiple emulators in it, you can simply scan that folder with the “Import” option, and Playnite will detect everything it can, at which point you can pick and choose what you ultimately want to use. If you have emulator backups, you may see multiple entries, so you can fine-tune as needed.
If an emulator you expected to pop up didn’t, then it’s likely that Playnite doesn’t recognize it. I ran into this with the Sega Dreamcast emulator DEmul. If you encounter this, you can click the “Download Emulators” option from this same screen, and Playnite will list every one of the emulators it supports under each platform, allowing you to click on one to immediately go to the respective website to download it.
Adding emulator ROMs is almost as easy as adding the emulators themselves. With Ctrl + Q, or navigating to the correct option in the menu, a scanner pops up:

From this screen, you’ll click the drop-down next to “Scan with emulator” to choose the appropriate one, and then you must select the correct scanner profile in the drop-down to the right. You can also scan multiple emulators at once, as the above shot shows, and then do the entire scanning as one big batch. Just expect the process to take a while if you’re scanning disc ISOs, or many files in general. Note that while it’s not reflected in the shot above, you will need to set the folder path for each one of the scanners.
If you have a modest collection, you probably won’t need to fiddle around with the filter options much; if you have many, you definitely will. If you want to find games based on a certain platform quickly, you could just click the Explorer panel icon (compass), and then click the appropriate platform on the left:

Configuring Standalone Games
Adding a standalone game is also fairly easy in Playnite, but some of the options may lead you to believe you need to do a lot more than you actually need to, to get things working. As covered before, one game I added as standalone was personal MMO favorite Asheron’s Call. After choosing to add a game manually via the Insert key or through the menu, you’ll see a screen with many empty fields:
")

")

")

")

")

")

")

The first thing you can do here is simply type out the name of the game in the “Name” section, as accurately as possible. You may need to be careful of games with somewhat complicated names, or those that write out numbers as letters. You could also write out the most basic form, and see what matches. After the game’s name is filled out, you can click “Download Metadata”, and then the default database, to scan for potential matches. At that point, you’ll likely see what you’re looking for, at which point you can pick and choose the correct entry, select which information to pull down, and then fine-tune it, if need be.
The next stop should be the “Media” tab, which shows the cover art. If you don’t like what was pulled, you can find your own image and import it in.
To wrap things up, you’ll want to check out the “Actions” tab, and hit “Add Action”. The action can be named if need be. In the “Working Directory” folder, you’ll want to choose the folder that has the .exe you need to launch, and with the “Path” selection, you’ll point directly to that .exe. Once finished, you can click “Save”, and then the game should appear in the list.
)
The shot above shows the newly-added game, which I quickly launched to make sure it worked. You can now see that Playnite will begin tracking your gaming time with whichever standalone game you added, which is really nice for those who love tracking their stats but are playing games not found on digital game stores. It’s also a nice touch to see so much information relating to the game provided.
Some Other Cool Stuff
Before wrapping-up, I want to call attention to a few other cool aspects of Playnite that may be overlooked. In fact, if you give the software a go (and chances are you are planning to, if you’ve made it this far), you should spend some time looking at all of the available options, because there are many. Before long, you will be left with a client you feel satisfied with.
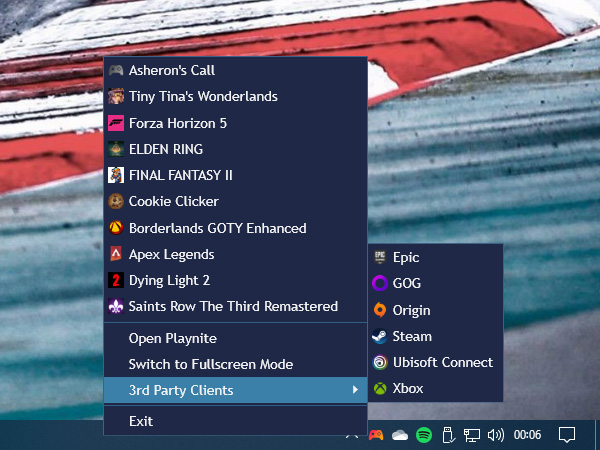
Every time I ran into a thought, “I wonder if Playnite can do this?”, it does. I had thought about how convenient it is to right-click Steam or Ubisoft in the system tray to launch a game without opening it, and sure enough, Playnite does that, too. Except with Playnite, it’s even more convenient, because it will show recently-played games from any platform. And, if you want to launch one of the official clients, the same menu gives you a quick option to.
If you can’t find a piece of functionality you hoped to, you can check out the add-ons section to see what’s available. It includes add-ons for other libraries, metadata, and themes.

Speaking of themes, it’s also worth mentioning that Playnite supports full-screen mode, and also has independent themes available for it. The fullscreen mode looks similar to the desktop one, except the menu will slide out from the right, and music can play for a bit of ambience. I haven’t used this mode enough to form a real opinion, but what I’ve seen looks great.

And with that, what more is there to say? If anything looks good here, you should check Playnite out. Meanwhile, I’ll spend some more time exploring all of the options to get things just right.

Support our efforts! With ad revenue at an all-time low for written websites, we're relying more than ever on reader support to help us continue putting so much effort into this type of content. You can support us by becoming a Patron, or by using our Amazon shopping affiliate links listed through our articles. Thanks for your support!

Rob Williams
Rob founded Techgage in 2005 to be an 'Advocate of the consumer', focusing on fair reviews and keeping people apprised of news in the tech world. Catering to both enthusiasts and businesses alike; from desktop gaming to professional workstations, and all the supporting software.


