- Qualcomm Launches Snapdragon 4 Gen 2 Mobile Platform
- AMD Launches Ryzen PRO 7000 Series Mobile & Desktop Platform
- Intel Launches Sleek Single-Slot Arc Pro A60 Workstation Graphics Card
- NVIDIA Announces Latest Ada Lovelace Additions: GeForce RTX 4060 Ti & RTX 4060
- Maxon Redshift With AMD Radeon GPU Rendering Support Now Available
Social & RSS Feeds
Latest Videos


Latest News
Windows 7 Libraries and Network Folders
by Jamie Fletcher on October 8, 2010 in Software
Have you ever tried to add a network folder to a Windows Vista or 7 library, but couldn’t properly map it? Or even worse, have Windows completely ignore its files via the built-in indexer? Well, there are fixes, and all are counter-intuitive. Until Microsoft “fixes” this issue, we’ll explain how to work around the issue.
The “Libraries” feature within Windows 7 can be extremely useful, as it allows you to aggregate folders from multiple hard drives to create a single folder. If you had 3 or 4 hard drives, each with folders containing music, you could easily combine them all to create a single library ‘folder’ for all your music, which automatically updates itself as new content is created/added.
There is a large caveat to this otherwise extremely useful feature… lack of network support. In an age where even everyday consumers have NAS boxes and file servers (without even realizing it), this seems to be a critical oversight.
If you attempt to add a network folder to a library, it’ll pop up a warning stating that the folder needs to be indexed first. The act of indexing files for searches has been the bane of Windows users for years now, as not only after indexing does it fail to successfully find files, it will also make it difficult for you to search files outside of an index (I miss XP already).
So, in an attempt to solve the problem, I enabled indexing on the specific folder, let it run for a while, then attempted to add the folder to the library again. No dice. Turns out, Windows Search can’t index networked folders without a patch. So, I downloaded that patch, installed it, and a new tab became available in the indexing service. I then added the network folder again for indexing. After letting it run for a while, I attempted again to add the network folder to the library… no cigar.
Upon further research, I found out that the only way to successfully enable indexing and thus allow the library feature to work, is to enable offline storage on the network folder/drive. What does this mean? Put simply, it means copying over the data to a local hard drive, e.g. synchronizing the data.
This kind of defeats the point of using external network storage, since typically, you store data elsewhere because you do not have enough space locally. Fortunately, there be a rather messy workaround for this dilemma that allows you to aggregate networked folders into a library.
Time to warm up that elevated command prompt.
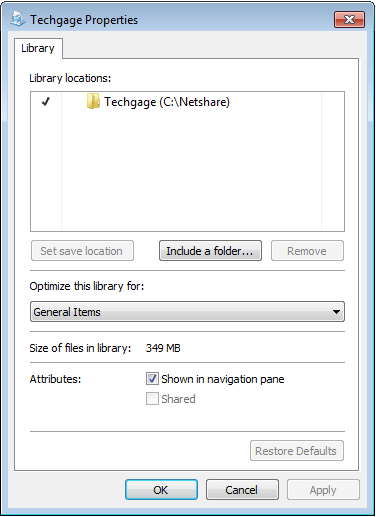
First of all, you will need to create a folder that will used to consolidate the networked folders you wish to use in the library. In this example, I created a folder called “Netshare” on the C: drive. Within this folder, I created another folder with the same name as the folder I wanted to include from the network… in this case ‘Techgage’.
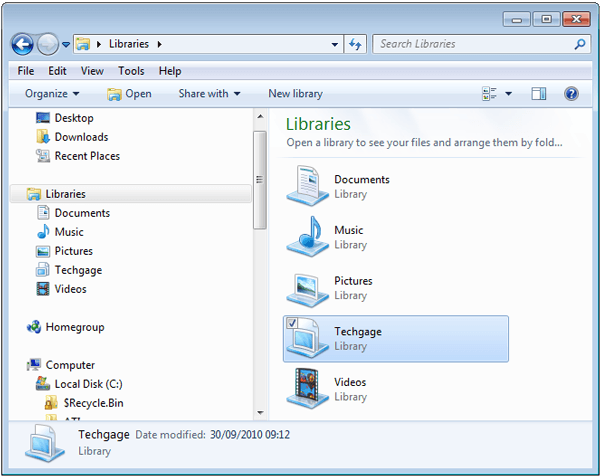
Then you need to go to the library and create a new library if you wish, or use an existing one. Right-click the library and select properties. Within this window, you need to click on ‘Include a folder…’ and then navigate to where you created the new folder.
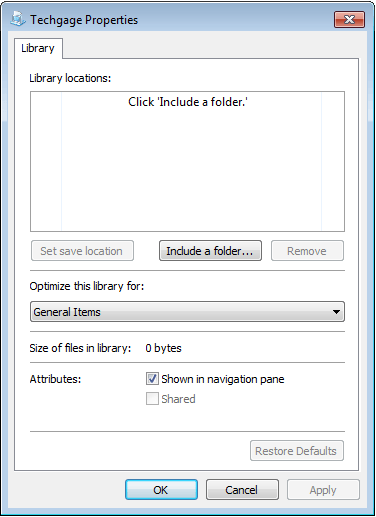
What you do now is counter-intuitive, but bare with me. Go to the folder you just linked to and delete it. No, the library will not implode upon itself or create any errors. If you create the symlink (explained later) first, and try to get the library to link to that, you will get the same error of being unable to link to a network drive that has not been indexed. The next stage will require some elevated command line work, but have no fear, it’s rather simple.
Open up an elevated command prompt by tapping the Windows key, typing in ‘cmd’ and pressing Ctrl + Shift + Enter. A UAC warning might pop up, and if so, confirm it. What you will be doing is creating what’s called a symbolic link, basically a folder shortcut that behaves like a real folder, even though the folder itself can be on a different hard drive or network.
You will be creating a link from where your folder/data is stored and creating a virtual copy of that folder on your local hard drive, where you created the share folder earlier. This does not copy the data at all, but merely acts like a shortcut that other applications will think is real. To create this link, type:
mklink /d target/directory source/directory
For this example, the source directory is a mapped network drive, and if your drive is not mapped, you will have to use the server directory notation of \\servername\directory. Make sure that the target directory has the same name as the folder you deleted, otherwise the library link will not update properly.
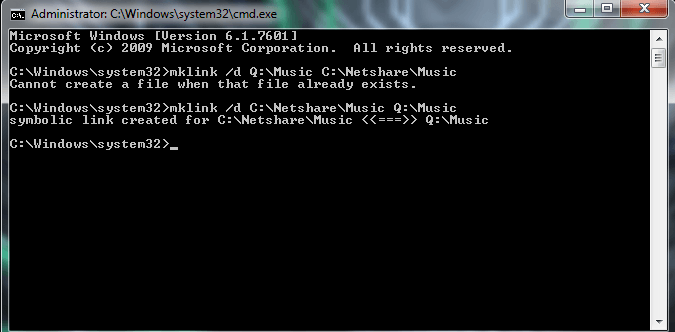
mklink /d C:\Netshare\Techgage R:\Server\Projects\Techgage
Hit enter and all should be well.
If you run into a problem such as “Cannot create a file when that file already exists”, then you need to swap the source and target directories around. An example of such a problem is shown below. Simply reversing the directories allowed the link to be created.
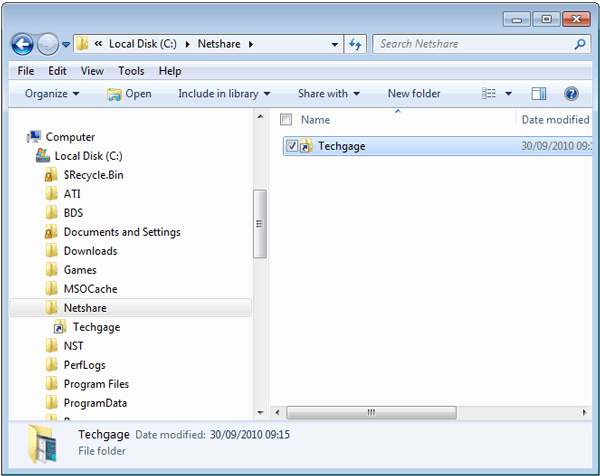
If you navigate to the previously deleted folder, you should see a new folder with a shortcut icon over it, if you open this directory, you will see it contains all the data stored on your network drive.
Now check out your library properties and you should that the folder is listed, complete with data.
If you run into trouble, please let us know, and we’ll try our best to help out. The most important step to remember is that the symlink name has to be the same as the folder you previously linked to in the library. Creating the link first and linking the library to that will not work. Now, maybe Microsoft will fix this in a service pack, but until then, we’ll have to use this workaround.
Discuss this article in our forums!
Have a comment you wish to make on this article? Recommendations? Criticism? Feel free to head over to our related thread and put your words to our virtual paper! There is no requirement to register in order to respond to these threads, but it sure doesn’t hurt!

Support our efforts! With ad revenue at an all-time low for written websites, we're relying more than ever on reader support to help us continue putting so much effort into this type of content. You can support us by becoming a Patron, or by using our Amazon shopping affiliate links listed through our articles. Thanks for your support!

Jamie Fletcher
Jamie has been abusing computers since he was a little lad. What began as a curiosity quickly turned into an obsession. As senior editor for Techgage, Jamie handles content publishing, web development, news and product reviews, with a focus on peripherals, audio, networking, and full systems.
