- Qualcomm Launches Snapdragon 4 Gen 2 Mobile Platform
- AMD Launches Ryzen PRO 7000 Series Mobile & Desktop Platform
- Intel Launches Sleek Single-Slot Arc Pro A60 Workstation Graphics Card
- NVIDIA Announces Latest Ada Lovelace Additions: GeForce RTX 4060 Ti & RTX 4060
- Maxon Redshift With AMD Radeon GPU Rendering Support Now Available
Social & RSS Feeds
Latest Videos


Latest News
Intel P67 Roundup: ASUS, GIGABYTE, Intel & MSI
by Rob Williams on May 30, 2011 in Motherboards
We’ve been a little short on motherboard content lately, so to kick things back into action we’re taking a look at four P67-based motherboards at once – all benchmarked using our newly revised test suite. The boards we’re looking at are the ASUS P8P67 Deluxe, GIGABYTE P67A-UD4, Intel DP67BG and MSI P67A-GD65.
Page 2 – ASUS P8P67 Deluxe
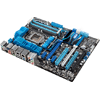
To help kick things off, let’s take a look at what could be the most robust board in this group; ASUS’ P8P67 Deluxe. Though a little more expensive than the others, at $230, the Deluxe series of motherboards has long been considered to be one of the best for those who want a bit of everything. While there’s no sort of overkill here, the number of features can still be a little overwhelming.
A major feature ASUS is pushing with its x67 and Z68 line-ups is “Digi+VRM”, a feature that encompasses two others; EPU (Energy Processing Unit) and TPU (TurboV Processing Unit). Working together, these two features intelligently adjust voltages and other options on-the-fly to help deliver the most efficient power scheme possible – and also the most reliable overclocking.
Though there is a lot of marketing speak to dig through here, I like what ASUS has been doing with its power schemes over the years, and with Digi+VRM, things continue to get even better. While optimized for both performance and temperatures, Digi+VRM also helps to reduce interference and power noise to and from the CPU, which can result in not only improved overclocking, but higher reliability and longer life.

Going further, the EPU component monitors everything from fan speeds to the hard drive to the CPU, and with it in place, you can feel confident in the fact that this board features what I’m sure has to be the most comprehensive system-wide power scheme in any motherboard.
For a lot more information about other features the board offers, I recommend hitting up the official product page. For the sake of time, we’re just touching up on the basics here, though I did want to talk a bit about DIgi+VRM since it is one of the most interesting aspects of the board.
ASUS’ P8P67 Deluxe has the best overall layout of all four motherboards we’re looking at here, and as such, it was the easiest one to deal with installation-wise. It features a total of four fan controllers aside from the CPU, with two found right at the bottom, and one next to the 24-pin motherboard connector.
The other is next to the CPU socket itself, which was convenient since we had no issue plugging in the cord to power the pump with our Corsair H70 liquid cooler. I also appreciated the location and orientation of the 8-pin motherboard connector; top and horizontal. This location made plugging in the cable a breeze, whereas it was a little more tedious with the others (or required a cable extension).

The photos don’t do the PCB justice, but the color is a bit darker than that’s seen here, though not black like the GIGABYTE UD4. All eight on-board SATA controllers are side-mounted, which today seems more like an expectation than a bonus, as all four boards we’re looking at here have the same.
At the top of the board we can see a couple of power phases dedicated to the memory, the TPU switch for enabling a faster bootable setting (a la overclocked) and the MemOK! button that allows the booting of a PC with memory modules that are not too compatible. Yes, it’s still possible to run into this problem in this day and age for whatever reason.
You might also notice the small blue connector to the bottom-right of the DIMM slots. Though it states “SATA 6Gb/s” next to it, that’s in reference to the SATA ports below. Rather, this blue connector is for used with the included 3 1/4″ peripheral that opens up 2x USB 3.0 ports on the front of your chassis. Though this header is standard fare, ASUS takes things to the next level by actually including the peripheral needed.

This is a great feature to have, as it negates the need to run two USB 3.0 cables to the back of your motherboard, and then hog those ports there. You can still do that if you like, either way, it means you’ll have 4 ports to use with the help of the peripheral rather than just 2.
At the bottom right-hand corner we have what I consider to be the most convenient ATX chassis connectors ever, a BIOS status LED, 2x fan headers, USB port connectors and also side-mounted SATA ports. For what it’s worth, the CMOS battery is also readily available, though it’s unlikely you’ll ever need to remove it.

Dual or triple-GPU setups are possible with this board, although the bottom card would require a chassis that offers enough space underneath the motherboard. In addition to those 3 x16 PCI Express slots, there are 2 x1 slots and also 2 legacy PCI slots. On-board power/reset buttons are available here also.

Nestled inside of wave-like heatsinks sits the CPU socket. Though the area looks tight, all large heatsinks should be supported here just fine, unless for some reason the sides stick out far more than normal. Thick tower heatsinks should be no problem, though, and neither was our Corsair H70.

As is to be expected of a Deluxe board from ASUS, there is nothing lacking on the I/O port. In addition to 2x USB 3.0 ports, there are 8x USB 2.0 ports, 2x NIC (Realtek and Intel), eSATA (with external power (green port)), a full range of audio ports, PS/2 keyboard/mouse and also a Bluetooth module.

As I mentioned at the top of this page, the P8P67 Deluxe could be considered the most robust board of this bunch, and overall, it’s the board I enjoyed working with the most. While the other boards we’re soon to look at are not lacking in any serious way, ASUS has done a great job in refining things to a great extent that working with its boards feels natural.
With a look at the board taken care of, let’s take a quick look at the EFI ASUS provides us.

Support our efforts! With ad revenue at an all-time low for written websites, we're relying more than ever on reader support to help us continue putting so much effort into this type of content. You can support us by becoming a Patron, or by using our Amazon shopping affiliate links listed through our articles. Thanks for your support!

Rob Williams
Rob founded Techgage in 2005 to be an 'Advocate of the consumer', focusing on fair reviews and keeping people apprised of news in the tech world. Catering to both enthusiasts and businesses alike; from desktop gaming to professional workstations, and all the supporting software.


