- Qualcomm Launches Snapdragon 4 Gen 2 Mobile Platform
- AMD Launches Ryzen PRO 7000 Series Mobile & Desktop Platform
- Intel Launches Sleek Single-Slot Arc Pro A60 Workstation Graphics Card
- NVIDIA Announces Latest Ada Lovelace Additions: GeForce RTX 4060 Ti & RTX 4060
- Maxon Redshift With AMD Radeon GPU Rendering Support Now Available
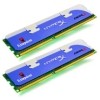
Kingston 2GB HyperX DDR3-1375 CL7

Last Friday, we took a look at one of the first DDR3 kits on the market, OCZ’s DDR3-1333 Platinum. This week, we are continuing that theme with Kingston’s DDR3-1375 CL7, also one of the first kits available. How does this one compare to our OCZ kit? Read on to find out.
Page 2 – Overclocking, Testing Methodology
|
|
Although overclocking any type of memory generally involves the same process, moving from DDR2 up to DDR3 can throw you for a loop. The main reason is that we are dealing with absolutely huge speeds, and it’s a little daunting at first, and requires a little time to fully grasp what to expect from such modules. As I mentioned on the last page, DDR3-2000 speeds have been achieved by eager overclockers, while DDR2-1200 was once considered amazing.
That said, neither of the launch kits I received had such overclocking potential, but were still able to be pushed a fair bit. However when compared to our DDR2 reviews, we are left with a far smaller overclocked settings list, simply because there is no sense of getting intimate with minor frequency jumps.
Similar to our OCZ kit, this kit topped out at around DDR3-1500 with 8-8-8 timings, although this kit managed to retain stability at 2.0v, while OCZ’s required 2.1v. Our DDR3-1333 setting on this kit used 0.1v less than the OCZ as well.
- 533MHz – 6-6-6-15-1T 1.5v
- 667MHz – 7-7-7-20-1T 1.7v
- 750MHz – 8-8-8-20-1T 2.0v
As I found out, these modules could care less about voltage after a certain point. Up to DDR3-1500, it will take what you got and stay there. I tested the modules all the way up to 2.5v and it didn’t inch the overclock any further. I should mention also that these settings are completely stable, meaning you could run it in your machine 24/7, although that’s not generally recommended when using voltages far beyond stock. You might be alright, you might not be. It’s all luck of the draw and depends on how great the chips are.
Regardless of what performance-related part we are evaluating, there are a few conditions that are first met, prior to testing.
- Clean OS installation (Only required applications/games/benchmarks are installed)
- Desktop and scrap files are cleaned up, including emptying of recycle bin/trash.
- No virus scanner or firewall is installed in our stand-alone installations.
- Internet is disabled prior to any testing.
- Computer has proper airflow and room temperature is >80°F.
Below is all of the information regarding our testing machine. Links lead to our review of said product.
- Processor: Intel Core 2 Extreme QX6850 3.0GHz
- Motherboard: ASUS Blitz Extreme
- Memory: Kingston 2GB DDR3-1375 7-7-7-20
- Video: ASUS 8800GTX 768MB (NVIDIA 162.18)
- Sound: Onboard HD Audio
- Storage: Seagate 7200.10 320GB
- Power Supply: Corsair HX620W
- Etcetera: Windows XP Professional SP2, Antec P182
- Cooling: Corsair Nautilus 500
Because each one of our overclocked settings hit the “right” number as far as dividers are concerned, we were able to run each with a CPU speed of exactly 3.0GHz and not a MHz over. At stock speeds of 333FSB and 9x Multi, both DDR3-1066 and DDR3-1333 speeds can be chosen. At DDR3-1500 speeds, a 375FSB was required, but lowering to an 8x Multi kept us at our 3.0GHz clock setting.
With overclocking and a look at our methodology out of the way, let’s check out some benchmarks.
|
|
Support our efforts! With ad revenue at an all-time low for written websites, we're relying more than ever on reader support to help us continue putting so much effort into this type of content. You can support us by becoming a Patron, or by using our Amazon shopping affiliate links listed through our articles. Thanks for your support!


