- Qualcomm Launches Snapdragon 4 Gen 2 Mobile Platform
- AMD Launches Ryzen PRO 7000 Series Mobile & Desktop Platform
- Intel Launches Sleek Single-Slot Arc Pro A60 Workstation Graphics Card
- NVIDIA Announces Latest Ada Lovelace Additions: GeForce RTX 4060 Ti & RTX 4060
- Maxon Redshift With AMD Radeon GPU Rendering Support Now Available
Techgage’s Testing Methodologies

Are you curious about how we handle all of the testing in our labs? Well, good news… this is the article you’re looking for. While still a work-in-progress, we so far explain how we go about installing Windows Vista, and also delve into how we benchmark for our graphics card content. In the future, all of our methodologies will be found here, in great detail.
Page 2 – Graphics: How-To Benchmark, Games List Pt. 1
When choosing games for use in our benchmarking, we look to a few things. The most important is whether or not the game is popular, because if it’s not, its results would prove useless for most people. To help aide our search, we use sites like Game Rankings in order to see which titles are popular, and how they’ve scored in reviews around the web. Ultimately, we look to gauge a game’s worth. This especially helps when we are planning to introduce just-released games to our suite.
Past that, we also look to see whether or not the game is worth benchmarking. If it’s too mild on our hardware, then the results aren’t going to be too important. So, no World of Warcraft results from us. Lastly, we won’t choose a game that caps it’s frame-rate, unless that feature can be easily disabled. Believe it or not, some games do indeed bar this ability (Burnout Paradise, for example).
Once we’ve chosen a game to use, we first find any cheat codes that might be available, in order to skip through the game’s levels. This might seem a little odd, but where time’s concerned, it’s important that we find the perfect level suited for benchmarking right away. If games don’t offer level skips, and the time to play through is just not possible, we’ll play the game until we reach an area suitable for benchmarking. If the game does support level skips, we’ll go through each and every level to see which is the most brutal on our hardware.
Because we value results generated by real-world testing, we don’t utilize timedemos in our testing whatsoever. The exception might be Futuremark’s 3DMark Vantage. Though it’s not a game, it essentially acts as a robust timedemo. We choose to use it as it’s a standard where GPU reviews are concerned, and we don’t want to rid our readers of results they expect to see.
Below is a list of the applications we install on our graphics card benchmarking machine. Since every-single game we currently test with is available through Valve’s Steam platform, we run each through there. If you’d like to add as us a friend on Steam, feel free to visit our profile.
- Specific Applications Installed
- FRAPS 2.9.8
- Futuremark 3DMark Vantage 1.0.1
- OCCT 3.1.0
- techPowerUp GPU-Z
- Game Titles
- Call of Duty: World at War (v1.5.1220)
- Call of Juarez: Bound in Blood (v1.0.0.0En-WW)
- Crysis Warhead (v1.1.1.693)
- F.E.A.R. 2: Project Origin (v1.04)
- Grand Theft Auto IV (Jan 09 Update)
- GRID (v1.2)
- World in Conflict: Soviet Assault (v1.0.1.1 b35)
FRAPS is what we use to capture the FPS information from our benchmarking runs, as it’s accurate, and well, it’s pretty much the only solution available. OCCT is used both for temperature-testing and power consumption tests, as it’s brutal towards any graphics hardware and can usually push the GPU to deliver higher temps and power consumption more than any game can. GPU-Z is used to verify our card’s clocks and also record temperature information.
Here are our most-recent GPU benchmarking machine specs:
|
Component
|
Model
|
| Processor |
Intel Core i7-975 Extreme Edition – Quad-Core, 3.33GHz, 1.33v
|
| Motherboard |
Gigabyte GA-EX58-EXTREME – X58-based, F7 BIOS (05/11/09)
|
| Memory | |
| Graphics | (See most recent GPU review for current list.) |
| Audio |
On-Board Audio
|
| Storage | |
| Power Supply | |
| Chassis | |
| Display | |
| Cooling | |
| Et cetera |
At this time, we currently benchmark all of our games using three popular resolutions: 1680×1050, 1920×1080 and also 2560×1600. 1680×1050 was chosen as it’s one of the most popular resolutions for gamers sporting ~20″ displays. 1920×1080 might stand out, since we’ve always used 1920×1200 in the past, but we didn’t make this change without some serious thought. After taking a look at the current landscape for desktop monitors around ~24″, we noticed that 1920×1200 is definitely on the way out, as more and more models are coming out as native 1080p. It’s for this reason that we chose it. Finally, for high-end gamers, we also benchmark using 2560×1600, a resolution that’s just about 2x 1080p.
On the remainder of this page, and the next page, we’ll go into great detail about how we benchmark each game, and also provide information on how to access the same level / saved game we do. In the near-future, we’ll be providing videos of our runs, so you can see visually, in addition to our explanation, just how we pull off each run.
Call of Duty: World at War
The Call of Duty series is one that needs no introduction. Although only six years old, CoD has already become a stature where both single-player and multi-player first-person shooters are concerned. From the series’ inception, each game has delivered stellar gameplay that totally engrosses you, thanks in part to creative levels, smart AI and realistic graphics.
World at War is officially the 5th game in the series, and while some hardcore fans claim that Treyarch is simply unable to deliver as high caliber a game as Infinity Ward, the title does do well to hold everyone over until Modern Warfare 2 hits (November 10, 2009). One perk is that WaW focuses on battles not exhausted in other war games, which helps to keep things fresh.
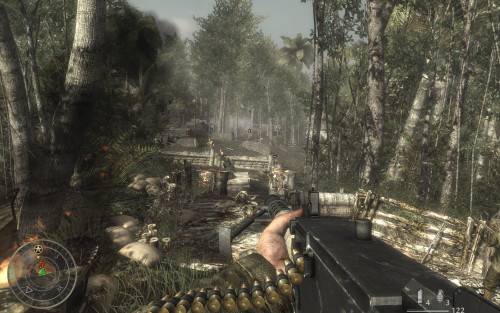
Manual Run-through: The level chosen for our testing is “Relentless”, one that depicts the Battle of Peleliu, which has American soldiers advance to capture an airstrip from the Japanese. The level is both exciting to play and incredibly hard on your graphics hardware, making it a perfect choice for our testing.
Relentless begins with you on a moving tank, which inches towards Japanese soldiers. Within fifteen seconds, a missile is sent straight your way, leaving you feeling extremely lightheaded, and also with blurred vision for a few moments. At this point, we move ahead and up the hill to the left of the river, taking out all soldiers that enter our path. Once the area is clear, the gun is reloaded.
From here, we continue along and take out a few more soldiers, then aim across the battlefield to blow up some gas containers, effectively ridding a half-dozen men at once. We then cross the river and go up and around gunning down everything in our path. Due to all the gunfire, our ammo is low at this point, so we reload once again. Afterwards, we continue down towards the open-air trench and walk towards the ground-mounted machine gun. After taking care of yet a few more soldiers, we make our way over to the fence and stop recording our FPS.
Loading the Test Level: Before you can load our level for testing, you’ll need to enable the console via the game options section. Once that’s done, you’ll want to enable a bind to allow quick access to God mode once inside of a level. To do this, hit ~ and type in: bind o “god” with o being the letter you’ll push once in-game (choose whichever letter suits you best). To load “Relentless”, enter the console and type in: devmap pel1b.
Call of Juarez: Bound in Blood
When the original Call of Juarez was released, it brought forth something unique… a western-styled first-person shooter. That’s simply not something we see too often, so for fans of the genre, its release was a real treat. Although it didn’t really offer the best gameplay we’ve seen from a recent FPS title, its storyline and unique style made it well-worth testing.
After we retired the original title from our suite, we anxiously awaited for the sequel, Bound in Blood, in hopes that the series could be re-introduced into our testing once again. Thankfully, it could, thanks in part to its fantastic graphics, which are based around the Chrome Engine 4, and improved gameplay of the original. It was also well-received by game reviewers, which is always a good sign.
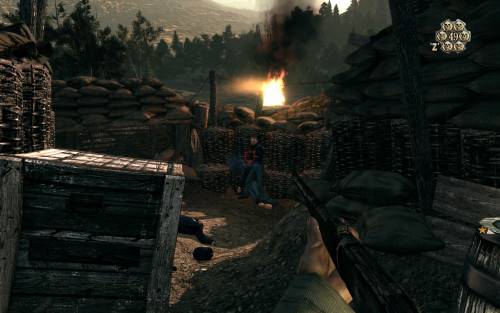
Manual Run-through: The level chosen is part of the game’s first campaign. About twenty minutes into this mission, you’re required to make use of your slow-motion Concentration mode in order to down five soldiers standing atop a fence. Our saved game begins us out just moments past this section, leaving us standing far up a hill from a large river.
Once our save is loaded, we immediately switch to our single-pistol and move forward while looking down the hill towards the river and a few men firing bullets our way. As we continue along, we fire off a few shots of our own, making our way towards a bunker where we replenish our ammo. We also pick up some dynamite, which helps us blow up a pile of lumber blocking our way.
Continuing through this newly-opened path, we finish off two soldiers blocking our way and stop at a box where we gain the ability to sneak around and fire off a couple of shots at angry soldiers. We then move towards the next box, where we are given a brief tutorial on how to peek up and over, then kill three more men. We then switch our gun back to the shotgun, and head around the corner and shoot a barrel filled with oil. Finally, we make our way towards where the explosion occurred, killing a surviving soldier if necessary and quickly looting ammo from the stash. This is where we stop recording our FPS.
Loading Test Level: Download our archived saved game file and extract it to your desktop. Once the game has been launched at least once, copy the two folders (profiles, save) to the game’s main profile folder, which can be found under your Documents folder. The proper path to copy these two folders to will be DocumentsCall of Juarez – Bound in BloodOut.
Once the folders are copied, a new profile will be found when you launch the game, called “Techgage”. The password is auto-completed, but if you accidentally delete it, it’s “techgage”, without quotes. There is only one saved game included with our archive, which you can find through the single player menu.
Crysis Warhead
Like Call of Duty, Crysis is another series that doesn’t need much of an introduction. Thanks to the fact that almost any comments section for a PC performance-related article asks, “Can it run Crysis?”, even those who don’t play computer games no doubt know what Crysis is. When Crytek first released Far Cry, it delivered an incredible game engine with huge capabilities, and Crysis simply took things to the next level.
Although the sequel, Warhead, has been available for just about a year, it still manages to push the highest-end systems to their breaking-point. It wasn’t until this past January that we finally found a graphics solution to handle the game at 2560×1600 at its Enthusiast level, but even that was without AA! Something tells me Crysis will be de facto for GPU benchmarking for the next while.
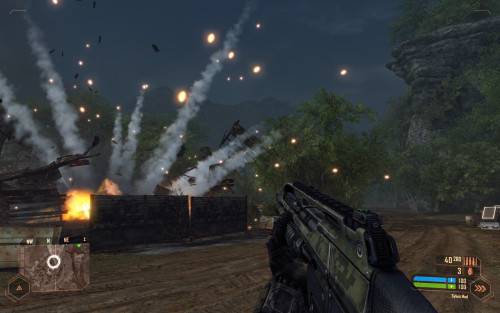
Manual Run-through: Whenever we have a new game in-hand for benchmarking, we make every attempt to explore each level of the game to find out which is the most brutal towards our hardware. Ironically, after spending hours exploring this game’s levels, we found the first level in the game, “Ambush”, to be the hardest on the GPU, so we stuck with it for our testing.
This run-through is one of the simplest on our list, as we don’t even need to fire off our gun once. The level begins us out after our team’s ship experienced a rough landing, so we follow the linear path up to the point where there is a large vehicle explosion across the bridge. There isn’t too much special in our run here, but we do make sure to look back towards a missile drop when a plane crosses our path, as we near the bridge.
Loading Test Level: The console in Crysis is automatically enabled by default, so loading the level we use for testing couldn’t be much easier. Simply open the console with ~, and type in “con_restricted 0”, without quotes, followed by “map ambush”, also without quotes. Because this game’s console supports auto-completion, after you type in “con_”, you can hit your Tab key to fill in the rest of the command. You will have to add the 0 at the end manually.
Support our efforts! With ad revenue at an all-time low for written websites, we're relying more than ever on reader support to help us continue putting so much effort into this type of content. You can support us by becoming a Patron, or by using our Amazon shopping affiliate links listed through our articles. Thanks for your support!


