- Qualcomm Launches Snapdragon 4 Gen 2 Mobile Platform
- AMD Launches Ryzen PRO 7000 Series Mobile & Desktop Platform
- Intel Launches Sleek Single-Slot Arc Pro A60 Workstation Graphics Card
- NVIDIA Announces Latest Ada Lovelace Additions: GeForce RTX 4060 Ti & RTX 4060
- Maxon Redshift With AMD Radeon GPU Rendering Support Now Available
Zalman Reserator XT Hybrid Liquid Cooling System

Given their nature, external water-coolers have a lot of room to do things right. Zalman took full advantage of the space they had with the XT and delivered a superb external solution with excellent performance. Though slightly expensive, “you get what you pay for” rings true here.
Page 3 – Installation & Testing
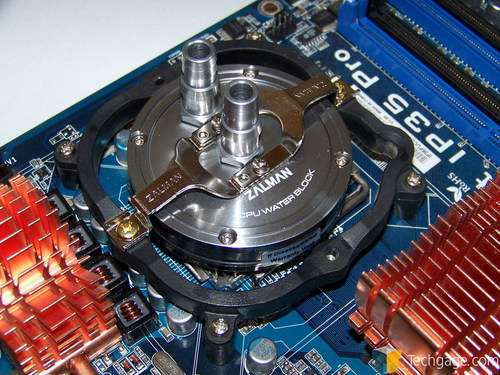
To install the ZM-WB5 on our Intel 775 test bed, we need to first install the socket adapters. These are a set of “Y” shaped metal that are attached to the block itself and have a slight upward curve to them. This curve is there to ensure a snug fit onto the top of the processor when secured down on the socket mount.
If you already own a Zalman cooler, be it air or water, you will not need to remove the mounting hardware from your motherboard. But, if you are new to the Zalman experience, you will need to remove your motherboard and place the back plate on prior to mounting the board in your case.
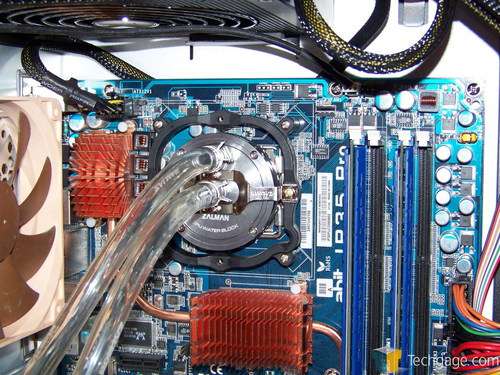
As shown, the ZM-WB5 fits nicely onto the abit IP35 Pro thanks to the roomy socket area and with only two screws to be tightened down, installation took very little time.
Once in place, we connect the tubing to the block and secure them to the barbs with the provided clamps. Please keep in mind though that there are two different sets of clamps provided by Zalman and one of them is slightly larger. These larger clamps are to be placed on the male quick disconnect couplers and not on the water block barbs.
That brings up an issue that we had with the Reserator 2 as well as in our experiences with the Reserator XT. The quick disconnect fittings must be removed from the degaussing tube and used on the water lines in order to use the system. I would like to see the addition of an extra set of fittings in future models. The idea of the quick disconnects is one of absolute brilliance but there is a chance that the fittings can be damaged when removing them from the degaussing tube. While this is a small complaint, it’s one that could be easily be remedied if Zalman wanted to do so.
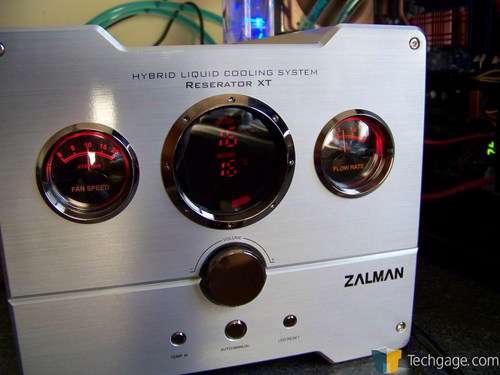
Once operational, the gauges of the Reserator XT glow a brilliant red, making the cooler easily read in dark, low lighting environments. One thing we noticed was that the temperatures displayed on the center gauge were often the same. So often that we only saw them differ a handful of times in our 2 weeks of constant testing. One of the numbers represents the ambient temperature while the other measures the temperature of the water in the loop. While pretty, I personally found little value in these numbers but did enjoy the look of the gauge as it did its thing.
For testing purposes, we put our test system through its usual paces and while the PC got its hind end kicked, the Zalman was taxed with the job of keeping the temperatures of our E6600 in check both at stock clocks and overclocked. For starters, our test hardware is as follows:
- Test System
- Motherboard: abit IP35 Pro
- Processor: Intel E6600
- Memory: Super Talent 4GB DDR2 PC2-6400
- Storage: Seagate Barracuda 320GB 7200.10
- Video Card: XFX 8800 GT
- Power Supply: Hiper 880W
- Chassis: Hiper Anubis
Our testing procedure has not changed since the last Reserator review. To get the E6600 temperatures up, two instances of CPU Burn-In will be started with one core of the CPU running their own instance of the stress testing program. What this program does is brings each core up to 100% load, more strenuous than almost anyone would ever be on their PC but it does do a great job of getting the temperatures up and doing so quickly.
One difference between the Reserator 2 review and this one is that instead of 45 minutes, the stressing will be conducted for a complete hour. The side panel on the Anubis will be closed to simulate an actual user’s experience. At the end of the hour, the temps will be recorded.
These same tests will be ran with the E6600 running at 3.4 GHz (378 x 9) with a core voltage of 1.4v. This isn’t the highest overclock we have achieved with this processor but it does fall into line with the average other overclocks seen around the ‘net ranging anywhere between 3.2 GHz and 3.4 GHz.
Throughout the testing, ambient temperatures were kept between 70 and 75 degrees Fahrenheit. While we are not directly comparing the Reserator XT to the Reserator 2, keeping the temperatures as close as possible allows us to get a good idea of how much evolution the Reserator brand has seen since its last version.
|
Results
|
Idle°C
|
Load°C
|
| Stock (2.4GHz) |
28
|
34
|
| OC’ed (3.4GHz @ 1.4v) |
35
|
42
|
Even with our nice overclock, the XT kept our temperatures well within reason. On the next and final page, I’ll wrap up with my pros and cons.
|
|
Support our efforts! With ad revenue at an all-time low for written websites, we're relying more than ever on reader support to help us continue putting so much effort into this type of content. You can support us by becoming a Patron, or by using our Amazon shopping affiliate links listed through our articles. Thanks for your support!


