- Qualcomm Launches Snapdragon 4 Gen 2 Mobile Platform
- AMD Launches Ryzen PRO 7000 Series Mobile & Desktop Platform
- Intel Launches Sleek Single-Slot Arc Pro A60 Workstation Graphics Card
- NVIDIA Announces Latest Ada Lovelace Additions: GeForce RTX 4060 Ti & RTX 4060
- Maxon Redshift With AMD Radeon GPU Rendering Support Now Available
Creating a Bootable DOS Flash Drive the Easy Way

Creating a bootable flash drive equipped with a Windows installer or Linux distro is a simple affair today, but what about creating one with DOS? Yes, DOS. The need for such a thing can hit you when you least expect it, especially as a hardware enthusiast, but luckily, creating one is very, very easy.
Like the old-fangled BIOS (which is slowly being phased out with the help of EFI), the DOS operating system is a piece of computing history that refuses to be only history. While most folks will never have to look at DOS in this day and age, there are situations where using it may be unavoidable. The most common? Updating that old-school BIOS we just mentioned.
So – where on earth do you get a copy of DOS in 2012?
You might be surprised to learn that DOS is stilll being kept alive thanks to projects like FreeDOS and DR-DOS. But even those can be a little complicated to get running, especially if you’re hoping to just plug in a thumb drive and boot right into it. Some DOS-variants exist on “LiveCDs”, but you might run into the problem where you’ll be unable to find any files outside of the operating system itself (eg: C:).
The goal of this article is to give you the easiest solution to build a bootable DOS thumb drive (flash drive). You might want to do more than simply run a BIOS flashing tool, and that’s fine. Solutions such as FreeDOS are designed to run anything DOS is meant to, including games. Your options are far from limited.
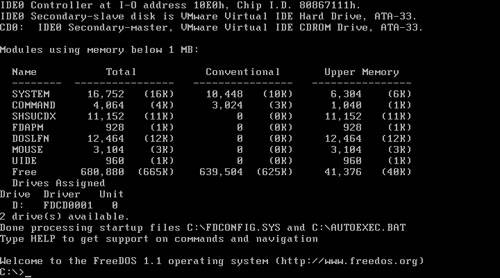
Since neither VMware or VirtualBox allow booting from a thumb drive, I’ll need to reference the below screenshot I grabbed after installing FreeDOS to a virtual machine. The solutions I am going to point out below aren’t going to mimic this screenshot entirely, but the end solution will be the same: you’ll have DOS at the ready.
One of the biggest reasons for writing this article is that finding a solution to this problem isn’t exactly easy. That’s so much the case that I’ve been without a solution for years, a problem rectified just within the last week. It’s clear that there are not enough simple guides out there, so this article strives to be one.
As a side reason, there’s a website you’re bound to land on when searching for this solution that refuses to tell you the name of its most-recommended tool unless you cough over $4. The site even goes far enough to provide a screenshot of the tool, while blocking out its title bar. Thankfully, with the help of Google image search, I’ve been able to track that tool down, and to my surprise (not really), it’s 100% free and open-sourced. For your hard-earned $0, I’ll let you in on its name: Rufus.
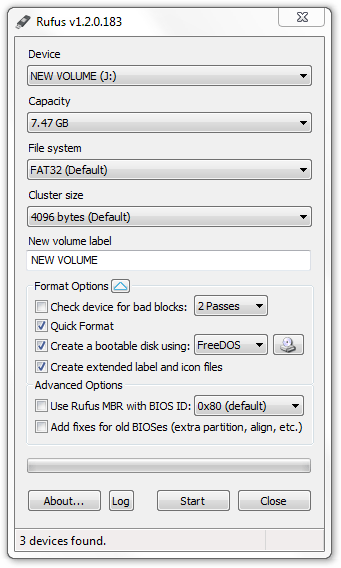
Rufus
Its name might be a little strange for the job it does, but Rufus has some interesting claims. According to the developer, it’s the fastest bootdisk creator around, even beating the secondary tool I’ll talk about next. The program can create bootable thumb drives for more than just DOS, including a ton of different Linux distributions and even Windows Vista, 7 and 8.

Despite its simple goal, Rufus is quite flexible. To gain full functionality, you’ll want to hit the “Format Options” toggle, which might as well be called “Advanced”, as it opens up a couple of extra options. Hitting that toggle also increases the number of options in the “Create a bootable disk using” menu. By default, MS-DOS will be shown, but after the toggle you’ll see FreeDOS, ISO and Syslinux.
I used both the MS-DOS and FreeDOS setting to test the program out, but to actually flash a BIOS, I simply stuck with the MS-DOS option (yes, I actually flashed a BIOS during testing). Because DOS as a whole is very small, the entire process took about five seconds total, and the amount of data transferred might as well be nil.
Unlike the next program I’m going to talk about, there are a couple of things that I find gives Rufus an advantage. First, it has the ability to detect when a drive is plugged in, after it’s already opened. Most other tools, by contrast, will need to be restarted to spot the change. Also, where FreeDOS is concerned, Rufus flashes the drive in such a way that when you boot up with it, you’ll wind up at the command prompt – there are no menus to contend with. This speeds things up and removes some tedium.
While I prefer Rufus for this purpose more than any other tool I’ve ever checked out, I’d be remiss to not talk about another very popular option, UNetbootin.
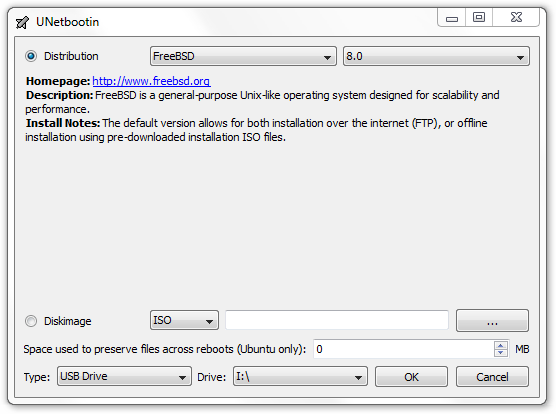
UNetbootin
I’ve used UNetbootin in the past for creating bootable Linux thumb drives, and to my recollection, it’s never failed me. One of its best features is allowing you to create a bootable drive for an OS you don’t even have downloaded. That of course means it’ll download the ISO for you, which is quite handy. If the OS you want isn’t listed, it might still work. In a personal example, Gentoo isn’t listed, but I’ve successfully made a bootable thumb drive with this program.

Compared to Rufus, UNetbootin is lacking in the options department, but for most people, that’s not going to matter. Unless you’re trying to flash an oddball thumb drive, either of these tools will suffice if all that’s needed is a FreeDOS option. There is one thing about UNetbootin that might turn some away, however. No matter what OS or tool you make a bootable thumb drive with, UNetbootin puts in its own boot menu. This might have its upsides, as it seems the OS you choose will edit this menu appropriately, but I’ve personally never needed anything but the default boot option, so it’s only ever slowed me down.
For non-Windows users, UNetbootin has a major advantage compared to Rufus: it’s also for Linux and OS X. I’ve used the Linux version in the past and it’s worked just the same as the Windows version, so I’d heartily recommend it.
With our look at Rufus and UNetbootin out of the way, you’re now on the right path to creating a bootable DOS thumb drive. So go forth, flash that BIOS, play that CGA game or torture yourself with a DOS spreadsheet program.
As a side note, if you’re interested in creating a bootable flash drive equipped with a Windows installer using a couple of official methods, check out our article here.
Download Links
Discuss this article in our forums!
Have a comment you wish to make on this article? Recommendations? Criticism? Feel free to head over to our related thread and put your words to our virtual paper! There is no requirement to register in order to respond to these threads, but it sure doesn’t hurt!
Support our efforts! With ad revenue at an all-time low for written websites, we're relying more than ever on reader support to help us continue putting so much effort into this type of content. You can support us by becoming a Patron, or by using our Amazon shopping affiliate links listed through our articles. Thanks for your support!


