- Qualcomm Launches Snapdragon 4 Gen 2 Mobile Platform
- AMD Launches Ryzen PRO 7000 Series Mobile & Desktop Platform
- Intel Launches Sleek Single-Slot Arc Pro A60 Workstation Graphics Card
- NVIDIA Announces Latest Ada Lovelace Additions: GeForce RTX 4060 Ti & RTX 4060
- Maxon Redshift With AMD Radeon GPU Rendering Support Now Available
Social & RSS Feeds
Latest Videos


Latest News
Custom Cool: A Review of the XSPC RayStorm D5 RX360 V3 WaterCooling Kit
by J.D. Kane on September 17, 2015 in Cooling
Despite the proliferation of AIO water-cooling options flooding the market, some people would still rather build their own custom solution. XSPC’s RayStorm D5 RX360 V3 WaterCooling Kit is a custom water-cooling option that gives you everything you need to cool your CPU. Techgage got a sample to review, so read on to see just how cool this kit really is.
There’s just nothing cooler than a custom-built water-cooling solution for a PC. Everything about it – from its looks, to its performance, even all the work and research and prep work you need to do to set one up – floods me with excitement like nothing else in this hobby.
Before the introduction of AIO water-cooling systems, custom-built water-cooling was the most practical upgrade from good ol’ air cooling. You could go with a more exotic set-up such as liquid nitrogen (LN2), but LN2 is useless for all but those mad overclockers who chased after speed records. For people who wanted reliability and stability with the speed, a custom-built water-cooling loop was the way to go.
The downside, though, is that it requires some effort to get it done. Noobies to the world of H2O often feel intimidated with the thought of getting all sorts of parts and components and wondering whether or not everything would be compatible with each other; I know I felt that sense of intimidation. Water-cooling isn’t cheap, either, so one can ill-afford to make mistakes. Finally there is also the terrifying prospect of springing a leak and killing your PC – water and electronics don’t really mix that well, after all.
It’s been almost ten years (!) since Techgage last reviewed custom water-cooling gear. We’ve ended that drought, though, thanks to XSPC, one of the better-recognized names in the world of custom water-cooling solution.
Behold the RayStorm D5 RX360 V3 Watercooling Kit.

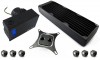
Here are the components that comprise the XSPC RayStorm D5 RX360 V3 Watercooling Kit. From top left, we have the D5 Vario+dual bay reservoir unit (with a blue LED atop it); the RX360 radiator (still in its box for protection); a coiled length of tubing; the accessories package; the RayStorm CPU waterblock; an AMD mounting bracket and its associated hardware; six compression fittings; a trio of XSPC 1250 rpm 120mm fans; and three fan guards. The only thing not included to get your custom water cooling loop up and running, actually, is coolant. I use distilled water for my own custom loops, always.
Custom water cooling systems have four major components: the water block, the water pump, the reservoir, and the radiator. All other components – fans, tubing, barbs/fittings, etc. – attach to these four major parts. For the most part, the quality and performance of your custom water cooling system come down to these four components. This XSPC kit features a combo water pump+reservoir unit.
Let’s have a detailed look at each of these in turn.


First up is the heart of the kit, the RayStorm CPU waterblock. Out of the box it is configured to go onto Intel-based systems. Fret not, though, AMD users, since the kit also includes everything you need to install this bad boy onto all modern AMD socket types.
The retention mechanism is basically a thick piece of acrylic with mounting holes on the corners. There is a black brushed metal ornamental piece that fits over the acrylic mounting mechanism which adds a good bit of visual flair. Also adding more bling to the RayStorm is a pair of blue LEDs; the block can actually fit up to four 3mm LEDs, if the user really wanted to.

Here is a good view of the dual-bay water pump+reservoir combo unit. The water pump is a D5 Vario (also known as a MCP655), an ultra-dependable pump that is now considered a true classic among water cooling enthusiasts. The D5 Vario has a speed control dial on its back which, as you might have guessed, controls the pump’s performance. This water pump requires a 4-pin Molex power connection.

Finally, here is the RX360 V3 radiator. It is a 3 x 120mm unit; by definition, it can fit up to three 120mm fans on each side of its fin array. Most times you install just three fans, but if you want more performance you can double-up on fans and have six in what is called a push-pull configuration.
Something I like about the RX360 V3: There are two pairs of G1/4″ ports on the edge of the radiator. Most users will likely use the horizontal-facing ports; but, if for some reason you need to use the vertical-facing ports in your build, the RX360 V3 allows you that option.
I won’t bother to show the rest of the various minor components, as they have minimal effect on this kit’s actual performance.
Let’s install this thing onto our test system and see how well it performs.
Installation and Performance Testing
While we’ve established that a custom water cooling solution has four major components, this XSPC kit has only three, given that the water pump and the reservoir are integrated. Therefore, installing the RayStorm D5 RX360 V3 Watercooling Kit into your system is a three-step process. Now you can take these steps in any order that you wish, but I always install the CPU waterblock first.


Installation of the RayStorm is pretty straightforward. If you’ve never ever done your own custom water cooling loop, this might seem a bit intimidating. I can assure you, though, that it’s not that much different to the installation processes for a run-of-the-mill heat sink, or even an AIO water cooling system. XSPC provides a rudimentary yet adequate set of instructions for installing its RayStorm onto your motherboard, so if you’re a little fazed, just follow those instructions.
(As an aside, Techgage has had a water cooling how-to article in the works for some time now. That article will walk you through all the steps of installing a custom water cooling system in much more detail than this review does.)
Note that I’ve pre-installed the XSPC-sourced compression fittings. Incidentally, the fittings measure 7/16″ ID (inside diameter), 5/8″ OD (inside diameter).
Once the water block is on the motherboard, I installed the radiator into the chassis.

This is as straightforward a job as can be.

The last to go in is the D5 Vario integrated reservoir+water pump unit. Now I know it looks a little weird seeing this thing in a chassis that doesn’t have any optical bays in it. For the sake of my own convenience, I left the test system in the last chassis I tested because my next product review will also go into this chassis. Also, note at this point that all the tubing has also been installed. You might not be able to tell, either, but I’ve also filled the loop with distilled water, bled it, and have done a 24-hour leak test. It’s ready to go at this point.
Sharp-eyed readers will have noticed that I’ve removed the GPU from the test system. Again this is done simply for my convenience. Since we’ll only be testing maximum CPU temperatures, I decided to remove the GTX 680 from the test system since I needed the space for the RX360 V3 radiator up on the roof of the chassis.
Now, with everything in, let’s do some testing.
As a reminder, here is what our test system consists of.
| Chassis Test System | |
| Processor | Intel Core i5 2500K @ 3.3GHz/1.2V VCore |
| Motherboard | MSI Z77A-GD65 |
| Memory | Patriot PSD38G1333KH 2 x 4GB DDR3 |
| Graphics | Intel IGP |
| Audio | Onboard |
| Storage | Crucial C300 (128GB) SSD |
| Power Supply | BitFenix Fury 650G |
| Chassis | Fractal Design Define S |
| CPU Cooling | XSPC RayStorm D5 Vario RX360 V3 |
| GPU Cooling | n/a |
| OS | Windows 8.1 64-bit |
Basically we’ll be subjecting our test system’s CPU to our established maximum CPU temperatures test. OCCT is our program of choice. Per usual, I’ve kept the room ambient temperature at 72°F/22.22°C.
So how did the XSPC water cooling kit do?

Across the i5 2500K’s four cores, the test system registered peaks of 40°C/44°C/45°C/45°C. To see how this result compares to the test system cooled with a NZXT Havik 140, which is a pretty effective air cooling solution, check the following graph:
| Cooling System | Maximum Core Temperatures Recorded |
| NZXT Havik 140 | 47°/51°/51°/51° C |
| XSPC RayStorm D5 RX360 V3 | 40°/44°/45°/45° C |
Per the data, maximum CPU temperatures improved by 7 or 8°C, depending on the core. That, my friends, is what you call a significant improvement. You simply cannot get this kind of result from air cooling, and it’s on a par with results you can get with a typical AIO water cooling solution.
So what does this all mean?
Such a performance improvement in CPU cooling affords you headroom for overclocking, for one thing. But even if you have no desire to overclock your CPU, it’s just better to keep temperatures low, especially if you run CPU-intensive operations.
Another performance parameter is noise output. With the RayStorm D5 RX360 V3 kit, I simply cannot hear anything coming from the chassis. And that’s with the radiator running three fans. Hook those fans up to a fan controller and slow ’em down, and you might think you’ve gone deaf.
Water cooling makes your PC cool and quiet.
Final Thoughts
I’m not at all surprised at the performance improvements endowed by the XSPC RayStorm D5 RX360 V3 water cooling kit. I’ve been running custom water cooling on my personal machines for a few years now, and I’ve seen just how much better they are over even the best air cooling solutions available. Because I overclock my systems, I think I appreciate the performance improvement even more than non-overclockers do.
As I said, though, you don’t even have to overclock your PC to see the benefits. In addition to the much-improved temperatures, you get a noise reduction bonus as well. Because water cooling is much more efficient that air cooling, you can run quieter fans. With a large radiator like the XSPC 360 V3, you can run up to six fans. Hooked up to a fan controller, you can run these at low RPMs, drop the noise output, and still get super-effective cooling.
While you can spec out your own custom water cooling system and select each and every component, there is a great advantage to going with a kit like XSPC RayStorm D5 RX360 V3: Everything is guaranteed to be compatible. You eliminate much of the guesswork by buying one of these great XSPC kits. If you’re careless, you can make a mistake when choosing your own parts. You might get tubing that’s the wrong size for your fittings, for example. Or your CPU water block’s inlet and outlet ports might be too close to each other, thereby restricting your options as far as fittings go.

Another boon to a kit like this is that it is expandable. You can add a GPU block, if you want. You can even add another radiator. This is custom water cooling’s huge advantage over any other practical cooling system: It can grow and evolve as your needs grow and evolve. AIO water cooling solutions (at least most of the older designs) are basically limited and static from a specs and performance potential perspective.
One last thing I love about custom water cooling: They just look so much cooler than any other cooling method (pun intended). AIO water coolers may have democratized water cooling, but they don’t excite me. There’s no soul with an AIO solution. And air cooling is just not cool enough (in every sense of the term). Custom water cooling is artful science. Because it’s a custom solution, you can change components as you see fit. The XSPC RayStorm kits, for one thing, include LEDs for bling factor (I didn’t bother to install the included LEDs because they are irrelevant performance-wise). Tubing is another easy way for a PC builder to express himself/herself. For example, I color-coordinate my personal builds; my primary PC has a red, black, and white color scheme, and I use white tubing on it. I like beautiful things, and custom water cooling is a great way to improve your rig’s aesthetics and to express yourself as an artistic PC builder.
The XSPC RayStorm D5 RX360 V3’s main components are just so good, I’m thinking of incorporating them into my primary PC when I eventually rebuild it.

But as good as it is, there are a few drawbacks to running with the RayStorm kit. First is cost. At around $284.99 it’s not cheap. That’s around thrice the cost of a very good air-cooled heat sink, and a bit more than twice the cost of a triple-120mm fan AIO solution. Another shortcoming is the learning curve required for first-time custom water cooling users. Even though you’ve eliminated some of the required research – your parts are all guaranteed to work with each other with a kit – you still need to do some research insofar as what you need to do to set a water cooling loop. There is a lot of prep work and testing involved before your loop is actually ready for final installation and deployment. Patience is definitely required. The penalty for not wanting to do all the necessary preliminary prep work is a hosed PC (and I mean hosed in both a literal and figurative sense).
On the plus side, spending less than three Benjamins on an excellent water cooling solution is actually a good thing. One could spec out a comparable set of components – a CPU water block, six compression fittings, three fans, tubing, a thick 360mm radiator, and a reservoir+water pump combo unit, plus a couple of LEDs – and have the whole lot cost more than $300 very easily. In this way, the XSPC RayStorm D5 RX360 V3 kit is actually reasonably priced.
Therefore, I’m comfortable awarding it the Techgage Editor’s Choice award.

XSPC RayStorm D5 RX360 V3 WaterCooling Kit
Pros
- Huge performance increase compared to air cooling
- Guaranteed compatibility of components
- Cool factor
- Silent operation
- Very good value (despite high cost) (relative to a self-spec’d custom solution)
Cons
- Cost
- Learning curve for first-time custom water cooling users
- No shortcuts

Support our efforts! With ad revenue at an all-time low for written websites, we're relying more than ever on reader support to help us continue putting so much effort into this type of content. You can support us by becoming a Patron, or by using our Amazon shopping affiliate links listed through our articles. Thanks for your support!